
Groves’ ORIGIN Congealed Oil Varnish (65 mil. glass jar)-- Now available in linseed oil or walnut oil-based versions
For oil painting in a tempera-like manner.
For my enlightening research into the exact nature of Rubens' turpentine solvent, go
here.
]
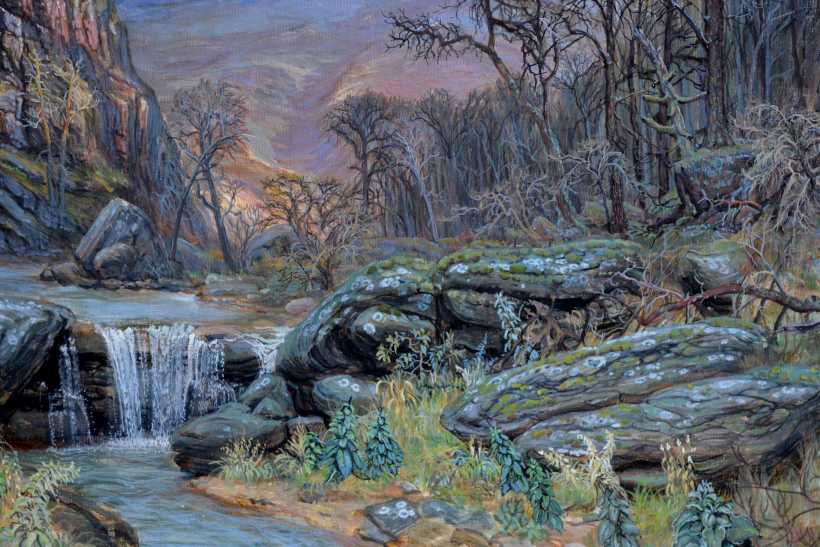
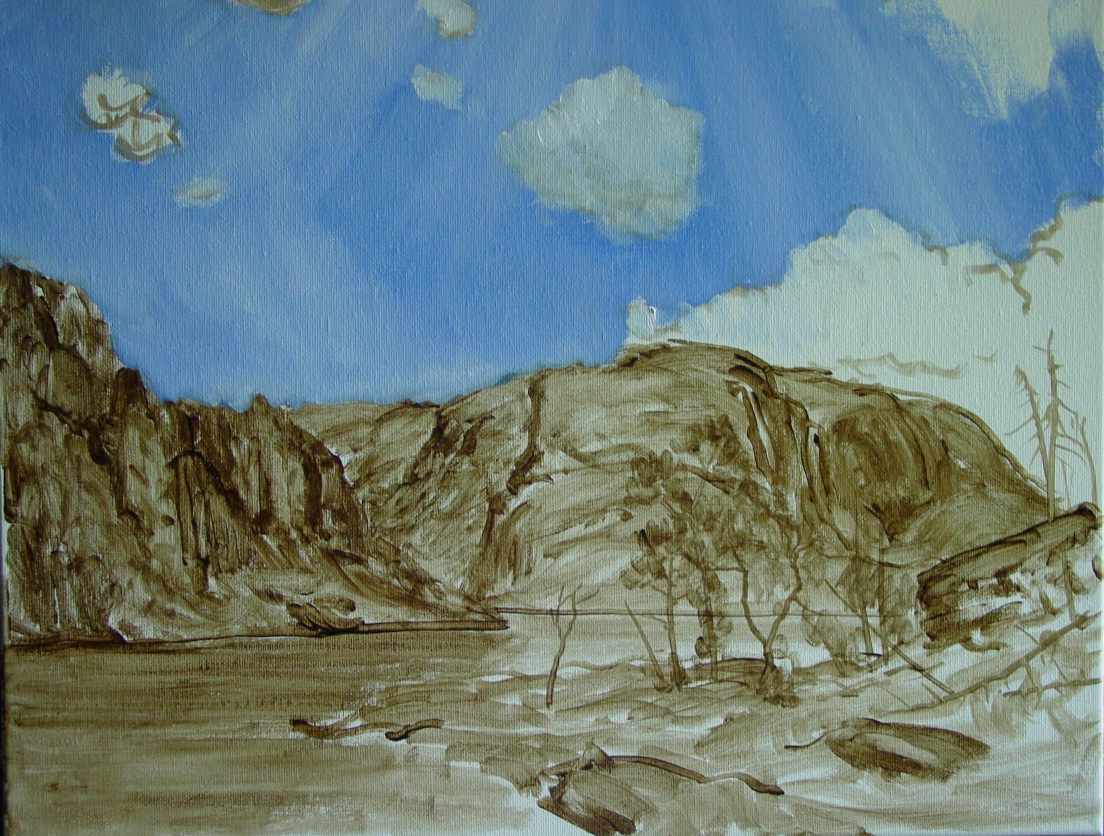
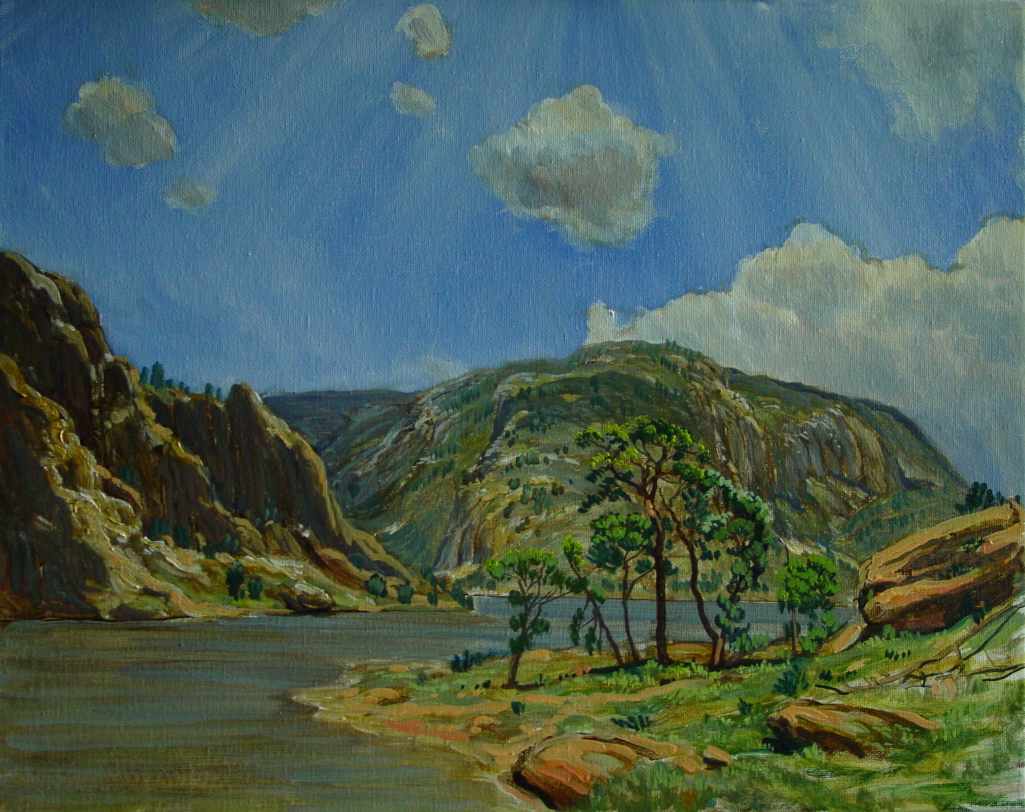
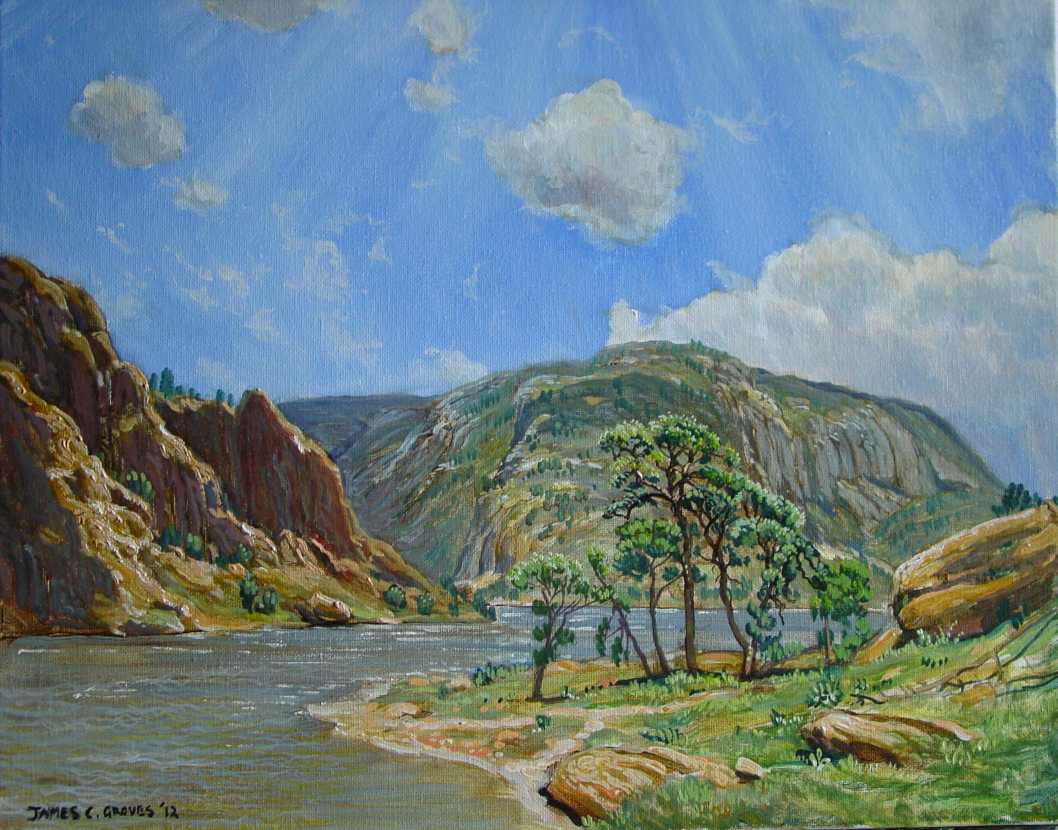
"Abandoned Surface Mine; December Morning in the Lower Georges Creek Valley, Western Maryland"
Oil painting by James C. Groves, February, 2013.
The above highly-detailed painting was created using a tempera-like solvent-technique coupled with ORIGIN Congealed Varnish. The painting measures 24 x 30-inches and was completed over a period of two weeks. The tightly-rendered paint dried with a gloss and did not require a final varnish. The amount of ORIGIN Congealed Varnish needed to create the entire painting amounted to about 1/4 inch of the jar.
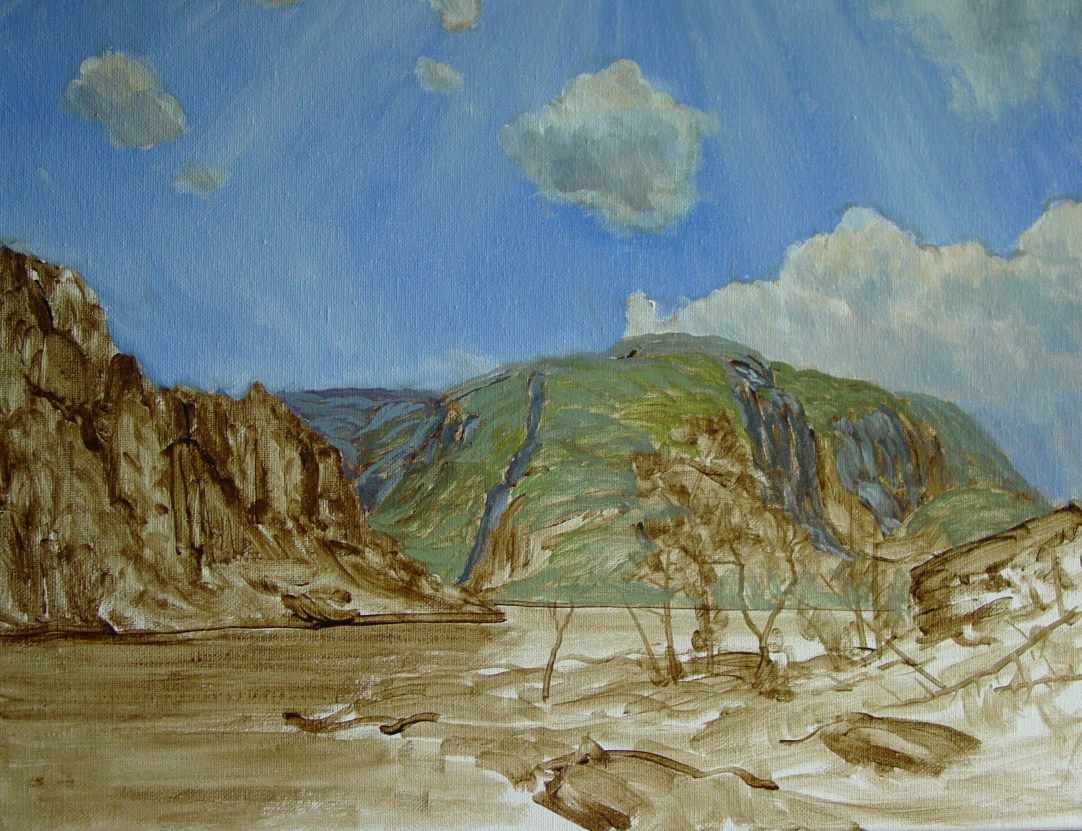
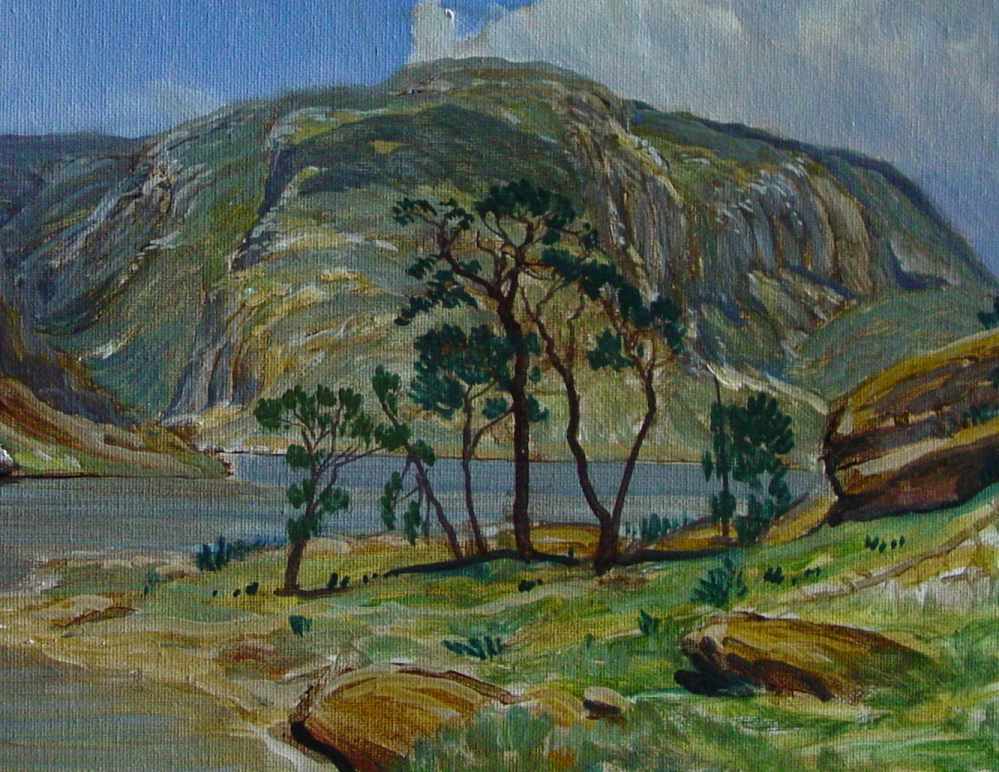
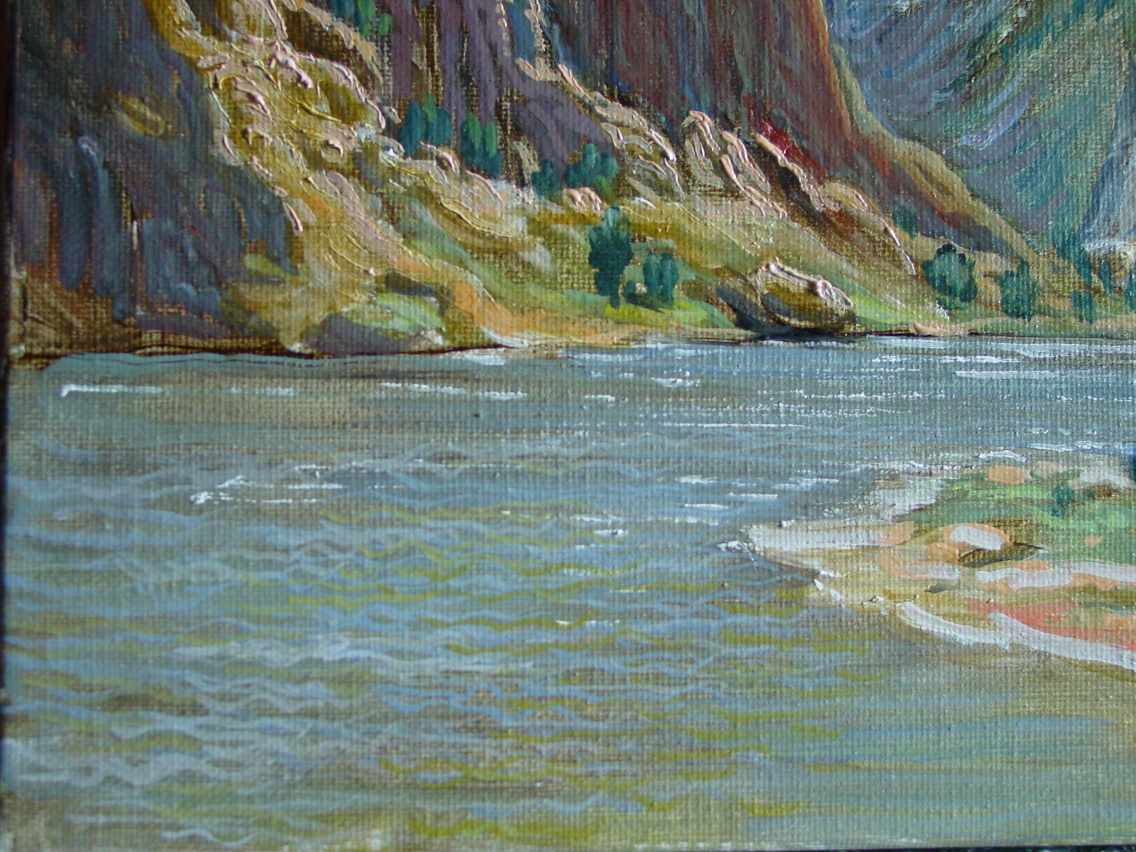
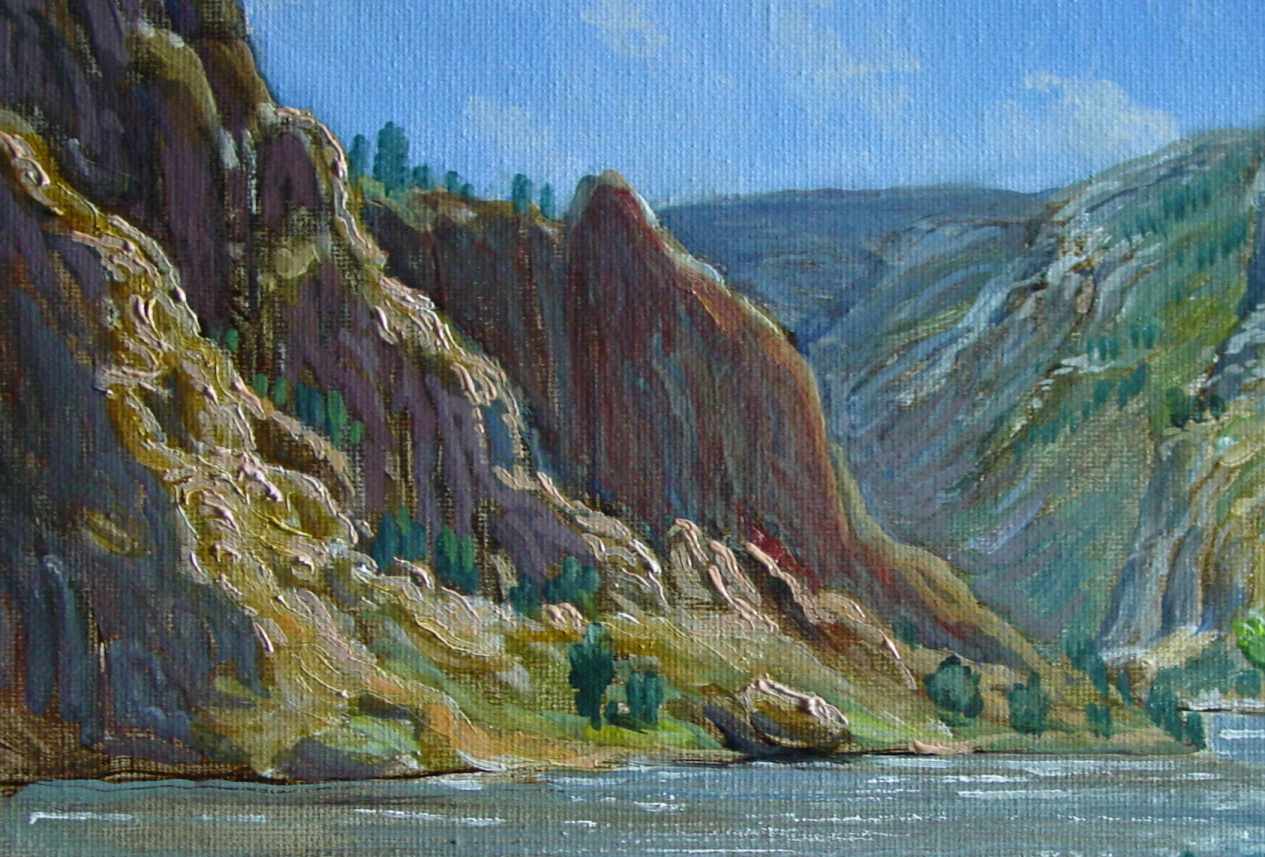
Above: A closer view of the 24x30-inch painting; right foreground.
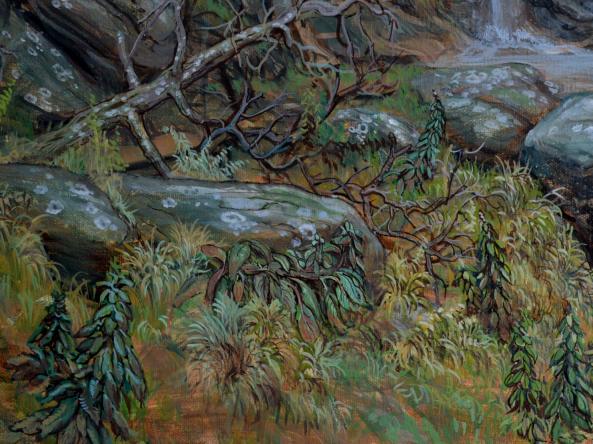
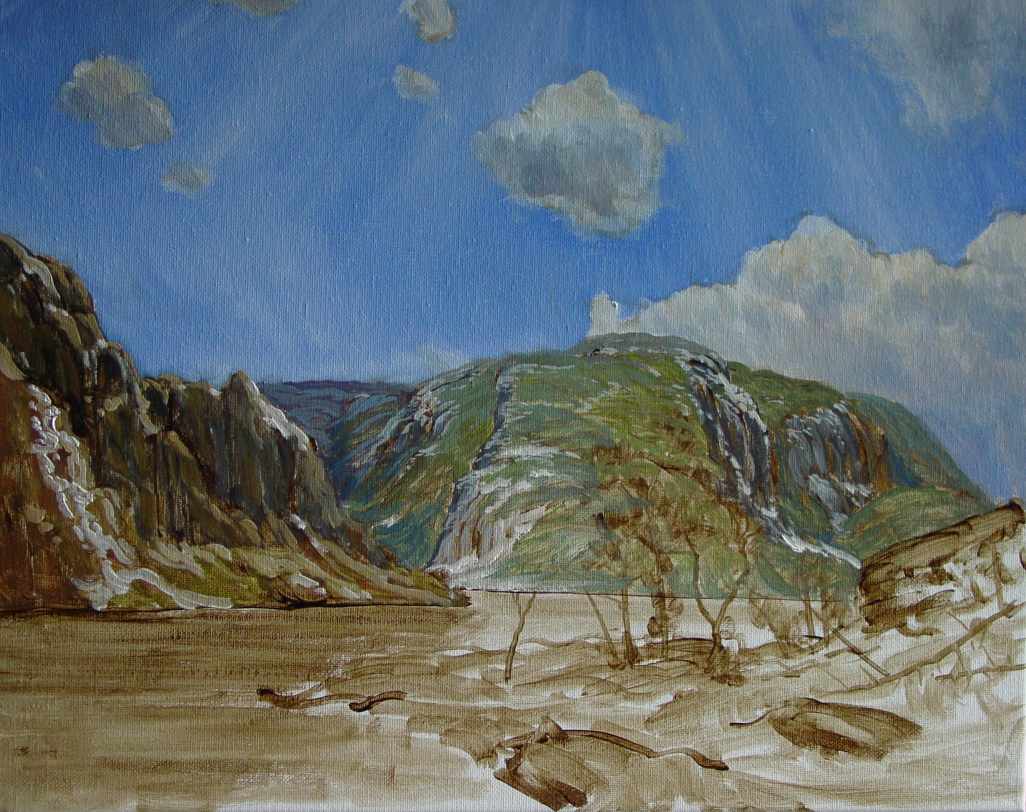
Above: Another detail; left foreground.
As these details show, the surface of the painting is perfectly receptive to in-painting using a tempera-like manner. This means the tinyest ink-like lines can be inserted at any time with ease and fluidity ... and with no 'skip'. Additionally, the act of blending using the solvent is ideally suited to the faintest gradations in coloring and modeling. This simple action is a valuable asset for the traditional painter. This ability to physically "meld" set-up paint-layers together is not available to regular oil-bound painting or egg tmpera painting; nor is this action available to the painter using combined egg-with-oil emulsion paint and technique (AKA "tempera grassa").

Above image: ORIGIN Congealed Varnish (or "ORIGIN") is a firmly-congealed coniferous resin-and-oil varnish of amazing clarity and binding power. ORIGIN is intended to be utilized in conjunction with dry pigments to create a unique varnish-bound paint. When paint is created using ORIGIN varnish, pigment, and a preferred solvent, a tempera-like manner becomes available to the oil painter. Paintings made using ORIGIN exhibit a brighter coloration which does not yellow, even when stored in darkness. Paintings dry with a gloss and do not require varnishing for a very long time. Kept at room temperature, ORIGIN will remain in its firmly-congealed state for approximately two-to-three-months; however, storing ORIGIN in a cold refrigerator between use allows it to remain perfectly congealed and viable for a year and more. ORIGIN also contains an essential oil (gum-spirits of turpentine) and requires the use of a solvent such as paint thinner, naptha, turps, spike, Rosemary, limonene or other diluent, during the painting process. Individuals who have experienced negative reactions to turpentine and other solvents/spirits should avoid this product (as well as Fir Wax).
Heat-Bodied Oil VS Bodied Oil ... and Pine Resin
Modern-day analysis of certain old master paint-chips shows frequent use of something called "heat-bodied oil". This finding or clue indicates an oil that has been thickened in consistence through the action of a high-temperature 'cooking', such as the actual physical boiling of the oil -- which begins to occur around 570 degrees F. Besides this high-temperature boiling, there are other methods of thickening painting oils; however, oils thickened (bodied) by oxidative exposure, such as to air and sunlight, or to low heats for extended times, will not produce a signature of heat-bodying. Instead, such oxidatively-produced thickened oils will likely show only their oil-type, such as linseed or walnut. There really is no way to betray how such oils became thickened, or if in fact such oils truly were thickened, at all.
It is important to understand something else: A signature of heat-bodied oil will also show itself when a high-temperature-produced oil-and-resin "varnish" is (or was) added to the oil paint. Be it known, some oil-resin varnishes require to be 'cooked' to a very high temperature in order to combine the resin ingredient with the "varnish-oil" (which was usually a thickened oil). Such hi-temp varnishes would be amber varnish, copal varnish, or sandarac varnish. Heating the resins to such high temperatures simply destroys their original 'finger-prints', or what is more commonly termed "markers". Most every other resin besides amber, copal, and sandarac, can be joined with a varnish-oil via the use of lower heats, and some of these heats may not totally destroy the resin's inherent "markers". Anyway ... it should be understood that a test-finding of "heat-bodied oil" in an olden paint-chip does not necessarily preclude the addition of amber or copal or sandarac, or other resin/s within the whole. In other words, what appears to be "heat-bodied oil" may, in fact, be an oil-and-resin varnish, instead.
Now here is something I find quite interesting: Current anaylsis of Jan van Eyck's oil paint gives-off findings of heat-bodied oil which often includes a slight addition of pine resin*. Aside from the pine resin and H-B oil, there appears to be absolutely no other oil-ingredient within the mix -- no "raw" linseed, no walnut oil, no-nothing. I repeat: The only sort of oil is heat-bodied ...with some traces of pine resin. This bodied-oil-and-pine resin-mix shows within some paints, in particular glazes, where this binder would be used in relative abundance (compared to leaner pigment-heavy paint); and also within the clear (un-pigmented) coatings --which coatings are found between some layers of paint and as a final-covering atop the paint, itself. [* For example, see here: ]
Yes, that is a very interesting finding to my mind ....because this finding could very likely mean Jan van Eyck's paint-binder was an oil and resin combination, otherwise known as a "varnish"; and more specfiically as an oil-resin varnish.
Traditional oil and resin varnishes, such as were commonly used by artists/craftsman, were made using a resin and cooking that resin into a bodied or thickened oil (either aged, or sunned, or literally boiled to its thickened state). Why a bodied oil? Well, such 'heavy' oils are tougher than simple raw un-bodied oil, for as such oils thicken and become concentrated in make-up, they also become very water-repellent. By extension, such thickened oils also dry to tougher films, very resistant to atmospheric-attack/degradation when compared to 'raw' oils. In addition to water-resistance and increased durability against atmospheric-degradation, those particular thickened oils created through exposure to air and sun generally add a faster-drying activity to the resulting varnish. By comparison, physically boiling the oil to achieve 'body' tends to make it slower-drying. Keep this point in mind.
Paint
Paint can be made very simply. Paint is created when a binder is added to pigment. If egg yolk or glare is combined with colored pigments, egg-bound paint is formed. Egg yolk dries and hardens which 'glues' the pigment particles together and makes the 'egg-paint' rather durable. The olden Italian name for egg-bound paint is secco. Today most refer to it as simply 'egg tempera'. Hide glue or cherry-gum, or other plant-gums can also serve as pigment-binders. In the same fashion, common 'oil-paint' is made simply by mixing pigment with any oil which is capable of 'drying' , or, more correctly, solidifying. Such simple 'oil-paint' usually works quite well and pleasantly with a hog brush. You can brush it on and it pretty much stays where placed. Now, certain agents can be added to give the basic oil-and-pigment paint extra abilities. For instance, as simple oil-and-pigment paint is soft, slow-drying and sort of gummy --and can even be water-soluable -- adding an oil varnish to the simple paint makes that resulting paint tougher and more durable. Those are good things. The bad bit is that adding much thickened or bodied oils -- or even oil-resin varnishes --to the same simple oil-and-pigment paint gives that paint a tendency to slump and level just like typical enamel paint. In short, the resulting paint may lose its ability to keep its place when applied to a vertical support ... or to allow creation of upstanding highlights (impasto), which is a trait commonly observed in the old master works. In fact, the very worst-behaving "oil paint" can be made by mixing thickened/bodied oils or an oil resin varnish directly with the dry pigment. ...producing an awful slumpy stuff that wants to creep and run from its place in similar to asphaltum. Thus, whenever my own eyes behold an impasto-effect laid exquisitely upon the surface of an olden oil painting, I may fairly deduce something of its paint-make up. I will automatically suspect either the paint is made with simple raw un-treated oil, or that only a very small amount of thickened oil or oil-resin varnish was used in its make-up. Conversely, if the paint shows an enamel-like character, then I might easily suspect either a thickened oil or an oil varnish was added to the paint and in a goodly amount.
Ah, but there are certain ways and means to overcome my simple thinking, for as the common expression maintains, " things are not always as they appear".
Take Jan van Eyck's paint again, for an example. The best (for now) chemical analysis of his paint-binder matches that of an oil-and-pine varnish, and this would indicate he simply mixed his colored pigments with that oil-resin varnish, alone, as the sole binder. As already mentioned, I know from experience with handmade paint that such a paint should exhibit very bad behavior, in that it will not keep its place, oozing and slumping like enamel. Now, to a certain extent, Jan's paint does appear enamel-like in its smoothness; yet, here and there, the work shows-off a crispness that would not be attainable by use of a typical varnish-binder. Some painters have offered speculation that Jan resorted to an egg or egg-oil emulsion to create such crispness-- yet no traces of egg show in the most-up-to-date chemical-analysis. [For some examples and discussion of this egg-oil emulsion theory, see Frederick Taubes' "The Mastery of Oil Painting"; 1953; PP 13-27. Also, look up "Mische Technique".]
Incidently, history says van Eyck painted his amazing work by mixing his colours with a novel wonder varnish 'which dried in the shade' ... and, in Jan's case, our modern-day paint-chip analysis appears to corroborate that historical account. Yet, as noted, Jan's paint shows paint-attributes that often keep their perfect place and exhibit no slump; thus I must consider there was something very different about his varnish-invention -- something that set it apart from the commonly-used pine-and-oil varnish of his day -- which, again, was a typically slow-drying varnish and one that would have produced nothing more than slumpy enamel-like attributes when mixed with the various colored pigments.
As I mentined before: I find this very interesting; and also very curious ...for the Eyckian 'wonder varnish' -- and I am one who believes it was a varnish --does not seem to behave like an oil varnish would.
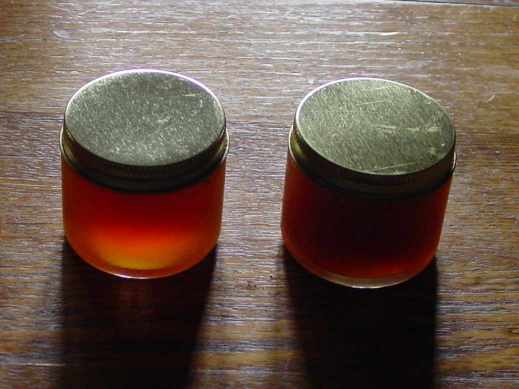
Above image: The relative clarity of ORIGIN (left) when compared to our mastic-based historical Bombelli Medium (on right). If ORIGIN is the sole binder for the pigments, the resulting paint will not noticeably yellow, as would inevitably happen if the same pigments were ground in simple oils. This trait makes ORIGIN unique as a paint-binder.
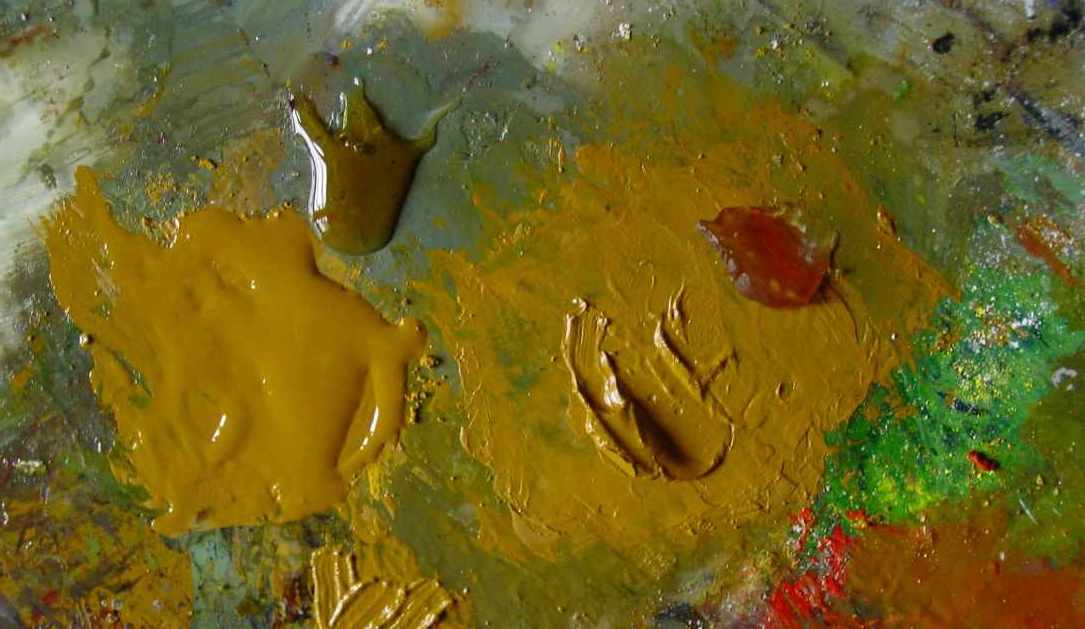
Above: ORIGIN is a traditional cooked resin-in-thickened-oil varnish which is at first a liquid; but then --soon after creation -- the varnish becomes congealed to a very firm state. This image demonstrates results in paint and character when ORIGIN is mixed with yellow ochre pigment: The left-side "slumpy" and enamel-like paint is created with the initial liquid-state ORIGIN varnish; while the right side (crisp paint) was created using ORIGIN varnish after it had congealed and became wax-like. As this image illustrates, a varnish which becomes congealed provides a "backbone" to the paint, allowing all sorts of effects, from impasto to washes, to very fine/thin lines, which hold their place and resist running/sagging/diffusion and trickling ('beading'). As such, ORIGIN solves the timeless problem oil painters encountered when grinding/mixing their pure pigments with either a thickened oil (stand oil, heat-polymerized or sun-thickened) or a pure oil varnish. While such paints are/were extremely durable, the semi-polymerized state of the oil-ingredient causes the paints to slump, creep, trickle, run with gravity. Such paint simply will not hold the brush-stroke as placed, even with solvent-use. This is another unique trait available only via the use of ORIGIN Congealed Varnish. [Note: If you have never made your own pigment-and-oil paint and use modern-day tube paints, instead, you will not be aware of this historical problem, as the congealed stabilizer in most commercially-produced oil paints generally overcomes the diffusion/creep/trickle effects typically engendered by the use of bodied oils or varnishes. In fact, many artists have come to actually appreciate the more-enamel-like effect of adding thickened oils or an oil varnish to their modern-day tube-paints.]
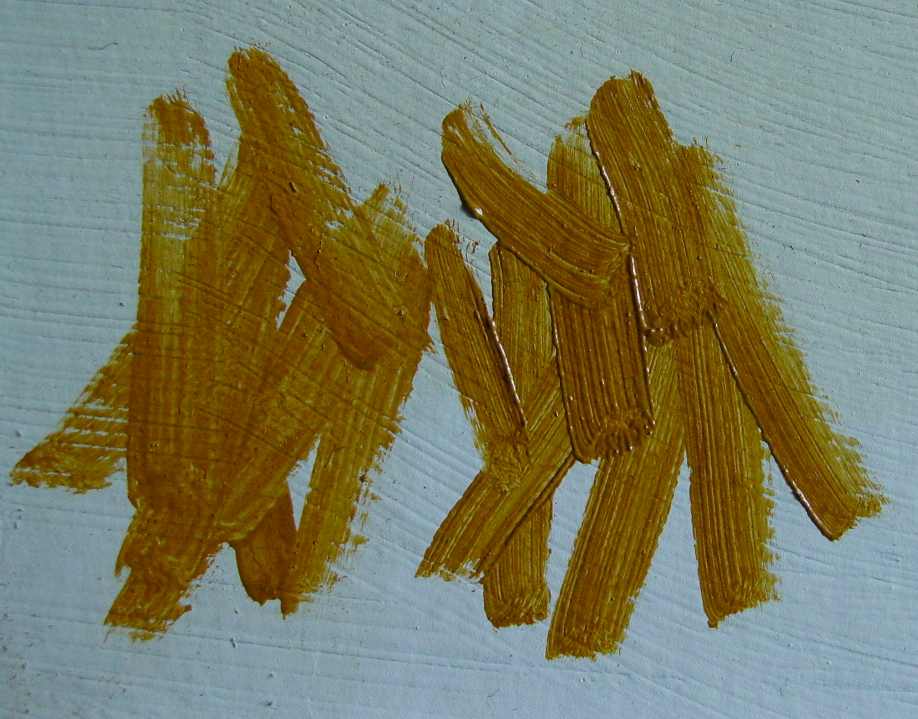
Above image: The same yellow ochre paints applied to a primed panel. The congealed varnish performs wonderfully compared to the uncongealed liquid varnish, which 'melts' and will not hold the stroke. Again, this is the exact same resin + heat-bodied oil varnish; first in its liquid state; and afterwards in its congealed state. The congealing character makes all the difference in paint-behavior.
As far as this painter/author has found, there are no recipes within the olden manuscripts/texts for making a congealed oil-resin varnish ...and neither is there such recipe for a congealed thickened oil. That stated, there does exist written reference as well as visual cues and examples which show that a varnish like ORIGIN did exist at one time, and was considered a great secret ...before it somehow became ...lost.
Uh-oh.... a "lost secret"?! Those oil painters who rebel at such notions, it is best you quit reading from this point.
Lost ways and means
I've always liked looking for lost things. Some folks like looking for rare coin and valuable metal. Myself, I enthusiastically stumble about with historical art materials such as pigment, oil and varnish, looking for the lost ways and means of great oil painting. I enjoy some fine company on my journey. I am walking with Joshua Reynolds, Julius Ibbetson, with Joseph Turner, with Merimee and Eastlake, Berger and Laurie ...even Jacques Maroger; and of course, you few other fools, out there. These earlier 'paint-detectives', you and I, we cannot agree on much; still we share a heady love and desire for the lost ways and means.
Some valuable tools have been missing ...missing from the oil painting craft for a very long time. As just one example, in Italy, strongly-gelling varnishes disappeared from oil painting-use around 1750. In the early-to-mid-19th C., certain landscape painters achieved amazing results using a weaker form of these earlier gelling varnishes, which in their turn also dropped from sight. Somehow tools become lost. Gelling varnishes have their place and some very fine artists today use them fondly. Still, I must relate most 'experienced' oil painters of today have no clue about these tools.
There are other valuable painting tools that have become lost.
Consider the cause undertaken by England's Joseph Turner: Some say his oil paintings look like watercolors, while his watercolors look like oil paintings. They do not; still I can understand the comparison. You see, Turner fondly painted in washes-- oil paints either bound with beer or gum, or meguilp, or wax, just so he could slightly or broadly wash-on his drawing and colors. He loved the light generated through transparent color. Turner traveled and explored the world. His eyes sought the wonders of the landscape while his mind struggled to find means for capturing that wonder with 2-D paint. Turner turned to the olden painters for clues to their own thin 'wash-y' ways and means. The Venetian painters of the 14-1500's were his ideal as to coloring (though Claude was his champion at design). Turner is not now able to defend his choice of tools but, as one of his admirers (Ruskin) noted, the means he found produced only fleeting brilliance, such that he would prepare his exhibited works in as fresh a state as possible, and this to allow the Royal Academy judges to see his work at its greatest brilliance, for to wait too many days would inevitably bring on a "painful deadness" so contrary to Turner's ideal.
The Venetian painters held an unknown ways and means to their coloring, one that remained lost and unavailable to Turner, and the multitudes of other painters standing in his shadow.
I might also mention the Pre-Raphaelite painters who found their own means for creating glowing color with mundane oil paint. Their use of a veil of stiff copal or amber-treated lean zinc white placed translucently over the careful drawing (so it might still be discerned through the veil), then overlayed tenderly with thin washes of color, produced an effect of illumination only seen in those aforementioned and much-older works. It was a tricky technique, and Hunt warned that any attempt to afterwards retouch those areas of glowing color resulted in the complete loss of that very effect. So that you might better follow along here, I will quote Hunt, as he 'spells it out' more clearly:
"...On the morning for the painting, with fresh white (from which all superfluous oil has been extracted by means of absorbent paper, and to which again a small drop of varnish [Copal or amber-JCG.] has been added, spread a further coat very evenly with a pallet knife over the part for the day's work, of such consistency that the drawing should faintly shew [sic] through. In some cases the thickened white may be applied to the forms needing brilliance, with a brush, by the aid of rectified spirits.Over this wet ground, the colour (transparent and semi-transparent) should be laid with light sable brushes, and the touches must be made so tenderly that the ground below shall not be worked up, yet so far enticed to blend with the superimposed tints as to correct the qualities of thinness and staininess, which over a dry ground transparent colours would inevitably exhibit. Painting of this kind cannot be retouched except with an entire loss of luminosity." [Holman Hunt, "Pre-Raphaeliteism and the Pre-Raphaelite Brotherhood", Volume I, page 276.]
This troublesome technique produced an odd intrinsic illumination within those sections of the painting where it was utilized. Comparatively dull colors like yellow ochre and Venetian red became 'lit-up' via this odd method, leading to a relative brightness not attainable through any opaque coloring.
Now, it should be noted that with the inventions of chemistry came a bright gamut of colored stuffs; and the resulting brighter and more intense pigments became available during the late 19th Century and beyond. Oil painters pretty much turned their backs on finding olden lost ways and means. Still, for some of us curiosity-seekers delving into musty texts, the historical examples of Turner and the PR-Brotherhood show plainly that oil painters have sought time and again to re-create the lost ways and means of producing intrinsic light and illumination with layered oil paint-- traits known and widely practiced during a much-earlier period of oil painting greatness ...then somehow phased out and lost. Of course, Turner and the PR-painters were not the only ones delving into such illuminating matters. In fact, there were many such fellow-wizards attempting the same ...and some achieved good results; but always by these same oil-y means-- means which will ultimately discolor and become yellowed ...or worse.
I have personally seen on numerous ocasions, modern-day research and illustrations claiming layered works can be built upon a white ground and retain that initial illumination through several over-applied transparent colorings, the light penetrating down through these several layers to the white ground, then bouncing back up through the whole, producing a wonderous overall illumination. Most claim this the very manner of the olden masters. This notion seems perfectly sane ...until one actually attempts the method ...whereupon the artist soon discovers that the bright illumination gleaned during his initial application of transparent/translucent color atop the white ground ....becomes lost when the second layer is applied. Try it for yourself. Things certainly glow with that initial layer; however, once that layer has dried and another color-layer is applied, the illumination dies straight away. At that point, you may as well resort to brighter opaque coloring, as your intrinsic illumination has been irrevocably lost; and this is exactly what Holman Hunt told us would happen.
In their attempts to recreate the lost manner, I would safely say that the Pre-Raphealite painters came the closest with their own novel but cumbersome method of gently painting thin tints atop wet stiffened white; but there is another way to achieve this same goal of producing paintings seemingly 'lit from within'.
Wait... what am I talking about? There are likely many reading my words and not comprehending my meaning. What I'm saying is this: If you look at an oil painting produced in this particular manner, that painting will exhibit an odd characteristic: If viewed in a dimly-lit room, the work merely appears as most any other; BUT, turn on the lights and the painting produces a weird sort of glow ... just as if there is a light behind the coloring. The colors suddenly jump into a stark brightness which causes any normal/usual/regular painting placed beside it to appear dull by comparison. Vasari mentioned that the wonder varnish of van Eyck, when mixed with the colors, produced an effect of brightness "as if lit from within". I think he was talking about this very effect, which comes not only through a proper binder but also the technique for its use. As for the actual technique involved, well, that rather resembles Hunt's and Millais' method, as well as a very old method used by the majority of painters back in the brothers van Eyck's day ...a time when nearly everyone painted using egg, glue or gum-tempera (egg yolk, hide glue, casein glue or, say, cherry gum as the binder for the colored pigments). I strongly believe it was this very visual phenomena of 'inner light' which created the late 1700's-into-1800's British search for the "Venetian Secret".
Rubens and van Eyck -- The Tie that Binds
In his 1830 book, "The Art of Painting in Oil...", J.F.L. Merimee mentioned that if a file were dressed over a painting by Jan van Eyck's hand, the surface of the paint took on the "shining appearance" of being painted with varnish*. Merimee stated another interesting tidbit. He claimed that P.P. Ruben's teacher, Otho Venius (AKA Otto Vaenius), painted with the original van Eyckian varnish and gave that device and the process for its use to his remarkably famous student (who, in his own turn, very likely handed that to his own remarkable student, Anthony Vandyke).** [*Page 14; **Page 18.]
I am uncertain where Merimee obtained this bit of info but I have never found any reason to doubt it.
According to the earliest historical word, both van Eyck and Rubens were said to have painted with varnish. In fact, there is an old mention that Rubens' critics claimed he painted with so much varnish that his paintings would not survive him. Adding to this, there are other obvious similarities in medium exhibited by the amazing works painted by each of these great craftsmen.
Aside from the historical word, modern-day chemical research generally supports Merimee's claim. Various paint-chip analyses of each painter's creations typically indicate a binder-composition of linseeed or wlanut oil "plus a little pine resin". In the case of van Eyck, the oil is "heat-bodied". Sometimes the oil in Rubens (and Vandyke's) paint is heat-bodied or heat-polymerized, and sometimes not*. ]*See, for example, The National Gallery Technical Bulletins regarding Rubens and Jan van Eyck.]
One particularly telling and notably uncommon characteristic is that the paintings created by van Eyck and Rubens dried with a gloss and required no additional varnishing at completion; and in fact, when cleaned of their aged and over-laid varnish coating/s --coating/s applied by caretakers/conservators down through the centuries --the original paint applied by these men can appear amazingly fresh ... and still exhibit their inherent gloss. I should interject here that this is a supremely amazing trait.
For supportive instance to this last notion, when the yellowed and degraded varnish was removed from Rubens "Samson and Delilah", instead of finding the usual matt paint-surface normally revealed by varnish-removal, the conservators found still-glossy paint. Conservator Joyce Plesters wrote: "As can be seen from his letters and from contracts, pictures often left Rubens' studio as soon as the paint was dry enough for them to be safely packed, so that it seems unlikely that they were as a rule varnished before they left the studio. In fact, though in his letters Rubens mentions the time taken for pictures to dry in connection with despatching them to clients, he never once mentions varnish or varnishing*. This does not of course exclude the possibility, or even the likelihood of their being varnished at a later date. It is noteworthy that when pictures by Rubens are cleaned, the surface after removal of old varnish often still retains a perceptible gloss, so that they could almost be rehung without revarnishing. By contrast most 'old master' paintings look matt and patchy in the unvarnished state. The 'Samson and Delilah' emerged from beneath the discoloured varnish looking almost like fresh oil paint." Plesters adds: " In the present state of knowledge it is not possible to say whether this special quality of Rubens' paint is due to the addition of some resin to the oil medium or to the mode of preparation of the oil itself", ( Plesters, National Gallery Technical Bulletin Volume 7, 1983; "Samson and Delilah": Rubens and the Art and Craft of Painting on Panel; Page 18). [* As regards Rubens never mentioning varnish or varnishing in his letters: He did, however, share a few words with Mayerne about that subject. Rubens told Mayerne that "the very best varnish is made with drying oil, much sunned with litharge and without boiling, at all". Rubens also mentioned adding varnish to his colors -- a practice I will explore later ...]
In light of this 1983 description of the cleaned-of-varnish yet 'fresh' and still visibly glossy paint, I pose a question: Has anyone reading this mixed pigment with raw or even thickened linseed or nut oil, applied that using a solvent, in layers, and had that painting dry with a gloss? Answer: No, it dries sunken, dull. It is possible to over-bind the pigment with thickened oil, thin that a titch with solvent; then apply it in a single layer. That should provide a gloss, yes; though odds are good the paint will slide down the support. Then again, one might wait months for an initail paint-layer to firmly cure before repeating the action. Yes, that might allow gloss-retention; but recall that Rubens was very quick at painting-execution, and that he utilized a layered technique in the performance thereof.
I believe this uncommon gloss-characteristic to be a particularly telling bit of evidence. When the old varnishes were removed, Rubens' paint retained a freshness... and a gloss. In my own experience, this rather singular and remarkable 'van Eykian characteristic' requires the use of a high-in-resin-content oil-varnish as the binder, whenever the work is built through multiple layers and with the use of a solvent -- which was the modus operandi of Rubens ... and quite possibly also that of Jan van Eyck. And I'll repeat, of all oil varnishes I've encountered, only a congealed version will allow the perfect capture of the stroke without subsequent slump or diffusion.
Following the Path...
The point I wish to persue here -- that the van Eyck brothers and Rubens may have used the same or similar varnish as the binder within their paint --is that it might serve in helping uncover the initial and wonderous van Eyckian 'lost ways and means' if we have other and later users of the similar or same device. The phrase, "the more the merrier", comes to mind; for if we can assemble the clues from the many it might better show the original path, which has become much hidden through the many intervening years.
Now, there are various ways to approach sleuthing like this; and I am one who prescribes the very best way is to take the historical word as truth and follow it as closely as possible; then to carefully 'watch' where it leads. I mention this because too many seekers of the van Eyckian ' lost ways and means' seem to take the historical word at the beginning of their golden trek ...but then head out in completely opposing directions.
Case in point: The number of researchers who have concluded the van Eyck brothers' discovery was simply another method of painting with egg, likely a combination of egg yolk and oil or varnish. Some call this egg/oil/varnish binder "tempera grassa". Unfortunately for those good souls pushing this particular painting technique, this very combination is mentioned by Vasari as having been tried, over-and-over, and always found wanting.
And so I should best not head off down that ravine, there; or over that cliff, yonder. I should stay on the vague path, as much as possible. Yes, I prefer to follow the path revealed and left to us all by the historical word; and really, why should I want to leave it?
In brief, the historical word initially begins with a famous/infamous story told by Georgio Vasari, some 100-years after Jan van Eyck had died. Essentially, Vasari claimed the following {and overlooking Jan's brother, Hubert, here}: Jan van Eyck was an egg tempera painter who, on one very notable occasion, varnished his dried egg tempera painting with the common varnish of his day. As this varnish was very slow to dry, van Eyck then placed his now varnish-coated egg tempera painting into the sunlight so that the oil varnish would soon cure --and I can vouch, this IS the effect of sunlight on common resin-in-oil varnishes. Unfortunately, the heat of the sun split the panel, ruining his great work. Seeing his loss, van Eyck vowed to create a varnish which would dry in the shade. He set about doing this and presently found his goal. He was pleased with his varnish invention and eventually decided to mix it with his colors, whereupon he soon found that he could paint in a sort of tempera-like manner, and that his paint possessed superior toughness, a saturation and "lit up" brightness of the colors ...plus an improved facility at blending (the ultimately desirable action of "melding" together under and over-layers of paint), as well as a wonderful gloss at the finish which obviated the need for a final varnish. All of these positive traits were there-to-fore unavailable to the near-universally-practiced egg tempera methodology, as well as the contemporanious means of oil painting (which, as the Italian craftsman Cennini recorded somewhat prior to that period, was a method of painting using either sun-thickened or heat-bodied oil combined with the pigments, or "colors"). Using his invention, Jan van Eyck began turning out works which were the complete envy of all the tempera painters who beheld them. [Note: Quoting Vasari from "Lives of the Architects, Painters, and Sculptors"; published 1550] "The mode of painting in tempera, which had been adopted by Cimabue from the Greeks about the year 1250, was followed by Giotto, and those succeeding masters who have hitherto occupied our attention; and it still continued to be the only method in use for paintings on wood and on cloth. The artists were, nevertheless, aware that pictures so executed were deficient in a certain softness, and in vivacity; and felt that, if a proper method could be discovered which would admit of blending the tints with greater facility, their works would be improved both in form and colour; the earlier practice (primarily using egg but also glue or gum tempera-JCG) having always been, to produce the requisite union of the tints by hatching with the point of the brush). But, although many had tried ingenious experiments with a view to such improvement, none had invented a satisfactory process; neither by using liquid varnish or other kinds of oils mixed with the tempera vehicles." [End quote] Vasari goes on to cite a few artists who tried combining egg with oils/varnishes: [Quote] "Among those who had in vain tried these or similar methods were Alesso Baldovinetti, Pesello and many others, but no works produced by them possessed the pleasing effect, and improved qualities which they sought; and, even if those artists had succeeded in their immediate object, they would still have been unable to give the same stability to paintings on wood which those executed on walls [such as was commonly done with (thickened) oil-bound paint] possessed. They could not, by such methods, render pictures proof against wet, so as to allow of their being washed without danger of removing the colour; nor was the surface so firm as to resist sudden shocks when the works were handled. These matters were often the subject of fruitless discussion when artists met together; and the same objects were proposed by many eminent painters in other countries besides Italy, in France, Spain, Germany, and elsewhere."[End quote] [Additional note: Regarding the aforementioned action of blending: Anyone who has tried egg-oil emulsion painting (AKA tempera grassa) will notice an increased ability to blend the paint during application; however, Vasari says combinations of egg and oil emulsions failed to improve the "blending of tints". Thus, I am one who greatly suspects that this sort of "blending" is not what the egg tempera painters desired within their craft. No. Instead, I believe they sought the ability to "meld" layers of applied and already "set" paint together --an ability I have personally found to be invaluable towards two-dimensional depictiion of three-dimensional reality. I'll repeat that this action of melding layers of applied paint cannot be obtained either through regular oil painting, egg painting, or combinations of the two systems (AKA emulsions or so-called "tempera grassa"). Also note: If interested, you can find a decent translation of Vasari's story regarding "Johannes of Bruges" (Jan van Eyck) and Antonella da Messina in Eastlake's first volume, "Materials for a History of Oil Painting; pages 201+". Do find it using google books, and read it several times.]
The gist of Vasari's account is Jan discovered a method of painting in oils that resembled but improved upon the then-universally-preferred tempera METHOD ...but instead of egg or glue, or gum, Vasari tells us that Jan used his "varnish that dried in the shade" as the pigment-binder. [Again, from Vasari, quoting that author: "(van Eyck) ...began to devise means for preparing a kind of varnish which should dry in the shade, so as to avoid [the danger incurred by] placing his pictures in the sun. Having made experiments with many things, both pure and mixed together, he at last found that linseed oil and nut oil, among the many which he had tested, were more drying than all the rest. These [oils], therefore, boiled with other mixtures of his, made him the varnish which he, nay, which all the painters of the world, had long desired. Continuing his experiments with many other things, he saw that the immixture of the colours with these kinds of oils [Vasari must rather mean the invented varnish here, and not the oil] gave them a very firm consistence, which, when dry, was proof against wet; and, moreover, that the vehicle lit up the colours so powerfully, [and] that it gave a gloss of itself without [the need to have a final] varnish; and that which appeared to him still more admirable was that it allowed of blending [melding the paint-layers] infinitely better than [egg] tempera." [End quote] [Note: Please pardon my inserted words sprinkled within the quotes of Vasari. It should be considered that Vasari wrote in troublesome-to-translate old Italian. His story about "Johannes" arrived via correspondence with other artists and with the Flemish ministry. Vasari was a practicing oil painter of the simplest means. By his own testimony, Vasari did not use solvents nor varnish; and he was, himself, admittedly and rather blissfully unaware of any other method of making oil paint beyond that basic of mixing raw or thickened oil with his colors (pigments)-- a method that will produce somewhat lasting works in a clime such as predominantly sunny/dry Italy, but eventually invite decay in damp/cold realms, such as Northern Europe. For Vasari's own direction as to how oil paintings shall be constructed, see my notes and his quotes near the end of my info-page on "Bombelli".]
I especially call your attention to the above underlined passages, "gave the colors a very firm consistence" and "lit up the colors so powerfully". Neither of these particular traits can occur using either a liquid varnish or a thickened oil. No, these traits come via suspension of the pigments-- meaning the varnish must have been congealed. This trait I have suitably demonstrated in those prior images using the pigment yellow ochre. Again, those painters who use modern-day tube paints containing a congealed stabilizer cannot or will not grasp this basic historical paint-phenomenae; and I'll presume neither will those reading this who have little or no experience making then painting with all the traditional oil-varnishes or thickened oils.
Now, some historians offer evidence showing Vasari's story was suspect on this or that ground when compared to recorded history, and so be it; but as regards to the actual invention by van Eyck, no one offers anything truly valid against that matter; and it turns out there were other well-known painters who were provided the 'invention' and apparently these one-time egg tempera painters were also able to reproduce van Eyck's workmanship. As these other painters works seem to show the same unusual characteristics as van Eyck's work, it necessarily becomes a bit tougher to ignore the whole historical scenario. Oh, sure, one can ask about brother Hubert's role in the discovery, but that matters not towards the 'invention' and its extraordinary attributes.
Rubens again...
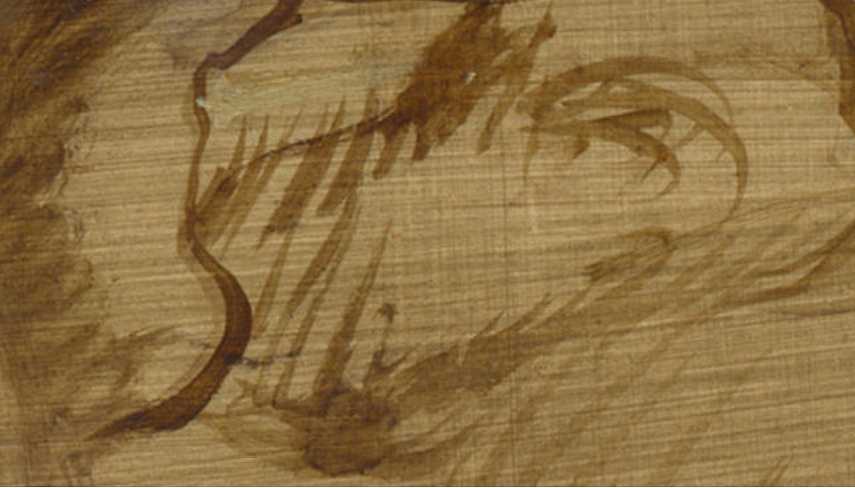
The detail above from a study for "The Lion Hunt" shows the "cartoon" or preliminary drawing typical to Rubens' method. Here we see Rubens use of a brown with the visual attributes coresponding to asphaltum. The transparent brown is of the apparent consistence of an ink-like wash. The darker lines are delineations, while the lighter weaker browns are used as shading. I surmise that Rubens has dosed this brown with a lot of turpentine; yet the brown steadfastly remains where placed, even when thinned-down ever more for the shading. There is a faint indication of spreading but there is no running. This enigmatic clue indicates -- strongly -- that Rubens gave this brown an addition of some sort of binder which possessed a strongly-congealing property. Also, very telling, notice how Rubens has stroked shading over previously drawn delineation-lines (the "S" line) and yet that initial line does not spread or disperse when over-drawn. This indicates Rubens' brown is setting very quickly, just as spirit-based asphaltum does. An actual oil paint will never allow this same ability; that is, unless it is allowed to dry first.
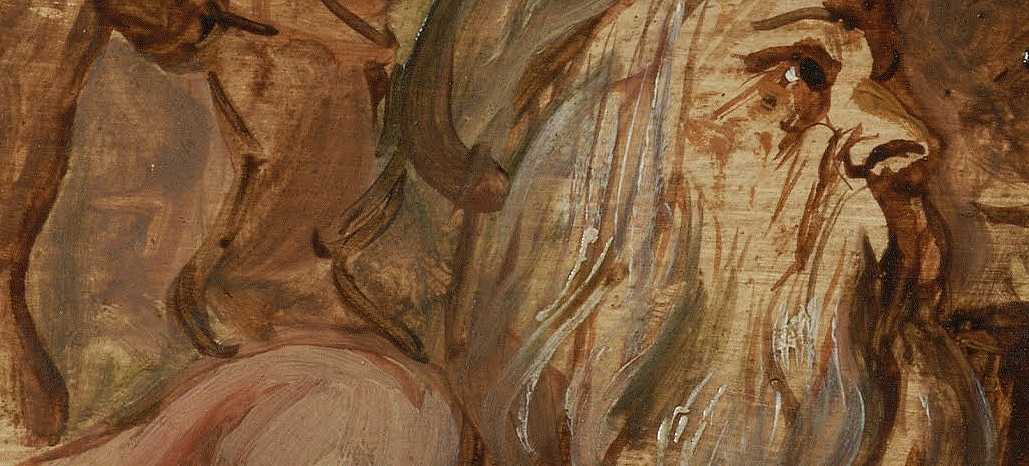
Here is another example of Rubens' drawing, this time from another study, "The Meeting of King Ferdinand..." (J.Paul Getty Museum). Also, observe the white lead paint used to indicate hair. That paint is granular and torn, which are strong visual indicators Rubens' white lead paint was congealed at the time of application.

Another detail from "King Ferdinand": Again, easily discerned beneath the transparent over-paint is that now familiar brown under-drawing, washed-on thinly via the use of a solvent; and very likely gum turpentine-spirit, as, by his own words, Rubens considered that his favorite to oil of spike.
Getting back to Rubens: While painting Doctor Theodore de Mayerne's portrait, Rubens told the physician that the "colours" (pigments) should be made ready by mixing them with solvent. Rubens said he preferred using that solvent we know today as gum spirits of turpentine. [Mayerne: "Sir Peter Paul Rubens said that all colors should be ready-ground, employing for this purpose spirit of turpentine*, which is better than spike oil and not so strong" (*Eastlake; "Materials...",Vol. 1, page 529). Rubens actually said "the essential oil of Venetian Turpentine which exudes from the larch-tree, and distilled in a water bath", which would be an exceedingly pure form of what we today call "gum spirits of turpentine". For my enlightening research into the exact nature of Rubens' turpentine solvent, go
here.]
Now a question: Why would a painter begin by 'moistening' or grinding his dry pigment with a solvent? For too many years, Rubens' odd direction to Mayerne confused this author -- and so many others; but, then again, we current moderns have only known one generally-understood manner for constructing oil paint, which is that our colored pigments are first "ground" (dispersed, or as an even better descript, rubbed-up) with a limpid drying oil --usually either walnut, poppy, hemp, or linseed --before anything as regards actual painting takes place. But what if the binder some earlier painters used was not simply a liquid and fluid oil? What if that binder was so very thick that it could not be mixed directly with the dry colors?
I believe to truly understand what Rubens meant by his odd direction, one has to become aware of unusual -- dare I say "lost" -- ways and means.
In this curious cause, and central to any further understanding, one should consider what agent bound Rubens paint. A solvent is not a binder as it evaporates. Spirits of turpentine contains a faint amout of pine resin but far, far less than would be essential to holding pigment together. By comparison, fixed oils, especially drying oils -- such as linseed or walnut-- do not but barely evaporate; and so they become a sort of semi-solid 'glue' that does hold the pigment together. Thus, oils that dry would certainly 'bind' the pigments ... but what else? What other 'binders' were available to Rubens, historically?
To narrow the multiple choices, I should mention here, modern-day scientific analysis discloses that Rubens' paints were bound with either walnut or linseed oils, as well as a "faint amount of pine resin". Now, consider, if Rubens' paint was to be bound with a simple oil -- or even, say, an oil coupled with some pine-type balsam -- then why would he need to 'pre-wet' that pigment with a solvent, for as anyone who makes their own paint will know, raw or even thickened oil (with or without a balsam) mixes rather easily with dry pigment. And so I am one who must believe that the binder for Rubens' paint must have been something stronger, such as a cooked combination of oil with a resin-- a combination otherwise known as an oil varnish, or, more precisely, an 'oil-resin varnish'. Further, this oil-and-resin varnish must have been either very thick ...or congealed.
This plausible scenario --that of using an actual varnish-binder-instead-of-oil -- did not take much reasoning on my part, for Rubens actually tipped me off when he described such a binder elsewhere in Mayerne's text. He mentioned adding a "hard varnish" to his color/s : Mayerne Manuscript; Rubens: "To use smalt so that it shall be beautiful and light, it is necessary to temper it with the hard varnish: then lay it on smoothly and do not work it too long, because over-working spoils the color: but when dry it may be worked upon to suit. The same mode may be adopted for blue bice. Ultramarine and ultramarine ashes are excellent for finishing the distance"..
There you have it. Rubens' told Mayerne that he (Rubens) mixed a varnish with his colors-- in this particular case he mentions only blues (smalt, blue bice, and Rubens compounds his direction by also mentioning two other pigs: ultramarine and a grey, which by either conjunction or simple 'slip of the tongue' seem meant for the same treatment/varnish-addition). A stretch to deduce? Well, something else to consider: It is precarious craftsmanship to add a certain binding agent to one color while avoiding that same or very similar treatment with others. For example, the use of a strong binder (oil varnish) in blue while using a weaker binder (say, just oil) in the other colors will cause differing stresses between and within the paint-film/s, resulting in eventual cracking/delamination problems. Know that Ruben's tough paint shows a uniformity of surface. There is nothing unusual or visibly apparent to indicate that Rubens utilized differing binders. Thus we can fairly assume that if the master added a varnish to his blues, he very likely added that same varnish to all his pigments. [Stability: When painting in layers, it is paramount that certain rules be followed. You are probably aware of the principal of "fat over lean"? Rubens --and the Van Eycks -- painted in layers. More than a decade has passed since I put forth the notion that a layered painting should best be accomplished by applying more-flexible layers of paint on top of less-flexible layers of paint. You see, I realized that the various notions of properly layering paint, i.e., "fat-over-lean", "soft-over-hard", "thick-over-thin", "slow-drying-over-fast-drying", etc., could all be combined then summed-up nicely by the simple phrase "more-flexible-over-less-flexible". The concept of "same-over-same" also fits this phrase owing to the initial layer, having dried or set, allows the same binder in the same amount to be applied safely --the fresh layer being more flexible than the dried or "set" layer beneath it (the concept of "more-flexible-over-less-flexible" has since been grabbed-up by several paint-maker's/painting gurus and has spread throughout the web). Again, it's all about stability! Painting in layers requires stability and for that you follow the encompassing rule: more-flexible-over-less-flexible. Now, as one glaring example which pertains, if you place a resin-in-oil varnish atop a paint-layer that was bound in heat-bodied oil, you will eventually experience cracking in the resin-in-oil varnish coating. The reason for this is the resin-in-oil varnish becomes harder and more brittle --less-flexible --sooner than the heat-bodied oil layer below it. Because instability within paint-layers leads to visually apparent faults such as cracking or fissuring, knowing this simple rule can also allow the painting sleuth to infer certain things about the binding media in an olden work. For one example, if the modern day paint-chemist/conservator finds a layer of resin-in-oil varnish sandwiched between two paint-layers and there is no instability issues (no abnormal cracking or other fault), then it is almost a certainty those two paint-layers are also bound with the very same resin-in-oil varnish. Now, as often happens, that same resin-in-oil binder may not even show within a chip taken from either paint-layer. Why? Realize, it is more difficult to detect the accurate make-up of a binder within a paint than within a pure unpigmented film. As one reason, pigment takes up space and so the binder-element is less. Pigment also hides fluorescence, which is another detection clue inferring resin-use. Thus, the fairest analysis and detection of a binder's make-up will come from either pure un-pigmented coatings, or binder-rich glazes, which contain less pigment. And yes, I am aware of modern day chemist's odd findings of additions of egg-here and gum-there in various sample-chips taken from old oil-painted masterworks. It certainly happens; but I would suspect and suggest the hand of earlier-restoration as causal to most such findings. Early and later-day restorers use/used anything and everything in their attempts to mimic a master's touch-- see Julius C. Ibbetson's "An Accidence of Gamut of Painting in Oils", 1879: 1828 edition available through Googlebooks.]
My myopic eyes eventually focused on something else: By Rubens' description to Mayerne, the word "hard" is coupled with the word "varnish"; and so I must wonder, what did Rubens mean by his mention of a "hard varnish"? Was this a varnish composed of oil and a "hard" resin, such as amber or copal or sandarac? Certainly, within the 19th Century, a "hard varnish" was indeed composed of thickened oil and such hard resins as copal and amber. But, curiously, the descriptive "hard resin" is not found in the written word from that much earlier time-period. Resins were simply resins (though there was some distinction in the color of the final resulting varnish, i.e., dark, red, light). Myself, I would accept the rather obvious and simply deduce that Rubens meant the term "hard" or "firm" to be an adjective, or the actual physical state of his varnish; and very likely meaning the varnish was a "solid" as opposed to a "liquid". Some might think I stray afield here, but besides being a painter I am, again, also a varnish maker, and I have experienced many odd findings within my field. Four-years ago I revealed the existance of these congealed coniferous varnishes-- varnishes I term "S-P-F (Spruce-Pine-Fir) congealed varnishes". These congealed varnishes do exist and they could easily pre-date mastic-based meguilp 'jellies' which gained such affection within the later 1700's. And so, yes, please think of this possibility for a "hard varnish": A solid varnish. Understand, I am privy to an insider's point of view in this matter. Again, these congealed varnishes exist. It is not a broad jump to allow the possibility that Rubens may very well have been referring to a congealed coniferous oil varnish; and also understand the generally -- and 'scientifically' --accepted ingredients of oil and pine resin within Rubens' paint lend plausible credence to just such notion.
If anyone is still reading along here, I should point out that these coniferous congealed varnishes --being almost as stiff as wax --are very difficult to incorporate with dry pigments. Thus, the initial wetting of the dry pigment with a solvent proves to be an expedient practice. I should also add, by the way, this practice would exactly mimic the wetting of dry pigments with water before incorporating the also-congealing egg yolk, as in the method of secco-- or egg tempera. You see, the original egg tempera practice called for using water to initially wet the colored pigments; then a bit of congealed egg yolk was intermixed with those wet colors, producing a gummy paint and requiring the brush be dipped and saturated in water, then stropped upon and throughout the stiff egg-bound paint in order to carry that wash of color to the panel. The technique of egg tempera painting primarily involves the laying-on of color in thin washes. The washes "set" through the action of evaporation and the congealing action of the yolk-binder, allowing further thin washes to be applied gently, delicately, until the artist is satisfied. Realize, this tempera technique of painting on panel was well-known and practiced by the van Eyckes; and it would be no great leap in deduction to conclude that egg tempera painters would seek to incorporate the very same technique .... with oil paint ...were there a ways-and-means found to do so.
ORIGIN VS Fir Wax
And so, as with egg tempera, ORIGIN-- a congealed coniferous oil-based varnish -- requires the use of dry pigments coupled with a "wetting" agent -- a solvent. This is an important distinction between Fir Wax and ORIGIN. Fir Wax was formulated for use with oil paints already "ground" using oil as the binder; however, like with egg yolk, ORIGIN is used as the actual and sole binder. If ORIGIN is mixed with regular handmade or most commercial tubed oil paints, the resulting paint behaves in similar to using a mastic-megilp: It keeps its place nicely, as a fine "jelly medium" would. But this is not the intended manner of utilizing ORIGIN. The preferred manner is that of using a solvent and developing the painting using a tempera-like delivery :Multiple thin washes but also thick impasto when called for....and all with the added convenience of a blending 'window of opportunity' (which is typically several minutes if using a mix of turps and mineral spirits). This system may have been the "tempera manner" of applying oils alluded to by Vandyke in his small manuscript, ""Observation of Anthony van Dykii", published just before his death; and apparently, this was also Vandyck's own usual painting technique, for he cited opinion that this "tempera manner" produced the best results. [Vandyke: "The tempera painters whose manner of applying the tempera technique was reflected in the way they handled techniques in oil, were the best.", "Observation..."; Introductory Page.]
I have little doubt that Vandyke obtained his own painting method through a study with his master, Rubens.* 4-years have elapsed since my public introduction of Fir Wax, wherein I also ventured the notion that Rubens utilized a congealed oil-and-coniferous-resin varnish with his paint; applying that same paint using a solvent, just as if he were painting in an 'egg-tempera-like' manner. In the interim I have found no reason to retract this position. I will say something more: Fir Wax was made using sun-bodied nut oil and fir resin cooked to a certain temperature and only high enough to combine the resin with the oil-- though not enough to completely destroy the resin's "markers"; and this heating act possibly allowing for a faintly-detectable finding of "pine resin" in Rubens' conjured paints. You see, to incorporate most coniferous or pine-like resins with a thickened oil, it is not necessary to cook the varnish to nearly as high a temperature as, say, amber or copal would require. [Be it known, cooking amber and copal and sandarac resins in oil to those amazingly high degrees does necessarily annihilate the amber or copal or sandarac-markers. Duly note that this is an established-by-'science' factual happenstance.]
ORIGIN is a congealed oil-and pine varnish "that dries in the shade". Thinned with a solvent, ORIGIN makes a perfect final-protective coating for oil paintings; or as a sealing or imprimitur coating atop any priming. ORIGIN is made using heat-polymerized nut oil and a coniferous resin common to Northern Europe. I should again mention -- and it has been fairly-well established by 'science' -- that a heat-polymerized oil containing faint amounts of pine resin has been detected in the brothers Van Eyck's paint. For example, see here again: and carefully note the last part mentioning the well-preserved clear varnish coating of heat-bodied oil-and-pine resin on the back of the panel matches that very wonderous binder found within the van Eyck paint. And so, based upon the latest analysis, the van Eyckian pigment-binder is/was very likely a resin-oil varnish.
Repeating myself, this most recent finding of science should not surprise anyone familiar with the varnish-making of that long-ago time, as thickened oils -- either created through sun-exposure or by boiling-- were regarded as the much-better oils to cook with the resins. This typical practice produced the toughest varnishes; and so this 'finding' easily equates to the brothers using a pine-resin-in-oil varnish as their paint-binder ...which rather neatly follows the original story penned by Vasari and concerning Jan's discovery of a wonder varnish 'which dried in the shade'.
To avoid confusion, be mindful that FIR WAX was/is a congealed oil and resin varnish conjured using a resin and a sun-thickened oil. ORIGIN is made using a coniferous resin and a heat-bodied oil. Why the difference? Well, Rubens told Mayerne that the best varnish was made using oil much-sunned with a lead-oxide and without cooking, at all*; and so I felt it best to follow Rubens own direction as closely as possible when constructing the congealed varnish -- a varnish I figured he would most likely utilize. This varnish would certainly dry his paints quickly. However, I know from experience that sunned oils tend to yellow sooner and greatly. As many years of trials now have shown me, heat-bodied nut oil will yellow only very faintly with age; thus I must deem the ingredient of heat-polymerized walnut oil to be the better oil for this congealed varnish. The resulting congealed varnish is somewhat slower to physically 'dry' (solidify) ... but that effect provides the opportunity to lay on many, many layers before final solidification of the applied paint occurs. There is a certain ease and freedom with this type of system. The painting can be built-up in a single day or it can be wrought over several days; but, in the end, the paint dries throughout, as if a single layer or "alla prima" technique was performed. This means the actual paint will not only resist yellowing and dulling, but also fissuring and delamination -- faults that would normally occur with the increasing vogue for applying straight and simple oil paint in numerous layers -- a dangerous practice straying from the rules of sound craftsmanship. Also, very importantly, an overall "lit from within" illumination can be maintained through this re-layering-while-wet methodology. [*Note From the Mayerne Manuscript: M. Rubens NB; "Turpentine (coniferous balsam, alone) in time becomes arid (oxidized) and is not proof against water. The best varnish, resisting water, is made with drying oil, much thickened in the sun on litharge, without boiling at all." I have underlined the word "with" because Rubens means the varnish will be composed of both the lithage-treated sun-thickened oil AND the balsam, combined together, and this act likely performed through a basic heating-process. The inherently yellowing-nature of the sunned-oil ingredient --either linseed or walnut oil-- within the varnish was apparently not a major concern to Rubens; or perhaps he was unaware of the essentially non-yellowing nature of a decent heat-polymerized oil.]
I should mention that, like Fir Wax, ORIGIN performs well with certain and generally considered nefarious olden pigments, such as asphaltum.
Colors
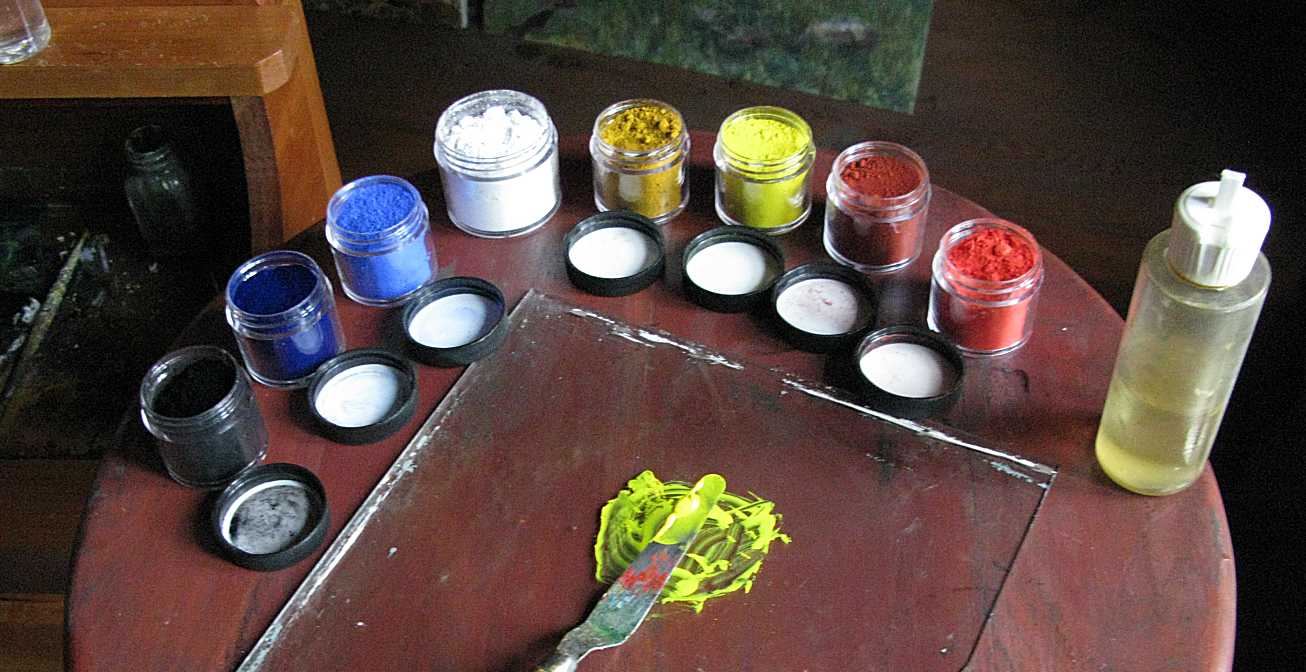
A basic set of dry pigments capable of handling a variety of subject matter would be the following (and I can recommend RGH online for ordering dry pigments that are not 'gritty'). Excepting the white, if you are new to making your own paints, order your color-pigments and black in the smallest increments offered. As for your white, that pigment should be ordered in larger amounts.
Lead, or Zinc, or titanium whites (with this system of coloring, it doesn't matter which, though I'll heartily endorse the most opaque zinc oxide for this method -- my reasoning will be submitted near the end of this essay)
Lamp black
Yellow ochre
Cad yellow medium or light
Iron Oxide red, such as Venetian Red
Vermillion or Cad red medium
Ultramarine blue
Prussian blue
Asphaltum (Gilsonite): Certainly not necessary but many early masters did use it. It does have unique qualities. Thomas Moran couldn't do without it..
Note: Western Maryland Gallery now offers these same artist's permanent pigments (excepting asphaltum) in a 'starter' 8-color set at $48.50 per set (Note: Pigments not sold individually). More info click here
Demonstrations
To give an idea of the general use for this congealed varnish, I'll submit a following step-by-step demo. But first, a few words about creating the actual paint bound with ORIGIN.
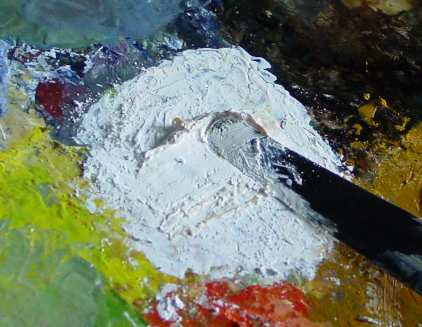
In most every case --excepting white and asphaltum -- a small amount of dry pigment (about a garden pea's worth) is placed upon the palette. A few drops of solvent are added to "moisten" the pigment and work it up to a paste with the knife ...like so:

Then an amount of ORIGIN Congealed Varnish approximately equal to the white paste is mixed in using the knife. The amounts of ORIGIN is typically increased with the various colors. [Adding more ORIGIN increases transparency as well as the paint's resistance to solvent-attack; though always bear in mind that too much oil in a thickly-applied paint results in gumminess. The general rule with ORIGIN and all oil-based binders shall be that medium-rich paint must always be applied thinly to avoid gumminess.]

You rub the paste and ORIGIN together and the paint is created, as so (next 2-images).
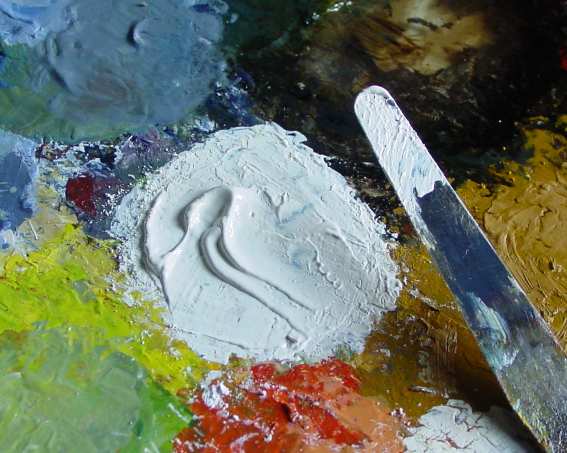
Hopefully, this appears as simple as it is. There's no mulling; everything is done using pigment, solvent, ORIGIN, and your palette knife. You see, if the pigment you obtained is truly pigment, then there is no need for further "grinding" or mulling of that pigment. The only act necessary to creating your paint is that of dispersion of the pigment into the solvent and binder (ORIGIN).
For my white (shown above) an amount of zinc pigment (yes, zinc is just dandy) equal to a marble was used and the amount of ORIGIN was a little more than half-that (though much more can be used). As for my asphaltum -- which I utilized for this particular demo because it was a favorite with this olden technique -- that lovely brown resin was previously melted into mineral spirits and so I merely scooped a pea's-worth from its container then mixed that paste with an equal amount of ORIGIN (yes indeed, the notorious asphaltum was used for my monochrome sketch and you will find much more info about this wonderful ancient color further along on this page. Asphaltum is not the n'er-do-well as so-often claimed). I usually work-up my initial colors and white rather stiffly, which comes in handy for impasto-work, but stiff paint is not useful at all for washing-in the drawing or the first colorings; thus I thin my asphaltum quite a bit with my mineral spirits. The thinned brown color glides off the Taklon and sable brushes which I prefer for this technique. I'm using a commercially-prepared 16"X20" canvas. Important! I have sealed the somewhat porous commercially-applied priming by having previously given that a thin coating of drying oil, made using nut oil, turps, and some varnish ...plus a few drops of siccative de Courtrai -- and which dried overnight. Solvent-thinned ORIGIN can also be used for this purpose. This clear sealing coat takes the place of a tinted imprimitur, which makes the technique go better than were it not applied beforehand, as there is less noticeable solvent-attack on set under-layers when applying fresh over-paint.. I should also mention that at no part of the painting process is there ever a need for oiling-out or lubricating the ground; nor do you 'paint into a couche'.
Delineating then washing-in the monochrome. This is simply a made-up design. Frederick Church once recommended that an artist should grasp the essentials of nature in one hand, then do as he/she wished with the other. I'll follow his advice with this painting of an imaginary landscape. By-the-by, in contrast with Holman Hunt's advice, I am beginning this little work in the late afternoon.
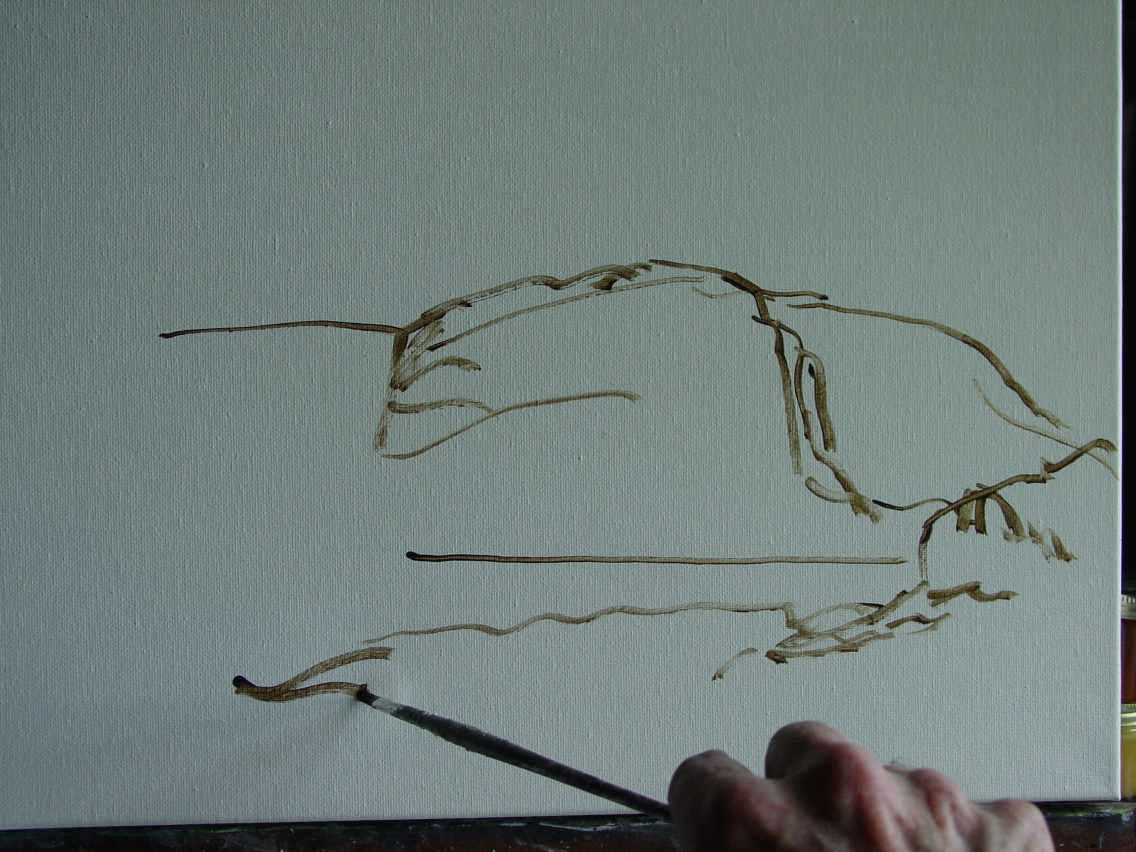
Below: The asphaltum sets quickly, allowing the first delineation lines to plainly show through the subsequent and even thinner brown shading of form.
Do you notice the similarity between my preliminary washed-on drawing when compared to those examples by Rubens, shown above? You should; and even though my canvas presents an obvious weave whereas Rubens' examples were sketched on smooth gesso. My asphaltum brown wash amazingly stays where I place it -- an amazing feat when one is cognizant of the inherent tendencies of true asphaltum.
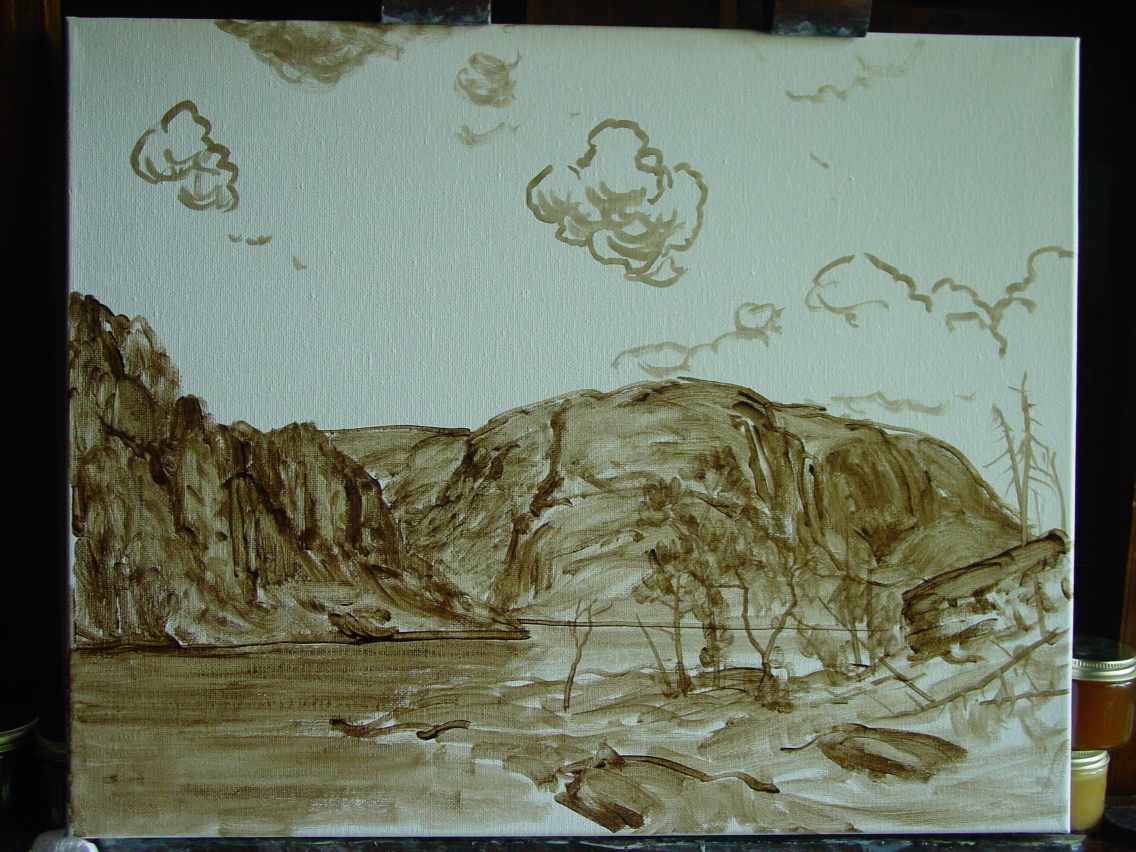
Next Image: The general sky begins about twenty minutes later. The asphaltum has set and will be resistant to overpainting. I mix-up some ultramarine blue paint then add it to some of my zinc white to form a lovely bright blue. Zinc white makes such 'pure' light blues-- like Hunt, I generally favor it over lead white; and a mix of the two is just dandy. Thinning the paint with solvent and using a bigger brush allows me to wash-in the sky in a translucent fashion. My much-preferred brushes are soft filberts or "rounds". I drag some pure white into the blue-sky to approximate the effect of descending rays of noon sunlight, blending the sky together well....and quickly, for ORIGIN-bound paint "sets" with the evaporation of the solvent (I'm using a mix of turps and mineral spirits) ...and once it sets, there can be no further blending... unless the brush is lightly 'wet' with solvent again and the whole area gently stroked ober. Judging from Rubens' mention to Mayerne, smalt, applied pure as a blue glaze (being too weak to be mixed with white) may have become "set" too quickly and appeared "stain-y", thus being especially troublesome to achievment of an overall even gradation.
Below: The first washes of color were applied transluently to the distant mountains. As there are no green pigments in my arsenal, I used a few similar greens and shadows composed of cadmium yellow, yellow ochre, ultramarine, a teensy bit of iron red, and a bit of white for atmospherics, dipping my brush in solvent then stropping it back into my too-stiff ORIGIN-bound paint to create translucent washes, which are applied with facile brushstrokes generally following the contour of the hillsides.The practice is very much like watercoloring. I hunch Turner would be pleased ...for paintings composed with ORIGIN --unlike wax -- do not lose their freshness within days of creation.
It began to get dark as evening came on but I did not adjust my camera. As with Hunt's example, most painters would never begin a work near the end of day but this tempera-like technique suffers nought from such practice. Everything about the application will be freely available on the morrow, or even the day after --excepting I will be making more white each day on my palette. If I fail, from time-to-time, to add solvent to my white and re-mix, it will become quite firm right on my palette. I need my white soft and facile for initial modeling. As it thickens with evaporation of solvent on my palette, my white becomes stiffer and can then be utilized for rugged or sharper highlights/texture. The other colors will be treated as if they were hardened cakes of watercolor, the solvent-wet sable brushes stropped across each to refresh and become charged with the color. Remember, most coloring is applied in transparent or translucent washes. Of course, if I need some pastose COLORED paint for some desired vigorous display, well, that is quickly conjured fresh; still, mostly I'll use washes of color atop my design. Below image shows my placing of pure thicker white highlights here-and-there over shadow and mid-tone blue and other color-greys. These white "heightenings" will be later subdued by various solvent-thinned color-washes (i.e., glazes/scumbles).
What follows is a close-up larger than life-size showing the original asphaltum monochrome showing through the transparent/translucent local color and shadow-washes. Impasto is only applied in the highlights -- and I've just washed-on a glaze of yellow ochre atop the now-set rock-highlights on the left. Heightening then glazing/scumbling can create amazing illumination and textural effects. This feat is very quickly accomplished using ORIGIN bound paint -- it would take days or weeks to do the same with regular oil paint.
Below view: I've now washed a mid-blue-grey over the distant heightenings; and also washed local colors over my foreground. Some foreground colors are pure while others have a titch of white added.

Above and below images: Purer greens come from a mix of cad yellow and ultramarine ...and especially Prussian blue, which is a "greener" blue. The initial brown for my tree trunks is lamp black with a touch of iron oxide red. I perceive this brown often in my surrounding environs. I abhor umber in my own work. Note that I have used a wash of my leaf-green shadow tint to apply a shadow of a passing cloud opon my distant central hillside. If too pure, wait for that to set then wash-over a bit of blue-grey, causing the shadow to become faint and recede into the distance
Following image: The light was fading fast. Time to give it up. The paint will set-up more firmly overnight. It's not close to being dry, though, so any new layers added tomorrow or the next day will not thwart the overall and intrinsic 'alla prima' character of the actual paint. Every layer added combines with the one beneath it and the result is essentially a single paint-layer. The gloss builds with each new layer, too. There will likely be no need to varnish this work when I'm done. I should mention that if any section of this painting does, in fact, become solid or cured, overpainting upon that 'dry' paintt with a solvent wash will likely cause sinking as well as fissuring in the new layer. The way to safely accomplish any such addition would be to apply a thin but pure coating of ORIGIN to that cured area first; then painting-over that treatment stops any tendency to fissure. This is the only instance where the adjunct of "oiling-out" would be needed.
Below: I sat down at the easel with plenty of morning light coming through my north-light window. What a difference to the camera images: The painting is absolutely glowing with innner-illumination. I left and came back to the work numerous times, simply refining the overall work which was quickly but broadly-established yesterday. Refining means applying detail/accents onto the 'set' but still 'wet' undercolorings. If I wait too long and the paint physically solidifies ("dries"), then I invite a loss of the inner glow.
Below: Detail of water showing rigger-applied solvent-thinned washes of light-blue and yellow-green to indicate waves. [Note: A "rigger" is an olden term for a long and thin sable or squirrel-tail "line", or "liner" brush.]
Application of some thicker opaque (YO+IR+Z) highlight to the cliff rocks.
Next image: Finally, two days after I thought this thing was done, I refined the sky by placing shadows and highlights upon the clouds.
Anyway, it's fini. I'll just call it "Mid-Day". Overall, the tempera technique is rather quick in execution. I spent little actual painting time --maybe 2-1/2 hours total --on this small scene, leaving it then returning whenever to put a few more strokes/details in. The final work has a pleasing gloss and an overall brightness that rather astounds the eye. Warning: as per Hunt's advice, placing another wash-layer over the now-dried painting will obscure the light ascending upwards from beneath the primarily washed-on coloring. If you wish to 'paint-in', apply a layer of white first; allow that to set, then glaze atop that, mingling the glaze into the white just a titch-- something it will do pretty much by itself. As for adding shadows, just go ahead and wash-over that coloring to the work where shade is desired. This act will effectively obstruct the inner light. There is a final warning. Paint which has not fully cured, though appearing dry or tacky to the touch, will suck the binder from your over-paint, causing a fissuring situation where applied washes shrink and pull-apart, especially if the superimposed paint is thicker as opposed to thinner. To help allay or remedy this effect, apply a layer of pure ORIGIN to the un-cured paint first; or add extra ORIGIN to your paint when you make it up; or paint very thinly, instead.
PS: concerning the above image, taken outdoors and showing a warmer hue: I've left plenty of kilobytes and weakened the compression in this last image, and so if you do a 'right click' on your mouse and select "view image" then a likely larger-than-life-size view should open.

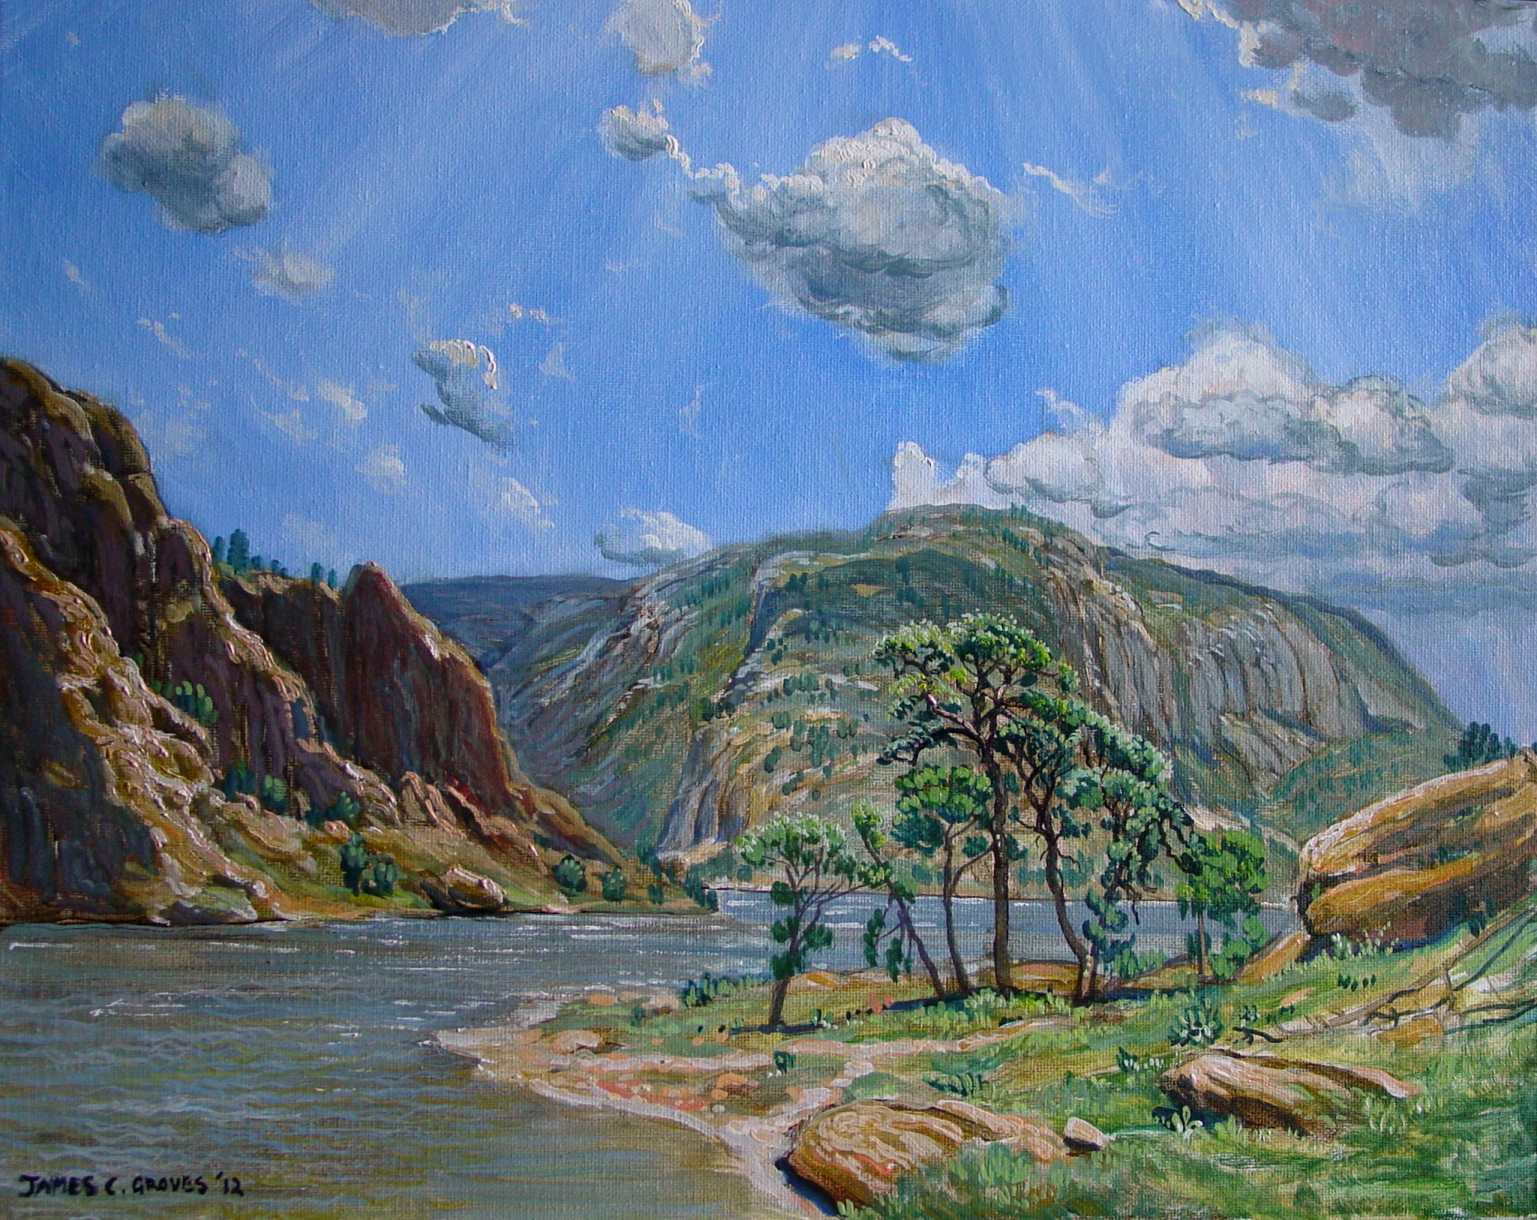
Above: A comparison showing two paintings, side-by-side, both created with ORIGIN; however the duller work on the right was painted-over again in order to improve detail; and this was performed well-after the initial painting had dried. What had originally been a glowing scene became just commonplace -- a lovely view but ....dim. Look at the two paintings carefully. The difference between these two works is striking as regards their intrinsic illuminative power. Even when you ignore the bright blue VS grey skies, the brightness of the left painting done in washed-on layers applied successively while set but still 'wet' proves Holman Hunt's cautionary advice concerning any repainting after the work has dried. Detail may improve but that 'inner light' is lost. There is a way to accomplish the feat, but that involves the use of an intermediate "heightening" with white. Performed one-section-at-a-time, detail and illumination can be had in this manner.
Blending, Modeling ...Melding.
Is this little painting too roughly performed for your taste and sensibilities? Are those boulders in the foreground built with forceful and bold strokes too .... callous? Is smooth definition and refined modeling your cup 'o tea? Then know this: At any time during the painting process-- and up to about a month afterwards -- extreme smoothness in modeling of form, light and shade and color can be increased by the simple act of "blending". Well, a much better word for this action would be "melding", but that requires some explanation. I'll now share something rather novel with you ...
"Blending" is an act so common to 'oil painting technique' that it would seem to be unimportant to even mention herein. In fact, blending can be performed in several ways. Examples: The painter can blend colors on the palette before applying them. A painter can also blend color on/ within the painting, as long as the paint remains "wet" or mobile. Blending can also happen when layers mix "optically', meaning you see the combination of tints by the visual mixing thereof; though this feat is not an actual mechanical mixing of the colors, at all.
As regards egg tempera painting, "blending" can mean something rather different. The primary modus operandi of the egg tempera craft is the ability to apply innumerable thin layers of paint -- layers that quickly build and refine objects towards a level of realism Cennini considered far better than that obtained via wall or oil painting. "If you would paint the Madonna, you must use secco", Cennini wrote. Why? Oil painting was cumbersome and slow to dry. But with egg tempera, the thinly-applied layers set quickly, allowing further layers to be added.
Here's the downside: Blending tints is easy with oil; but blending is neigh impossible with egg tempera.
It is not that the tempera painter cannot mix colors before laying them on; and, of course, blending can also occur optically -- which is another hallmark of the craft. But that third process of blendng whilst the applied layers are wet, well, that becomes a problem. The paint layers dry too quickly to allow much of that mechanic, excepting within the first layer. Applying then blending subsequent layers is tricky and fraught with danger. Thus, a most desirable trait to secco would be a way or manner of combining the numerous thin paint-layers --layers that have 'set-up' but are as yet not physically dry. It can't be done, really -- and this is why Vasari mentioned the fault in his story of Jan van Eyck and Antonello da Messina. Water may be the universal solvent but in this situation its solving action upon set-up egg-bound paint is only partial. The water does not truly solve the under and over-layers so as to easily combine or "meld" the layers together. Instead, the layers may very likely swell, tear and crumble; and what a mess to fix. Thus, this particular form of 'blending' has always been a hazardous act with egg tempera. Again, as mentioned above,Vasari wrote that many painters had tried in vain to find a way to blend ("meld") applied layers by somehow combining wall painting (pure basic oil painting) with tempera painting (this combo is termed "tempera grassa"); and, until the van Eyckian discovery of a "wonder varnish that dried in the shade", these experiments towards improved blending ...failed. To this day, tempera painters have instead continued to meld paint-layers by the cumbersome act of 'hatching' colors with the brush, which is a rather petty gimmick for optical-blending.
Melding" layers of paint is an invaluable aspect of blending that has been truly lost to painting history and especially oil painting-technique. Nobody does it anymore, really. Melding of paint-layers would be a great thing if it were allowed within the tempera technique. As for the oil technique, within that realm the notion is quite unheard of.
But my point in covering all this is that this act of 'melding applied and set layers' is easily performed when using ORIGIN and a preferred solvent. I performed this simple, desirable, amenable and corrective artistic procedure numerous times in that more-carefully rendered 24x30-inch landscape painting at the top of this web-page. As was done with the above demo, objects were painted quickly and brusquely; then melding was performed, and with clever results towards realsim. The actual mechanic is simple, for you see, the solvent I used nicely solves pre-set ORIGIN-bound paint-layers, allowing an actual and deft melding thereof. Regular oil painters schooled in today's common techniques will not appreciate this re-solving of the paint. No, they are used to blending while all is 'wet'. Your average oil painter of today might even view this solving of the applied paint as a troublesome happening. For the basic oil enthusiaste, blending occurs upon the palette and also within the fresh paint layer; that's it. By contrast, using ORIGIN with a tempera-like method of oil painting, blending can occure in all manners; and the cleverest painter will use the melding of applied layers as his/her ultimate weapon towards realism. And what a tool that is! As long as the solvent is still able to soften the paint, melding can occur and recur at whim. Rubens also mentioned this very action when he told Mayerne, "In order to make your colors spread easily, and consequently unite well ... dip your brush lightly in clear essential oil of Venetian turpentine*...." [* A solvent comparable to gum spirits of turpentine which Rubens said was extracted through boiling of the Larch balsam with water and distilling the vapor.]
And so, to smooth and blend your brusquely-applied initial paints and layers, simply dip your brush lightly, faintly in your solvent; then stroke over the objects you wish to refine. Be gentle and be careful. You wish the layers to meld, and not completely dissolve. Stroke along the planes and follow the form of your object. Once you 'get the hang of it', you will be amazed how the rock or cloud or whatever melds into a soft and realistic union of color and modeled form.
Again, I suspect Turner would have loved this stuff; ditto the PR-Painters ...
...And in the particular case of the PR-Brotherhood, I will post another short demo building upon their clever method but using ORIGIN. It would not be a stretch to posit that the PR-painters were 'held back' by their new-found manner of producing illumination. They had to use a white ground, a careful drawing, and this was then covered by a thin veil of stiffened white to produce their glowing effect. By amazing contrast, the olden painters whom the PR-painters were attempting to emulate were not held to that same restrictive performance. The olden painters made use of, instead, a rather thin-to-thick "optical grisalle", which was typically built atop a brown monochrome of the subject constructed upon an imprimitur of a mid-toned color, such as a grey or salmon. A fast-drying imprimitur not only sealed their white gesso priming, it also toned-down that glaring whiteness, so that their superimposed colors retained more visual force. After the monochrome was painted upon their imprimitur --and using pure white lead -- a modeling was built using thin translucent white for the darker tones, while thick pastose white was piled-on for the highlights. So you see, there was no need for a white ground simply because the intrinsic illumination would be provided by glazing the colors atop the luxuriously modeled-with-white "optical grisaille". What I'm saying is, instead of using a thin veil of white --as practiced by the PR-painters -- the older "optical grisaille" modeling would often be quite thick in application, a trait first fully explored and implemented by the Italians in the South of Europe --such as Titian and the Venetian painters -- and then later by the Dutch of the North. As perfect example of the later, Rembrandt and Rubens utilized this "optical grisaille" manner. I suspect Ruben's student, A.Vandyke, also used this method at the start of his own career, though I have personally found no example to prove it. [Note: For more historical background concerning the "Optical Grisaille", see the provided link at bottom of this page.]
For some recent (1999) paint-chip analysis which would seem to indicate Vandyke used asphaltum as well as the same or similar 'oil-plus-pine resin' varnish as his master, Rubens, download this National Gallery Technical Bulletin: www.nationalgallery.org.uk/upload/rtf/white1999.rtf
With regards to Vandyke, I have decided to demonstrate this "optical grisaille" technique using his so-often-copied portrait of Cornelius van der Geest. The Geest portrait is mentioned in the National Gallery Technical Bulletin as one of the works whose paint chip analysis indicates the same 'oil+pine resin' medium as Rubens utilized. Now, I've never witnessed this painting "in the flesh" and so I'm limited by what images I could obtain online, but, looking at the detailed image, I think he may have indeed used the optical grisaille approach. Certainly his master was fond of the manner, especially for his central figures painted in the highest illumination. Then again, I suppose Vandyke could also have mixed some color with his modeling, as that might prove 'economic' in the construction, overall.
By the way, you can find the same detailed image I'm using for this Vandyke "Geest" portrait here: but do realize this is not the same thing as actually witnessing the original. And so this demo, while accurate as to the construction and coloring of an optical grisaille, is, nevertheless, just a guess as to how the original was created.
Now, I'm not a portrait painter and I've painted very few portraits during my career. Thus, so I would not make a complete fool of myself, I grabbed a primed piece of paperboard and attempted a practice monochrome to familiarize myself with Mr.Van der Geest's most salient features. I used asphaltum mixed with ORIGIN and applied using Taklon brushes to a sealed white acrylic ground. As duly mentioned within the previous demo, asphaltum was a commonly-used brown of that rather golden time-period of oil painting greatness. Of course, this wonderful brown is another tool currently lost to the realm of oil painting. There is no need to fear this brown but it has to be utilized in certain lasting ways and means. Asphaltum is a powerful antioxidant for oils; and so it greatly retards the drying of that oil. What to do? You need to add a drier or a drying agent. Any drying varnish will help; but you'll need another agent to stop asphaltum's other fault, which is its unhappy penchant towards slumping, creeping, crawling; and ORIGIN is perfectly remedial. As to color-durability, true asphaltum is nearly light-fast, though it may become noticeably less-intense with age.
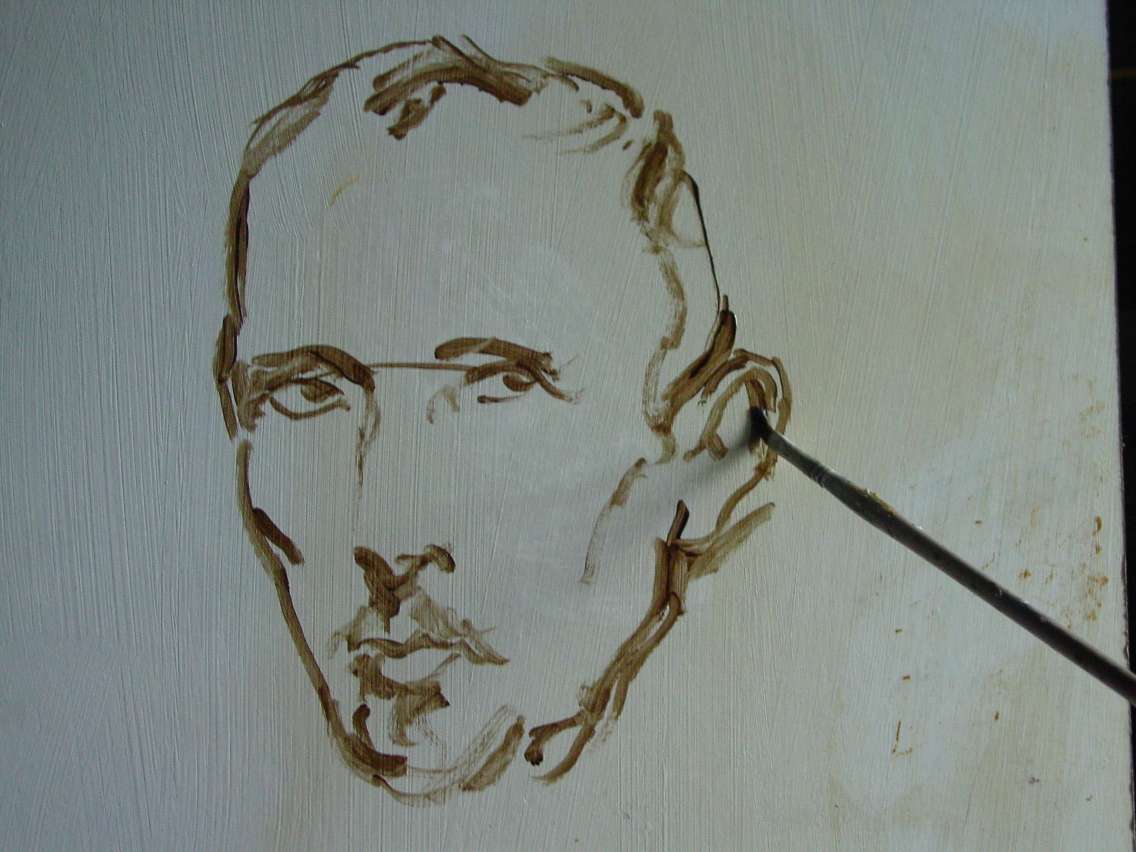
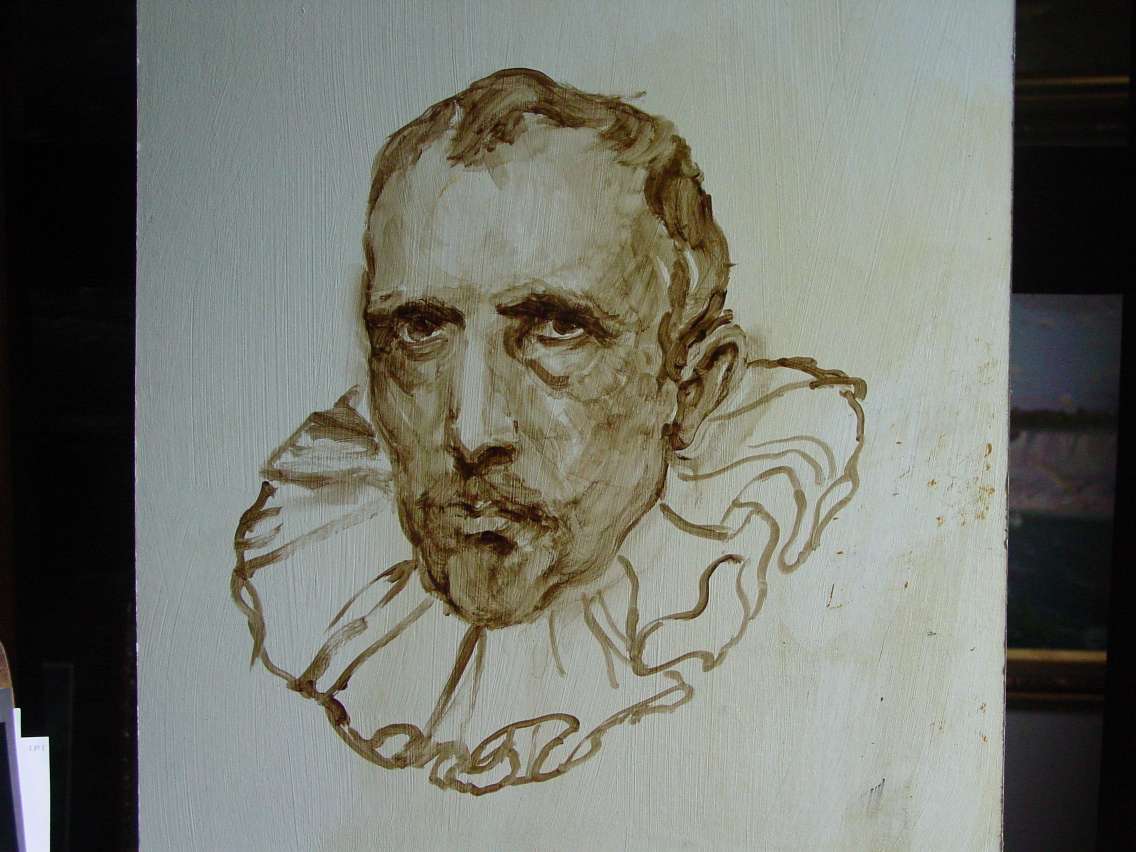
Alright, a new day has dawned and I'm now using another and freshly prepped paper board "panel". The original white acrylic priming has been sealed using a simple grey imprimitur; and this imprimitur has been allowed to dry. This will be perfect for constructing an "optical grisaille". The mid-tone grey imprimitur will greatly help the modeling with white, though I'll first need a new monochrome sketch of van der Geest to guide my optical grisaille-construction:
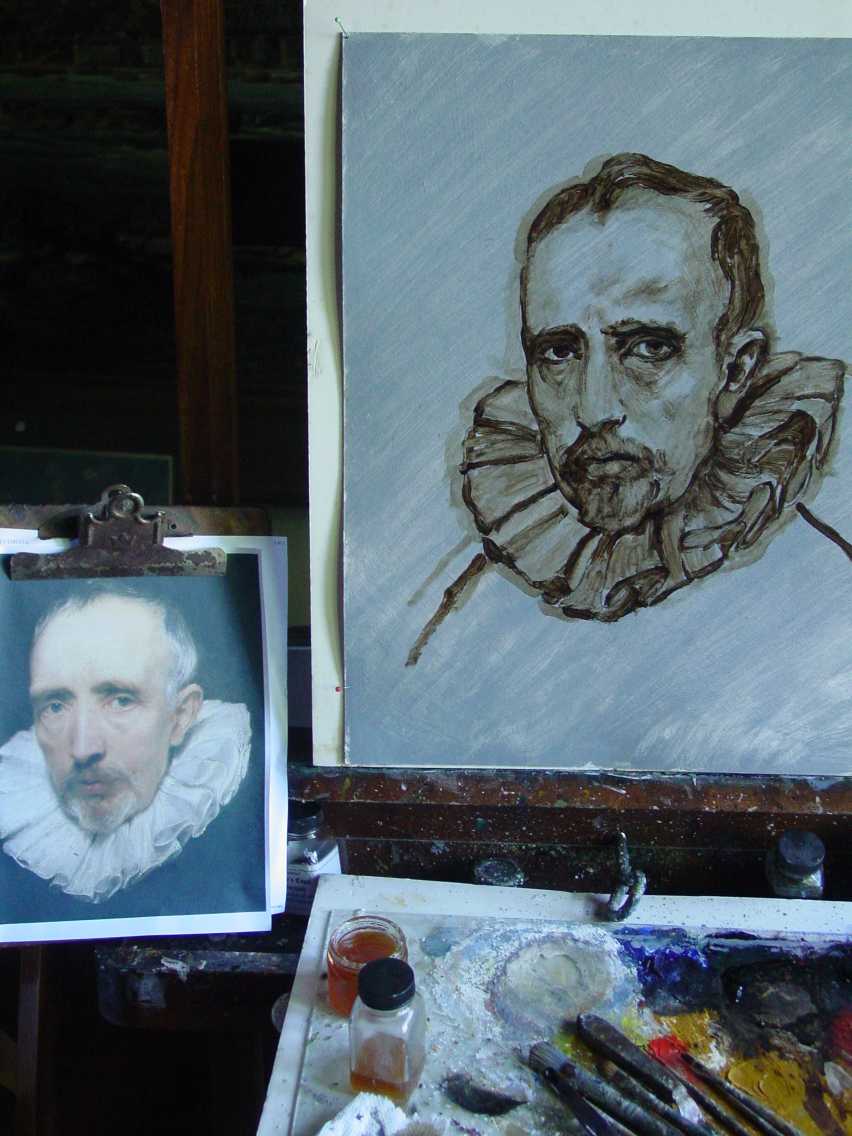
Above: You can see my "sitter" on the left. The fellow is tireless and will maintain his strict composure the whole day. My monochrome is a bit more careless than yesterday -- a rather racoon-like appearance to the eyes, especially; but I'll correct the features along my way as the day progresses. There is not a lot of painting time involved with this process. In fact, most time will lapse awaiting the paint to set so as the next layer may be applied. Fine for me, as I have several other things to do (I began about 10:30 AM after the morning sun had blasted that imprimitur a good while). Now, at any time, I can remove and correct with solvent because the paint is not dry but merely set. By the way, I suspect Vandyke likely constructed van der Geest's portrait within at least a three-day time-span. Why? Because van der Geest would not be available throughout a single day. Still, as with Hunt's notice, to achieve the highest illuminative effects, it is best if all layers beginning with the white modeling are still "wet", from start-to-finish. I certainly could begin with a dry monochrome and this would not affect the final illumination; however, the modeling and its coloration should be wet. Regardless, ORIGIN-bound paint sets quickly but it does not physically dry for several days, thus allowing a decent 'window' of opportunity to play at will. The bottle of orange-ish liquid on the left of my palette is what I used to make my imprimitur. It contains a fast-drying mix of 2-teaspoons nut oil, 1 teaspoon copal varnish, two teaspoons turps, and 7 drops of siccative de Courtrai. This allows my grey imprimitur to become almost touch-dry overnight. The morning sun did the rest. BTW, I could have used any number of binders to obtain a similar effect. In fact, I could have used the ORIGIN as my coating, simply by taking a 3/4-inch wide Taklon or soft bristle brush, dipping that into a solvent, then whisking and stropping that 'wet' brush into the ORIGIN -- in similar to using shoe-wax. This stropping/whisking action mixes the solvent in the brush with the congealed ORIGIN, therefore charging that brush with the thinned varnish, producing a perfect and easily-applied coating or imprimitur to seal the priming. This coating or imprimitur should be applied thinly, producing a sheen; then allowed to dry overnight -- though it can also be painted upon after it sets-up. One big plus to using ORIGIN is that it fights yellowing --which is a hindering trait so-common to all other traditional binding oils.
Regarding ORIGIN and its non-yellowing character, here are two acrylic-primed commercially-made canvases that have been given a sealing-coating, then subsequently stored in a closet for 5-months (below). Both coatings show a gloss and were invisible (clear) when stored away:
The acrylic-primed commercial canvas on the bottom was sealed against absorbtion by using drying nut oil, which, like all painting mediums based on regular drying oils, will tend to yellow in darkness. It's not bad, really, and will likely bleach some when replaced into a normally-lit room. However, by obvious comparison, the canvas on top was sealed using solvent-thinned ORIGIN and nothing else. This simple comparison demonstrates why ORIGIN can be used as a perfect final varnish-coating on oil paintings. Essentially, ORIGIN Congealed Varnish does not yellow. To see a demonstration of how to apply ORIGIN as a sealing coating, or how to varnish a finished work go here:
Continuing with this portrait demo: The solvent has flashed from my asphaltum monochrome. I begin modeling with solvent-thinned fluffy lead white atop the 'set' sketch. The asphaltum is anything but "dry" but it is rather firmly resistant to being carried away by my gentle but sweeping application of thin and thick ORIGIN-bound white lead. The lead white can be moved around for about 10 minutes. Sometimes, especially with the coloring stage, you have to place the paint then refrain from messing with it too much. In that case, blending can often be done easier after allowing the paint to set, then gently stroking over the area with a faintly-wet-with-solvent brush, stroking in the direction of the modeling a few times ....but only a few times! Too much stroking and you may take it all away. You learn to apply the paint in a very decisive way when using this technique.

After awhile, my lead white begins to lose solvent and thicken. It's showing its congealed nature as it sets right on my palette. I can either add some solvent and re-mix with the knife; or I can use this oddly congealed white for certain special effects and character. Rubens often did this act. I'll hunch Vandyke simply went ahead and used it, too -- to create his highest lights on his sitter's forehead, as well as the obvious texture upon the white ruff surrounding the neck of Mr. Van der Geest. It surely matches the appearance of congealed and stiffened lead white. If you have already downloaded it, you can easily discern this oddly-textured granular white lead in the enlarged detailed image of Vandyke's portrait. I'll explain a little more about this stiffening white and show some samples:
When you first mix your paint using pigment, ORIGIN, and enough solvent, the paint is quite fluffy and creamy, as the following image shows:
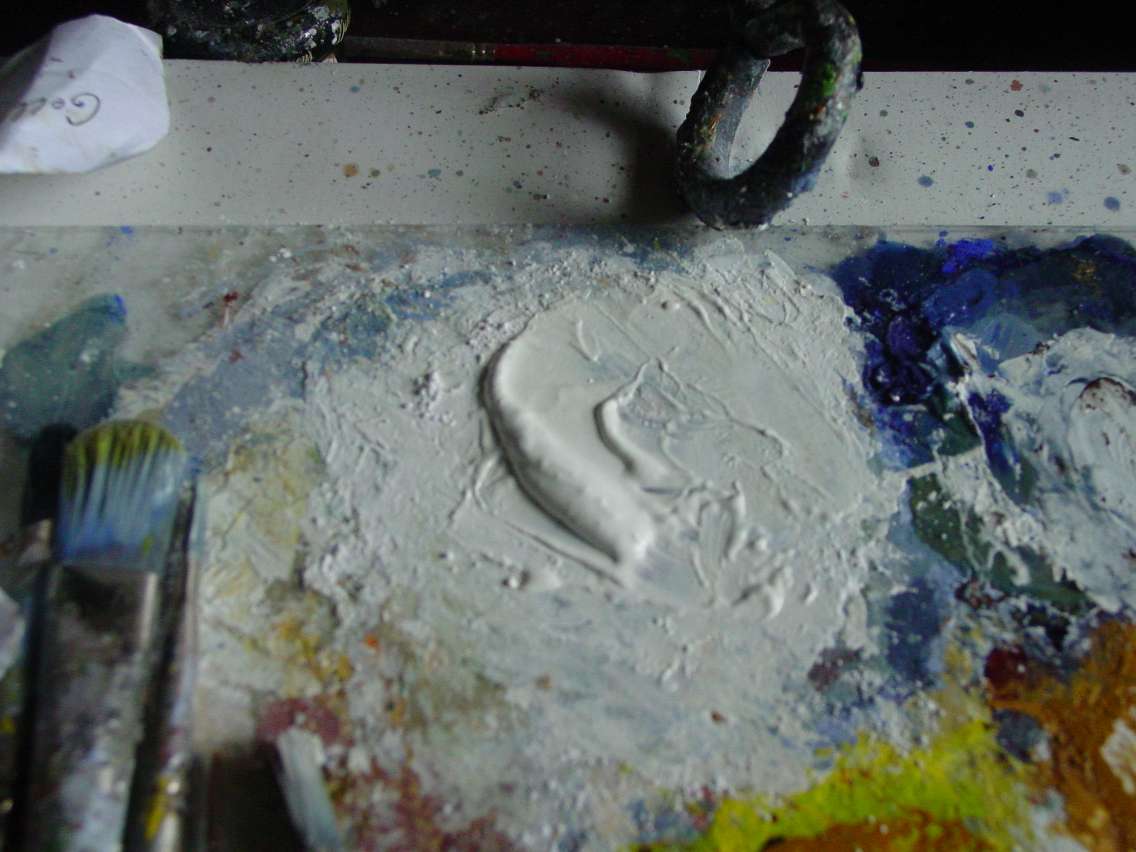
If I now take some of this creamy soft paint on my brush and apply it to, say, a white ground, it goes on a dry surface smoothly and with great facility --as if you were painting with whipped cream -- and often exhibiting a sort of "plowed" effect caused by the brush. The center of the applied stroke is thin and translucent while the sides show a certain elevation and opacity. This is quite typical of most olden masters whose brushwork displays an intrepid skill brought on by much practice.
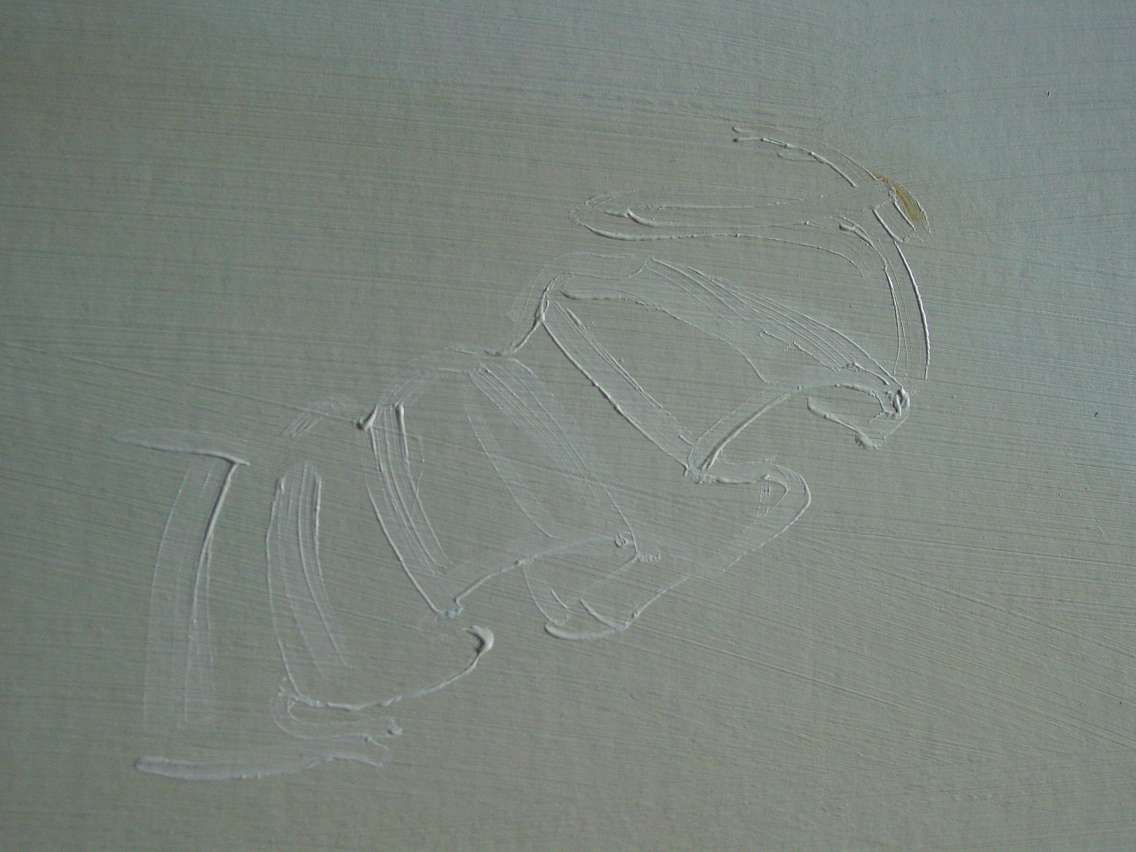
However, as the paint sets minute-after-minute on the palette, the solvent slowly evaporates away leaving a more-and-more stiffened congealed paint. The texture becomes sort of granulated.
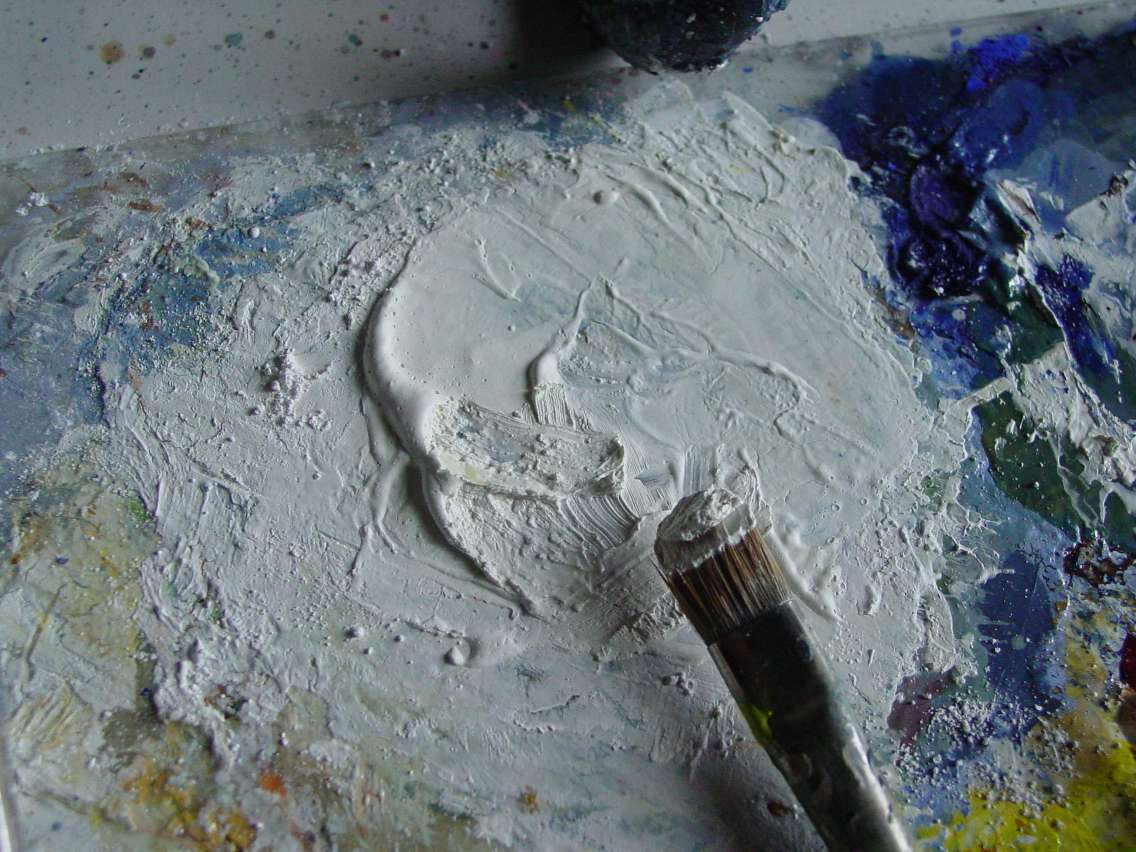
After a half-hour the paint on the palette is getting rather stiff. If I then scoop-up some of this congealed white paint and apply that to the same white ground, it shows off an odd texture which is also quite typical of Rubens and Vandyke's paint. Also notice that the newly-applied paint does not erase or harm the now-also-stiffened and underlying initial outline and its ridges. I believe this odd graininess is the same phenomena first alluded to by Jaques Maroger in his book and chapter on Rubens.. and when I see this peculiar texture within their work, I reason this as the most probable underlying causation -- congealed paint! [There will be more mention over this odd paint-trait --so common to Rubens' work --further along on this webpage.]
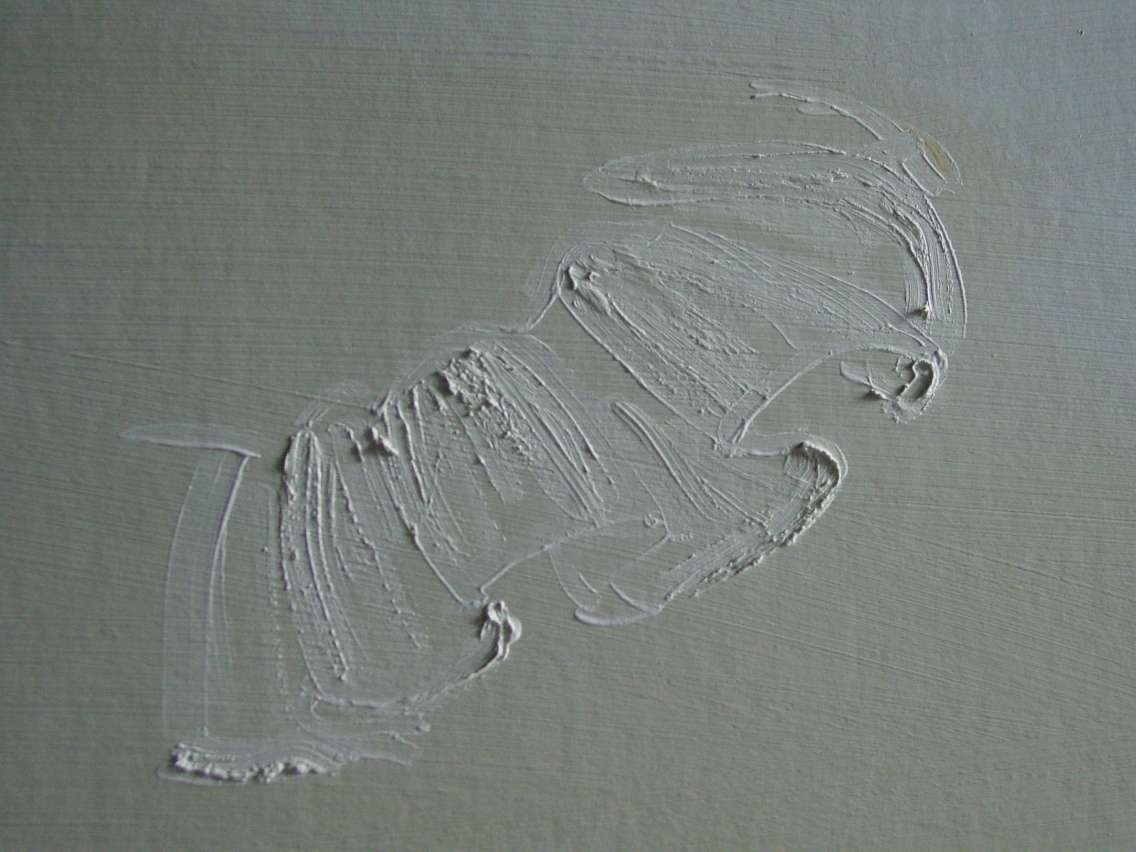
Update: I have now added [below] an image detail of Vandyke's Geest portrait which shows a seemingly congealed lead white brusquely applied in the ruff. Be aware, I was not looking at this detail when I applied my own congealed lead white in the above 'quicky' example. My purpose was merely to sample and show that odd 'crispy' and 'torn' and granulated appearance of congealed lead white when brushed-out upon a ground.
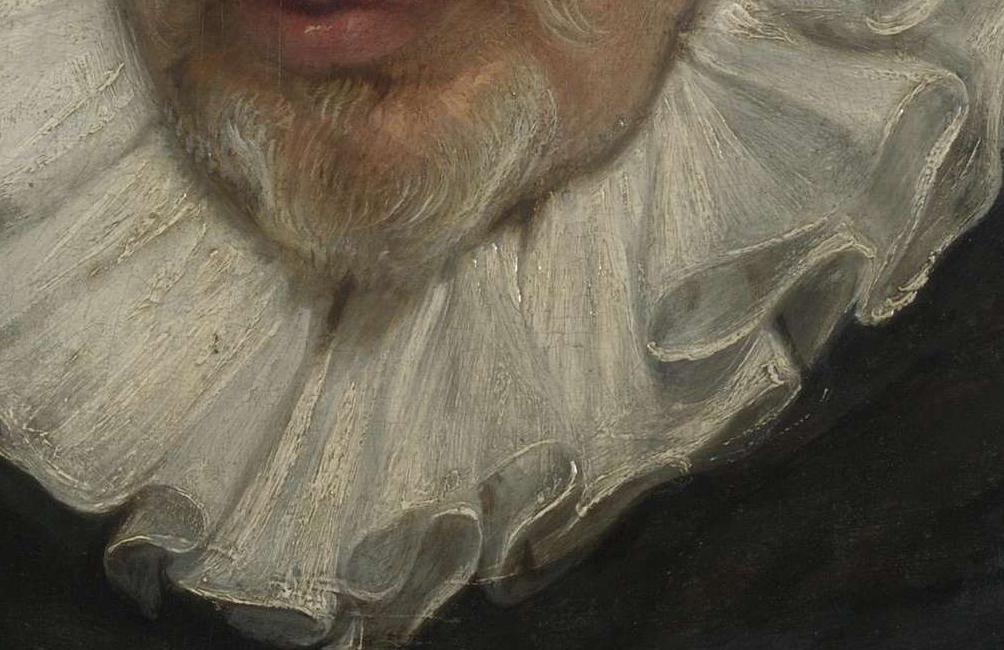
BTW, take a careful look at the leading outer-edge of the ruff.(just above at bottom of the image) and notice how the coursely applied stiffened/granular lead white paint did not erase the underlying ridges created during Vaydyke's initial outline of the ruff. This occurrance indicates either the inital outline was firmly "set", or the outline was already dry.
Next image: I have now applied some of the congealed lead white onto the ruff and to the subject's forehead. I have noticed this sort of granulated white lead in Titian's work, too -- see my page on "Optical Grisaille" for an example (linked below this demo).
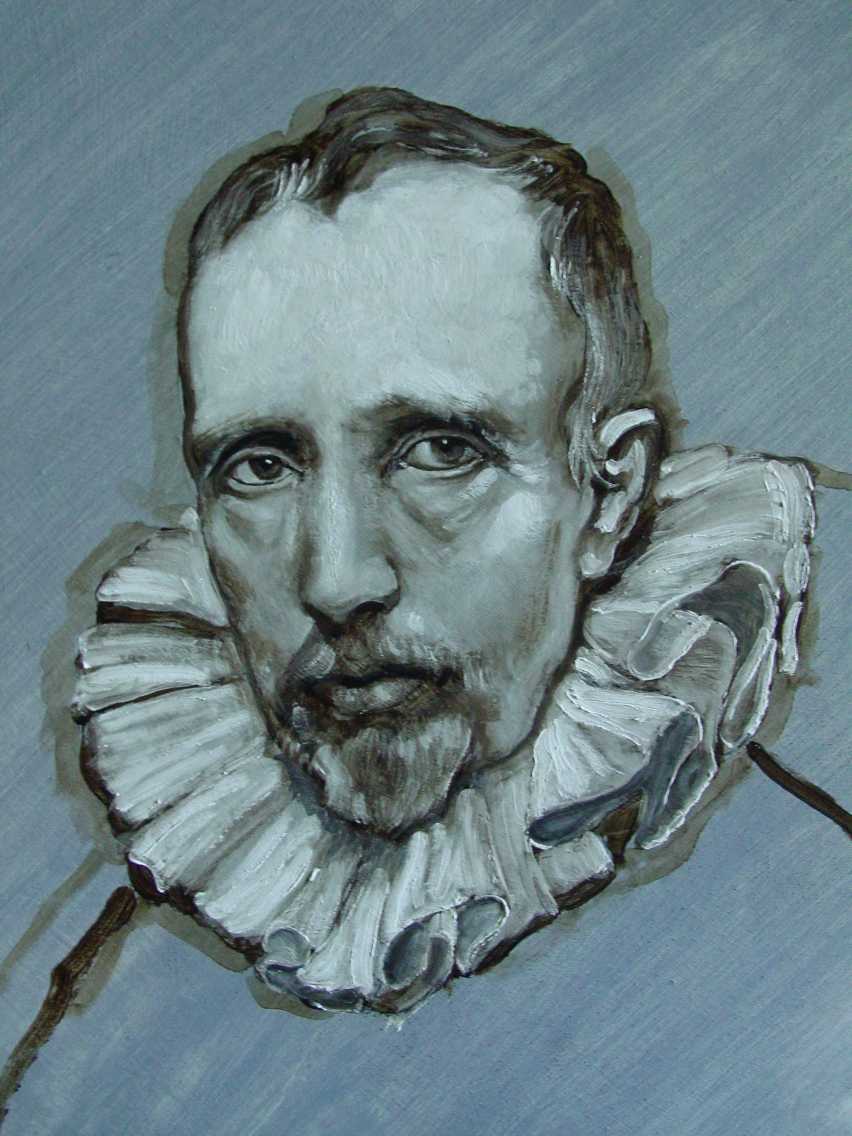
Something else I should mention here: Applying your white modeling often times covers or obliterates your monochrome in certain key places such as a the eyes, the lip-line, or a nostril. Do not hesitate to re-state those lines using your monochrome color, for it matters not that a titch of brown finds its way into your white, here or there! In that same vein of thought and practice, it is just fine to leave the white off certain deepest shadow-areas of your monochrome -- in other words, you do not have to cover every vestige of your monochrome with white; that would be silly and, moreover, a waste. You will need those darks as support when glazing on the colors.
Now to begin the coloring. My initial skin-color glaze is nothing more than a mix of Yellow ochre and Venetian red. I dip a 3/4-inch wide Taklon filbert lightly in solvent; then swirl it into the edge of my color-mix. I make it soupy. Then I touch the charged brush onto a paper towel nearby to rid it of too much color and solvent. I then carefully and quickly apply this "wash" over my modeling of white. The fleshy glaze will pick up a bit of the white as I go but that is a welcome effect, as without that titch of white, my glaze would appear as a stain -- read Hunt's cautionary direction above, again.

Okay, everything is fleshed-out. Note that I also put a trace of the flesh-color over van der Geest's eyeballs --they're too white, otherwise. I now allow the initial coloring to set, then other tints can be applied in the same manner, though often with smaller brushes, as would be required for, say, the lips and eyes.
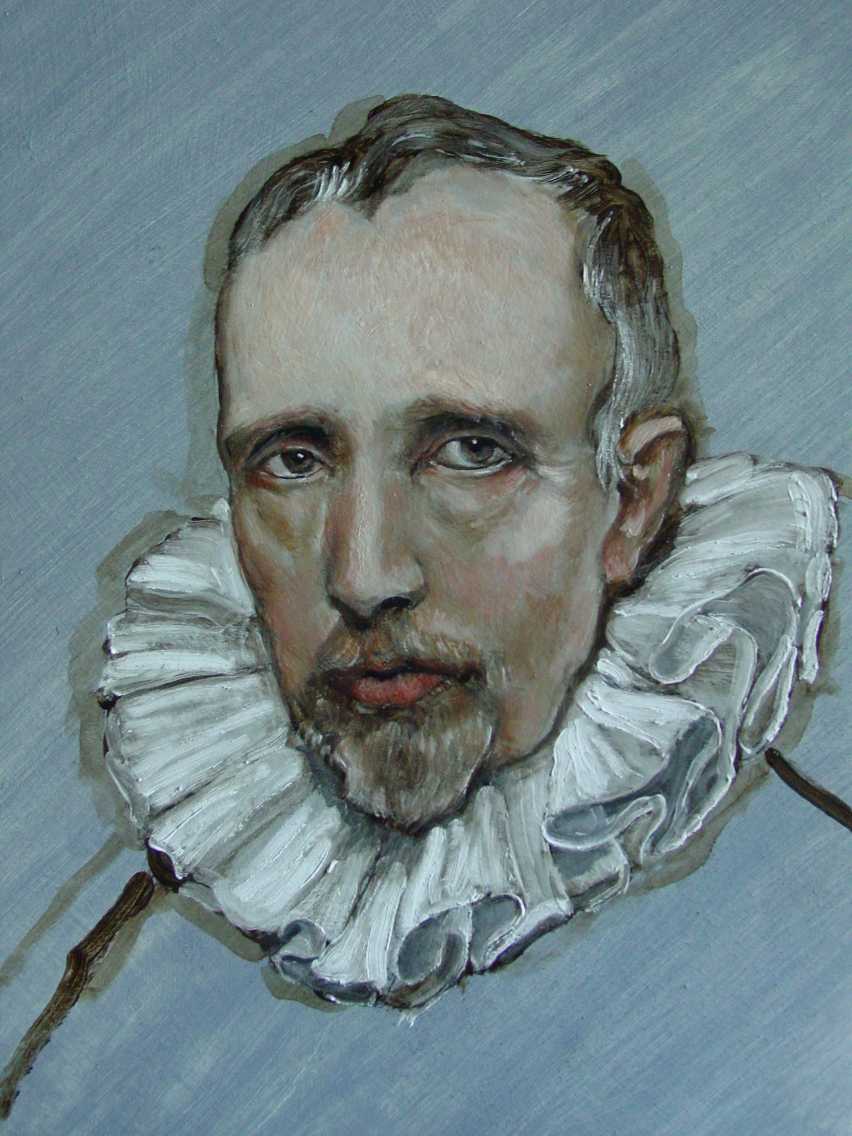
Next image below: At this point I have to do something before any continuation. The heightened white lead forehead-modeling of Mr. van der Geest has sunk-in, draining the saturation in the applied skin-color glazes. Descamps wrote of Rubens direction as regards "bringing back" any sunken areas before subsequent color-applications. Curiously, most every color applied using ORIGIN-bound paint sets quickly and eventually dries with a gloss ....except for white. For whatever reason, the various whites set as if devoid of binder. They become dull, sunken. This causes some optical hazards with the applied over-colors, and to allay such concerns, the whites drying dull should, at every stage ater the white modeling, be 'brought back' either by applying a scrubbed-on coating of ORIGIN mixed with a little solvent; or, in its place, a retouch varnish will suffice. Vandyke was said by Mayerne to have used a retouch varnish composed of two parts solvent to one of Venetian turpentine (whatever that was back in the day) between layers. Such a coating should be brushed-on quickly and evenly ... and gently, so as not to disturb the previous work. [Note: This step of 'bringing back' the sunken whites is also performed with the landscape.]
A slight glaze of lampblack for the hair and cad-red for the lips, ultramarine for the eyes. 5PM and I'm putting down my brush for the day-- dinner at my mother-in-law's.
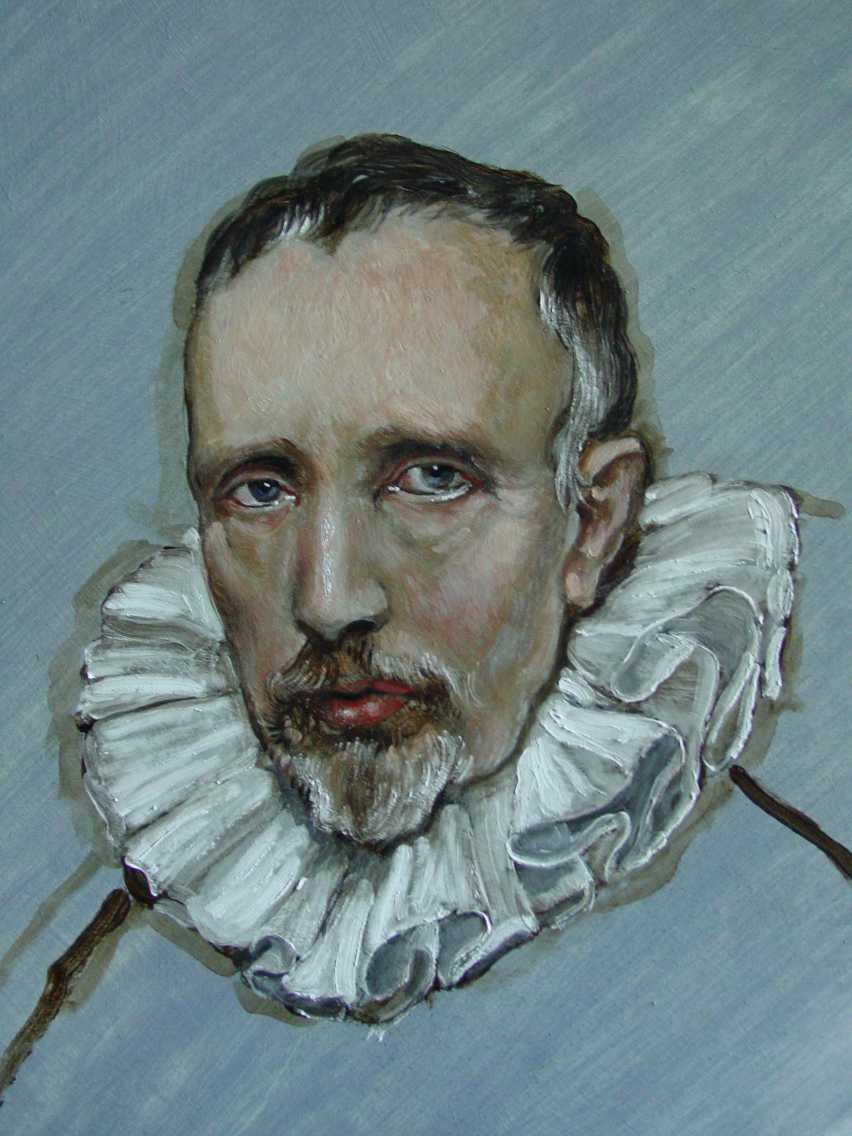
This last image shows results after some further additions. The entire thing is set but still 'wet'. Mr. van der Geest was glowing a bit harshly when I came into the studio this morning; and so I gave him another broad wash of the YO + VR flesh-tint-- but this time I added some white so as to create a scumble. This scumble was applied whisper-thin. This scumble not only reduced the hot glow of the previous glazes, it also helped create the effect of translucent flesh. I also mixed up a few opaque accent-colors to place here-and-there. Yes, you can mix these colors with some white; just don't cover any broad areas with these opaque mixes. They are accents only.
Melding was also performed gently with a large (1-inch) soft filbert brush. The clean brush was lightly touched into my solvent then deftly stroked over areas of the face so as to smooth and combine the various paint-layers together. Melding occurs because the solvent re-solves the set paint-layers evenly, without tearing or crumbling the paint. Melding is a very refined act of blending. Be careful! You can over do it. Stroke over the area a few times then quit and await re-set of the paint. Repeat until satisfied. You get the hang of it after awhile. If you attempt to meld with egg tempera, the layers will swell, tear and crumble; and it cannot be executed with emulsion-based paint, either. If you attempt the act with uncured oil paint then the paint surface will simply discombobulate because the simple oil-binder lacks 'set'; and of course, cured oil paint will not meld at all. Yet, ORIGIN allows this performance, and handily so.
Finally, using the same filbert brush, the ruff was thinly washed-over with a mix of ultramarine and lampblack.
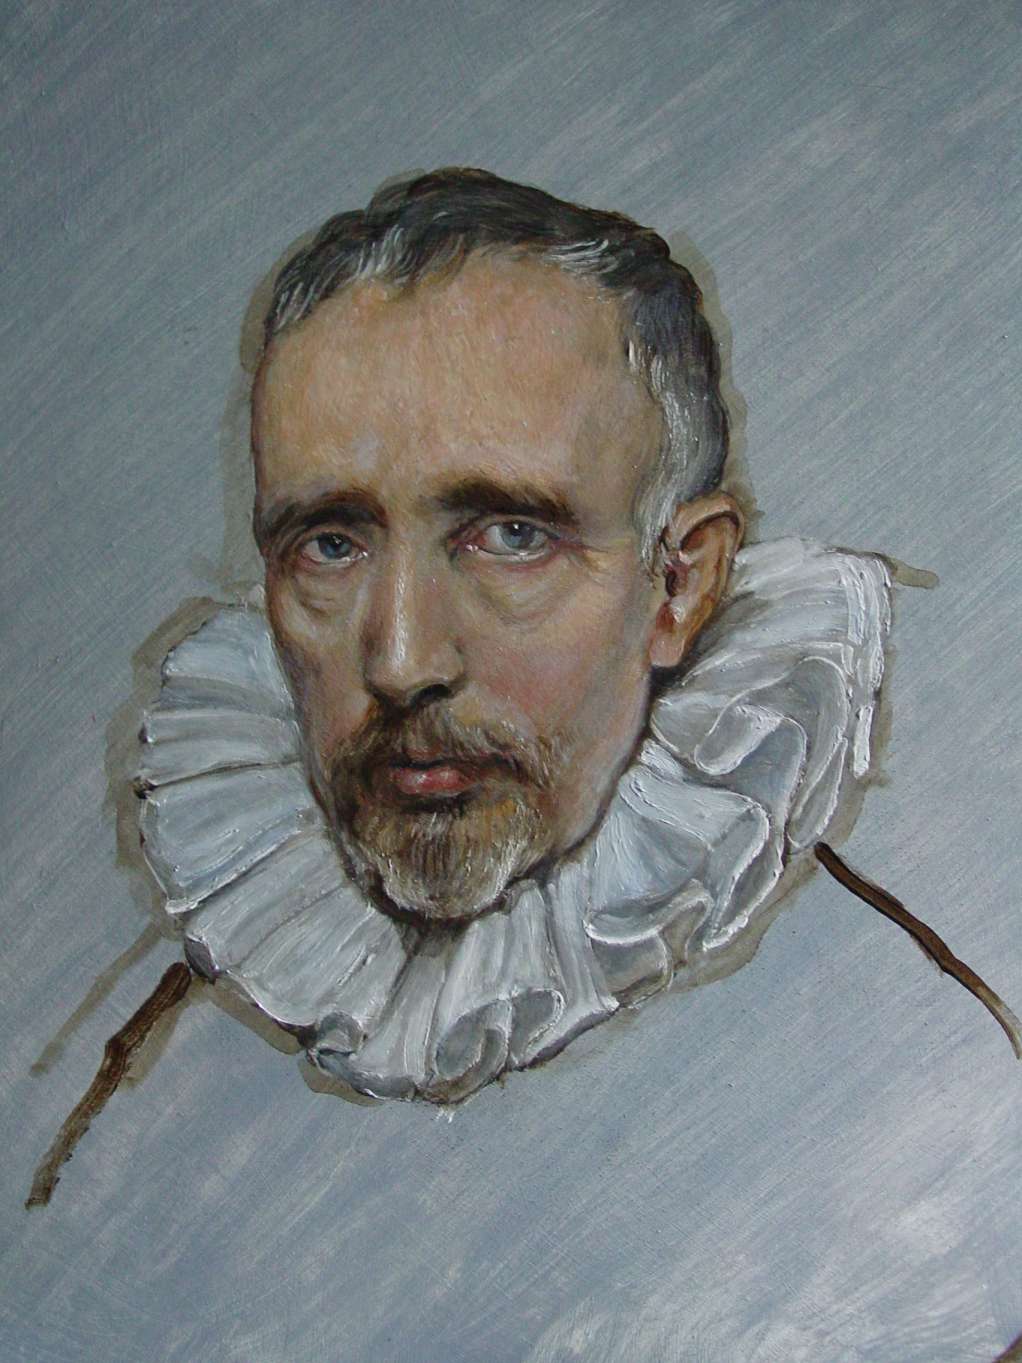
Well, I'm sort of happy with it, overall. There's no need to surround the face with a dark-ish background to create a sense of illumination; he appears nicely illuminated just the way he is. I wish I had my long-lost squirrel-tail brush*, the likes of which Vandyke probably used for painting individual hairs, as well as a few sharp, thin highlights around the eyes. If desired, you can do a right click and "view image", then magnify the curser to obtain a slightly larger view. Again, this is the optical grisaille approach and I am uncertain if Vandyke used it. This sort of modeled grisaille does not involve actual mixed-greys. Highlights and greys are simply produced through the thick-thin application of pure white over a mid-toned imprimitur and monochrome of the subject. More info concerning the optical grisaille and its historical use will be found on this older page.
This final image is an outdoor shot comparing the Geest copy based upon the optical grisaille/ORIGIN system to one of my own earlier self-portraits. My 1995 self-portrait was also painted upon a grey imprimitur and using the very same palette of straight oil-colors; however, I used actual opaque color-mixes for the self-portrait. Even on a dark grey day -- and even with the Geest being painted upon a lighter tone of grey, and with the face surrounded by a grey-white ruff -- the difference in intrinsic illumination between the two painting-approaches is apparent.
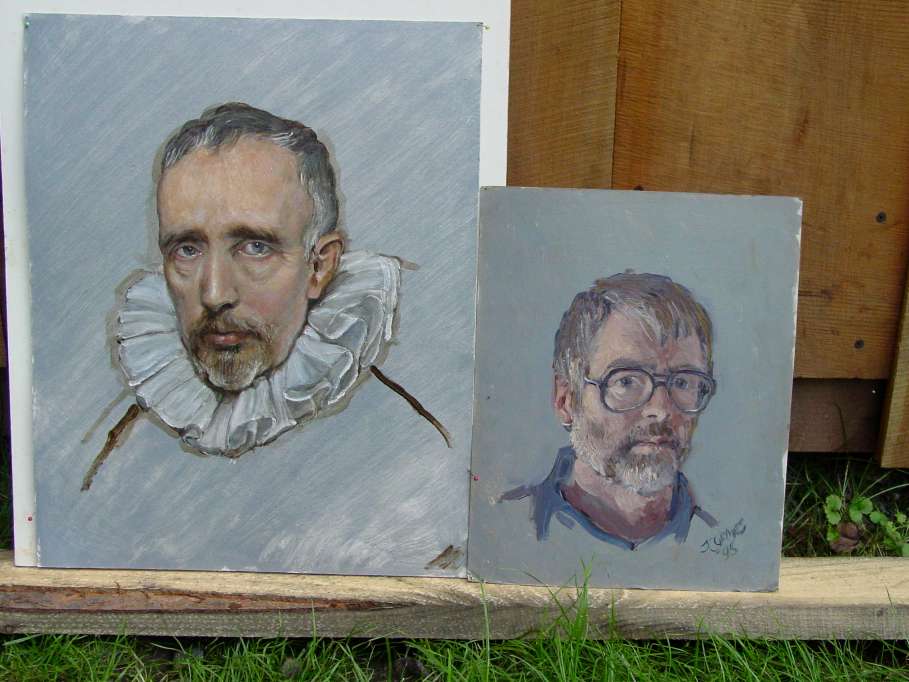
As revealed by the camera, the underlying pure and thick-thin white under-modeling of the Geest-copy transmits a certain glow through the thin glazes/scumbles of color; an effect that is completely missing within my opaquely-colored self-portrait.
* Update: I had to make a new squirrel-tail brush; then tried it out. Just so you know, a miniver brush made from the European grey squirrel was the most likely means for obtaining those amazingly tiny body 'hairs' so often observed in the brothers van Eyck productions. Here is an image showing what an inch-long squirrel-brush can do so quickly and easily when using solvent-thinned ORIGIN-bound paint. Applied upon a dry ground, the effect matches results here-to-fore only found using traditional egg tempera:
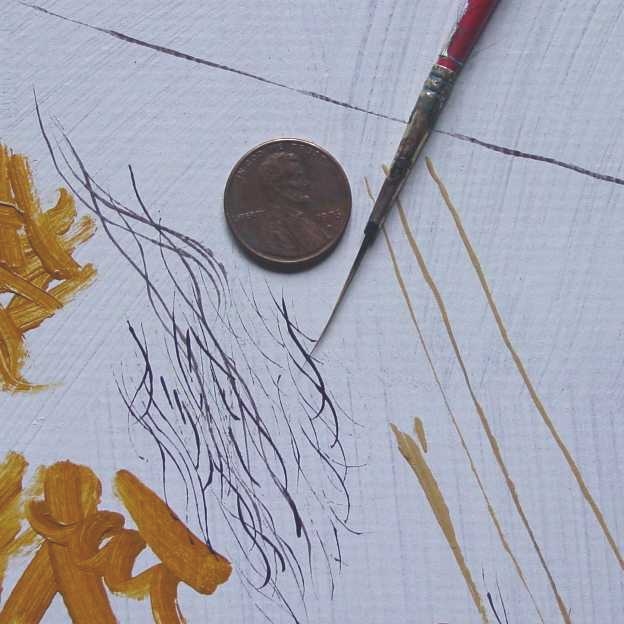
Below image is a detail of the hairs on Adam's chest painted by the van Eyck brothers (Ghent Alterpiece).
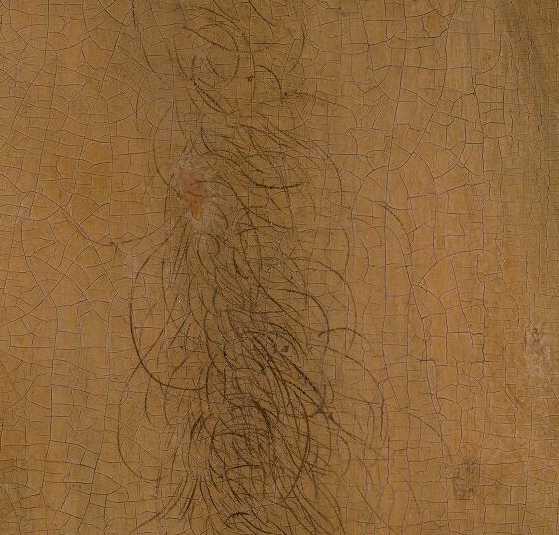
Now...what happens if I use a regular oil-resin varnish, such as amber or copal varnish -- or a thickened oil --as the pigment-binder? These varnishes and thickened oils are not congealed; and so even when thinned with solvent they appear more "blobby", creep, pull apart, or assume a 'skippy' appearance when applied, thickly or thinly, atop an already-painted but receptive surface, such as would be required in most normal painting performances. I demonstrate the effect in this image:
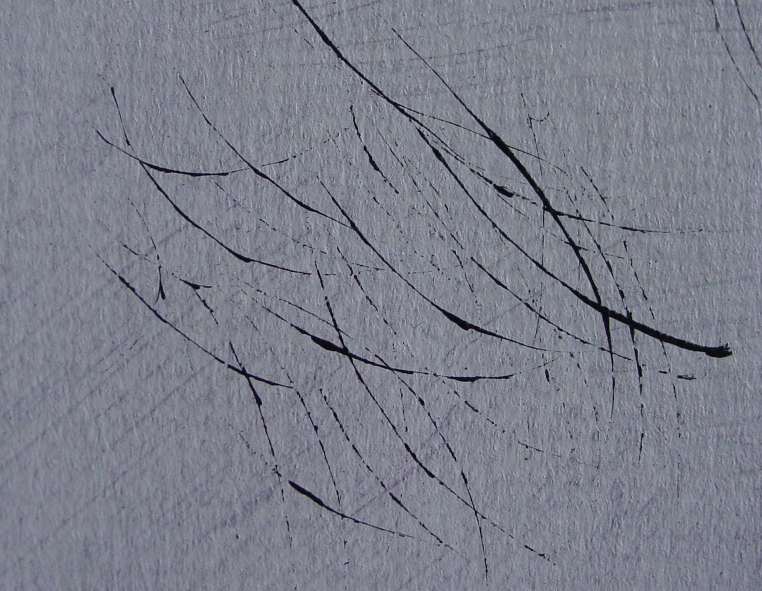
The above image seems to indicate the van Eyck brothers having utilized a congealed varnish, such as or in similar to ORIGIN Congealed Varnish; otherwise those smooth and consistant tiny brush 'hairs' would also pull-apart and become skippy-looking after application.
Note: I have recently read online of an exceptional and keen-eyed egg tempera painter, Koo Schadler, finding and pointing out the existence of numerous 'beaded' hairs showing in the Ghent Alterpiece "Adam" panel. In fact, I, too, can discern a good many skippy-'hairs' placed here-and-there within that area -- and do realize the surface of the alterpiece is very smooth and should easily thwart otherwise un-intended paint-skip. Curious seeing this 'beading', for why would a painter who plainly appears to have had the very means to make smooth consistent strokes ... then settle for creating inconsistent and 'skippy' (or 'beaded') versions? I suppose any man can become lazy in his task; however, the van Eyck's productions indicate a level of care and attention to details second-to-none. With this in mind, I have found another plausible rationale: I recall reading once that the Ghent Alterpiece had later additions performed upon it about the year 1550 by Jan van Scorel and Lancelot Blondeel. Thus, I suspect the possiblity those 'skippy' hairs were not placed by the van Eyck brothers; and instead by these or another painter who, yes, used either a strong and durable liquid oil-resin varnish, or a thickened oil as the binder-- either of which binder would have trickled and caused this effect, for it is innacurate to claim a liquid varnish or a thickened oil will exactly reproduce the paint-wizardry of the van Eyck brothers. Either binder will produce this same 'beaded' trouble. I will repeat that only a congealed oil-resin varnish is capable of reproducing egg tempera-like effects-- and that it must be used with a solvent in similar fashion to egg yolk and water.
The next image is taken from the http://vaneyck.kikirpa.be/ website showing a detail of the groin/leg area of "Adam". Note the even consistent lined 'hairs' versus the 'beaded' ones. Also notice that the beaded 'hairs' do not match-up with the typical length and curve of the smooth consistent 'hairs -- an indication of another artist's hand and medium at work.
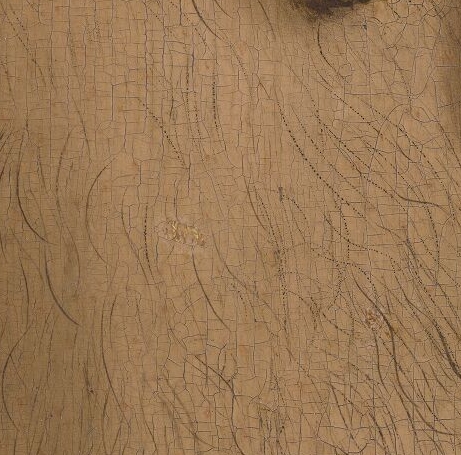
Does this mean the van Eycks used a congealed oil-resin varnish? No, for no one excepting the van Eycks could claim such; and yet it is another curious clue to occupy the reasonable and deductive mind. BTW, a careful perusal of Rogier van der Weyden's workmanship, who is often said to have known the van Eyckian ways and means, does not reveal the same ability to produce the typical long fine and consistent 'hairs' of the van Eycks.
For those souls who may be curious about the fecund theories regarding the medium of the van Eycks, here is a fairly accurate assemblage put together by Elise Effmann.
The seeking and theorizing continues. Recently, the gifted and knowledgeable painter/Maroger-enthusiast, Frank Redelius, introduced his own theory in book-form and just before he died in 2011. See Googlebooks, Frank Redelius, "The Master's Keys". Mr. Redelius believed the medium was a sun-thickened oil coupled with mastic varnish.
--------------
Excepting how ORIGIN is formulated for use as a binder with solvent-wet pigment (rather than using already ground-in-oil colors), the following original submission regarding my own search for "Rubens' medium" is retained herein, and with very minor alteration. The submission provides historical and practiced information concerning Rubens and his likely use of a congealed "hard" or "firm" varnish. As for the 'minor alteration', see the section below on asphaltum wherein there is added info concerning a recent MOLART study. That study found asphaltum NOT to be the notorous bandit blamed for the oh-so-many faults in the last few hundred years of craftsmanship; moreover, it actually finds asphaltum to be a much better and lasting performer within oil painting than those other historically thought-to-be-safer browns such as Cassel Earth, Vandyke brown, Rubens brown, and Cologne earth. You see, through current analytical ("scientific") analysis it actually proves-out that those creeping and fissuring brown passages found in many 19th C. and earlier works were often conjured with those falsely-presumed "safer" browns --not asphaltum. This study linked herein and below is a must read! Asphaltum is a much-maligned but wondrous brown pigment with a very long history of use, dating at least back to the Venetian painters of Titian's day. Asphaltum is also a key to many amazing works painted throughout the 19th Century. Use it as you fairly may; though, as with every other color, know its traits and limitations.
The Search for Rubens' Painting Medium; Painting with Solvents via the use of Resinous Varnish with Oil Paint
In his 1948 book, "Secret Formulas and Techniques of The Masters", Jacques Maroger made claim that a "mastic jelly" created by the mixture of a leaded drying oil with spirit mastic varnish was a major part of Rubens' long-lost painting medium.* He also observed the master's paint, characterizing it as often oddly granular in appearance. Maroger reasoned this granularity was likely due to its containing wax-paste. [* Maroger combined the 1830 guesswork of J.F.L Merimee regarding Rubens' supposed use of a thick "jelly" (constructed from cooked lead paste and spirit mastic varnish) with a falsely-attributed passage from Max Doerner maintaining VanDyck's use of leaded-oil and spirit mastic varnish as a "white jelly" medium for his colors (essentially a form of meguilp).]
Many followers of Maroger remain convinced to this day that mastic jelly, with or without wax, is indeed the basis of Rubens' painting medium. Unfortunately, as far as I have learned, no mastic or wax has ever been found in any Rubens' paint chip, though his paint quite often does betray the presence of pinene. This is rather bad news for Maroger because the construction of leaded mastic jelly (AKA his "Rubens' Jelly") does not require heating the mastic resin anywhere near hot enough to destroy this resin's inherent chemical "markers". In fact, spirit mastic varnish is often made without heating, at all. As for wax, that can also be readily-combined in oils and solvents via either a gentle heat or a 'cold' mechanical maceration. As little or no heating is required, wax or mastic 'fingerprints' should easily still betray their presence within the old paint chips-- that is, if they are truly involved in Rubens' paint; and yet, nada is yet found. Some believers claim the reason for this failure to ID any mastic or wax is due to the oil, resin, and possible wax somehow cross-linking over the years to create a completely different material. Perhaps, I don't know... but if true, then one must wonder why there is the finding of pinene? Wouldn't a coniferous-type pinene-resin cross-link, too? Again, I don't know.
These questions generate another group of today whose members claim Rubens never used resin varnishes, nor any resinous medium at all; and that his painting medium was nothing more than simple oil -- alone or with turpentine spirit -- or variously cooked or sunned combinations thereof. They say Rubens painted in a fairly 'straight-forward' manner with very basic materials. This group sees nothing unusual about Rubens' paint beyond what great talent can produce....and they pretty much base their suppositions upon modern day science's failure to find much of anything excepting oil and "a little pine resin" within R's paint. [Some maintain the 'pine resin' finding might be simply a trace left from Rubens' use of turpentine-spirit. I would doubt this, though, as findings of "a little pine resin" would explode rampantly among the paint chips of too many Golden-Age masters who also used that commonly-available spirit.]
Allow me to somewhat enter the fray with another possibility; but first, though, some thoughts about fools and foolishness. Seeking knowledge is not, in itself, foolish, though a seeker can easily become a fool. Like too many others out there, past and present, I have studied Rubens' work with intensity and performed far too many trials in re-creating his effects. I recognize others lay claim to his method, and I'm fine with that; though I must point out one insurmountable difficulty in our quest: Only Rubens knew what his method and medium were; and he will not reveal either. This remarkable painter left us some written clues, yes, but he never actually said what he used.
For noteworthy regards, Rubens did say he approved of sun-treated and leaded-drying oil. He mentioned using a solvent while painting and told Mayerne (who was sitting for his own portrait at the time) that he preferred turpentine spirit over spike oil. He also informed Mayerne that he added varnish to his paint*. Rubens referred to this varnish as the "hard varnish" (the adjective "hard" utilized likely in the sense of "firm", rather than our more modern classification of 'hard' or 'soft' resin-derived varnish-- which could mean Rubens' varnish was a firm consistance (or perhaps even congealed?). According to his own quoted words, Rubens possessed at least some rather intimate knowledge about Larch balsam and Silver Fir balsam. He also warned that his own oil paintings kept in darkness would sallow due to the oil-ingredient. Finally, and based upon at least one letter he wrote, Rubens was quick at painting-completion, and some of his canvas-works could be afterwards shipped rolled in a matter of days. [*Note: Rubens' contemporary critics maintained that he painted with too much varnish and that his paintings would not outlast him.]
We might also gain clues by closely looking at Rubens' actual paint; and after all, this man's paint has lasted well and has pretty much come down to us in a close-to-original condition-- and this may be stated apriori when one reviews the many historical visual descripts written and uttered over and about Rubens masterworks as they appeared through the dimension of time. To wit: Rubens generally painted thinly and made great use of transparent and translucent paint. Contrary to the words of some, Rubens' paint possesses a certain distinct character. For one, there are often found passages which seem performed by means of a thixotropic painting jelly -- hence the many current believers in Rubens' possible use of wax or a mastic jelly like megilp. Building on this thixotropic paint-appearance, Rubens somehow managed to utilize asphaltum in a way where it kept its place and could even be used as an underpaint. That, in itself, is rather astounding! More later, though. A third noteworthy mention comes from Maroger, who, we should note, was once chief conservator at the Louvre. Maroger had perfect and repeated opportunity to closely examine Rubens and many other master's paint. Curiously, Maroger often observed that aforementioned oddy "granulated" effect which sometimes occurred within all of Rubens' colors. Maroger decided this granular effect was not due to poor grinding of the colors*; thus he pronounced a wax paste as being involved in Rubens' paint. [* From Maroger's 1948 book, chapter concerning Rubens, pages 94-95: "All the pigments, whether in the impasto or in the glazes, are of a semi-translucent material and present the appearance of a rich mousse. The general tone of the paintings is suggestive of amber, but the most banal colors are seen to take on a precious, almost pearly quality. The glazes, even the most liquid, have remained where they were placed, without running. There are always to be found in this material very apparent granulations, whatever the pigment employed. These were due to the wax and cannot be attributed to poor grinding of the colors, for the masters were very careful about the quality of their materials, whether their paintings were executed by themselves or by their pupils." Additional note: Maroger also found a similar granulated appearance in Titian's and Tintoretto's paint-- thus making claim they, too, used wax.]
Well, that's about it for the historical and visual information concerning Rubens and his paint; and it is only a meager base to build upon. Accordingly, I make herein no claim to having uncovered "Rubens Jelly", or whatever. I only offer a possibility; and so I shall venture to the cliff-edge gladly but I will not jump over it. So declaring, I'll now share a plausible theory concerning Rubens' method and material with you right up front:
Peter P. Rubens began with lean oil paint-- generally nut oil rubbed-up with pigment*-- then he added a good dose of some sort of thixotropic varnish to this paint. This varnish effectively congealed the lean oil paint while also making that paint more transparent or translucent. He may have kept this tempered oil paint all ready to go by storing it within bladders; or he may have worked the varnish into his lean ground paint just prior to use; and at which time, he mixed into the tempered varnish-and-oil paint a requisite amount of either oil of spike or, his preferred solvent, turpentine spirit; afterwards, he proceded to paint with this solvent as his only medium throughout the work session. As to the mysterious varnish -- the varnish that made his paint behave in similar to a jelly or wax medium -- I believe that varnish was very likely based on either fir resin, or a combination of fir and some other related pinene-bearing resin. [ *Note: This was my thinking when I originally posted this report in 2008. I now suspect Rubens began with dry pigments, then "wet" those pigments with some turpentine solvent before adding his "hard varnish". In other words, I now hold notion that Rubens never added any oil to his pigments-- only the varnish and a solvent.]
Fir Resin "Wax"
Beginning in the later ninties, I uncoved the means for making jelly-like varnishes and mediums based upon pinene-bearing resins. I term these resins "S-P-F" resins. As with lumber yard two-by-fours, S-P-F simply denotes Spruce, Pine, Fir. I should point out that any and all of these spruce-pine-fir balsam/resins will almost certainly produce a finding of pinene, easily matching the finding of "a little pine resin" noted in so many modern-day paint analyses of Rubens' paint-chips. Interestingly, many of these S-P-F trees produce good and durable lightly-colored resins which can be utilized to make jelly mediums-- mediums quite similar in appearance and performance to mastic-based jelly mediums. Of course, these S-P-F resins were historically readily-available to craftsmen in Europe and other realms. Now, you won't find this shared information anywhere else, in book or website venue; yet these "jellies" exist and I have been working with them for more than a decade. I have been reluctant to offer these S-P-F type jellies only because I originally felt they might produce soft oil paint; however, today, after these many years of testing, I am assured this is not the case.
"Fir Wax" is my pet name for one of these S-P-F gels. As its name implies, Fir Wax is a concentrated congealed fir-based oil varnish. Fir Wax looks and behaves much like true wax; except it dries quickly to a very tough and durable film; plus it is glossy whereas wax produces a dull soft finish. This oddly-congealed varnish is composed of fir resin, walnut oil, and a traditional solvent ("turps"). This varnish toughens oil paint much more than fir balsam; plus it engenders faster-drying. Fir Wax contains no gelling substances besides the fir resin, itself. What I mean is, there are no gelling-agents such as aluminum stearate, wax, bentonite; neither are there oily paint-darkening bulking agents such as fumed silica, chalk, barytes, kaolin, etc.
The congealed condition of this particular varnish allows it to perform in many valuable functions. It behaves like a stabilizer in oil paint. It can be thinned with oil or solvent to create soft jelly mediums or wood coatings. I am of the opinion that Fir Wax works well with a system of oil painting using solvents and in a manner quite like egg tempera, whereby Fir Wax is substituted for the egg-component, and a chosen solvent takes the place of the water. I believe this solvent-based and tempera-like oil painting technique was likely discovered by the Van Eycks and later used by Rubens and many other Northern and Southern painters. Again, I cannot claim with certainty that it was their wonderous methodology, but I believe it so.
I should offer some basic standards here: A tempera-like oil painting methodology can work rather well if the right varnish is used to boost the binding power of the oil. Additionally, if the varnish can also congeal the paint, more solvent can be then incorporated into the paint and without fear of running or diffusion. Thin lines may be painted in an ink-like manner. Colors keep their place beautifully, and even the troublesome asphaltum will behave. Plus, no extra oil is ever required; only a solvent. This means colors do not yellow or darken with age, as happens when the oil constituent in the paint increases. With this solvent-application method, the paint remains lean of oil. [Note: Fir Wax transparentizes paint without the addition of yellowing oil-bulking agents such as fumed silica, aluminum stearate, chalk, kaolin, or barytes. Every one of these oil-bulking agents can allow a certain transparence/translucense to oil paint; unfortunately, each agent also greatly increases the oil-content of the paint, which will eventually cause paintings to become quite yellow and lower in tone.]
Fir Balsam?
Various lightly-colored unctuous Fir balsams such as Strasbourg Turpentine or the balsam of the European White Fir have a long history of use in oil painting. Writings tell us fir balsam was known and used to create spirit varnishes by Italian masters of the 1500's, such as Correggio. It was likely used by Leonardo, too. Fir was prescribed as a painting varnish by Armenini (1587), who gave recipe compounding the fir with naphtha, and directing it be mixed with all the colors and at all stages of painting. As a spirit varnish, fir was early on considered the supreme final coating for oil paintings. I maintain a strong hunch the Venetian Painters, as well as Peter P. Rubens, made use of fir balsam, in some form -- perhaps even the unusual form we now offer, which is a congealed fast-drying fir oil varnish.
Now, in its simple basic form, fir balsam offers some welcome benefits, though it is not perfect. For instance, the honey-like substance can increase gloss amazingly, but the balsam often sets up the following conditions: soft easily-dissolved paint-film*; creeping/running, diffusion/leveling on drying; long-remaining tackiness/stickiness; or the balsam may often fall out of suspension when mixed with thickened oils. Painters of today usually thin fir balsam with turps or spike but this does nothing to improve hardness and durability. Some mix the balsam with stronger agents, such as stand oil or a hard varnish. I believe there is merit in this approach as it provides the positives while diminishing the negatives of the balsam. [*The aforementioned Max Doerner was an early 20th C. advocate promoting balsams combined with oil paint to re-create the technique of the olden masters. His book is filled with such advice. Doerner's students carried forth his claims and all seemed pretty much positive until Helmut Ruhemann of the National Gallery performed 30-year-later cleaning trails on some of the students likely balsam-made works. Ruhemann wrote that he found discolored and soft easily-dissolved paint, which is something old master paint is generally not known for; on the contrary, OM paint -- especially that of the Northern masters-- is typically found to be extremely hard and resistant to solvent-attack. Ruhemann's findings might not be surprising when we realize that balsams, especially larch balsam (AKA Venetian turpentine), serve as plasticizers in paints and varnishes. Perhaps the lapse of thirty years is not sufficient time to allow curing of balsam-laden paint ...though that particular soft-keeping trait holds no appeal to myself. I should add that the inclusion of wax and mastic might have had a dirty hand in Ruhemann's claim; and of course, we who actually paint should necessarily take some heed against blindly accepting the words of any conservator, who like ourselves, is merely human, after all.]
Use of the Fir Wax with Solvents
As a congealed varnish, Fir Wax may be thinned-down with a solvent of choice then easily brushed-out or rubbed-out with the hand or cloth onto any surface, such as an oil painting or a violin, where it will function as a glossy filling coat that retains that gloss and can be set firmly within fifteen minutes or less; and fully dry within 24 hours. It possesses wear and water-resistance, produces an excellent longevity; and without any fear of running or spreading once placed.
When this Fir Wax is mixed with simple oil-and-pigment paint, the effect is also very much like adding a thick wax paste. The paint stands up and stiffens considerably more than wax, though. The applied oil paint sets firmly and can then be gently worked over again and again. Upon total paint-drying -- 48 hours or so-- the completed work will exhibit a fine gloss and require no further varnishing later on. Again, numerous solvent-thinned layers can be applied one-atop-the next by the use of this congealed fir varnish. As mentioned, this technique resembles egg tempera, though without the egg and water.
Now, very important, if you cannot or will not paint with solvents, this tempera-like method is not for you. If you wish to use an all-oil technique, you can add 25-30% drying oil to this varnish and create a medium similar to megilp; then use that as you would with regular oil-only paint-- but I am firm in my belief that the majority of olden oil painters --if they used this sort of congealed varnish-- used it in conjunction with a solvent, such as lavender, rosemary, naphtha, spike, or turpentine spirit. Solvents can be dangerous to health. OK, if you can tolerate solvents then do read on.
Expanding here, this unique varnish performs exceptionally well with a certain novel painting methodology, one which I believe was first introduced by the brothers Van Eyck. The technique depends heavily on the use of a solvent. You see, whenever regular oil paints are mixed with this fir "jelly", they may then be applied in a pseudo-tempera-like fashion, thinning the paint as you work to any desired consistency via dipping the brush in a solvent, such as turpentine, spike oil, lavender essence, or, the least desirable, common mineral spirits.
Paint compounded with this Fir Wax can then be thinned-down with pure solvent to the consistence of tempera (or watercolor) and still keep its place; and with great resistance against running or spreading.
Due to the solvent-use, brushing-facility is extreme. A loaded brush can create a stroke that can travel effortlessly for several feet across a dry and sealed priming before recharging. Thicker opaque paint rolls off the brush with an equally-effortless flourish, creating juicy highlights where desired.
As earlier noted, I have been personally testing this material off-and-on within my own paintings since the nineties. The paintings produced have remained clean and bright and the paint is exceedingly tough against solvency; much tougher than were I to have used any of the common balsams historically available. Fir balsam is very expensive but well-worth the cost for its use in oil painting craft.
Basic Oil Painting with Solvent: Problematic by Design
If I might back-up a bit here, it is well-known and long-known that you can 'oil paint' with some added solvent, say turpentine spirit, by simply mixing that spirit with your basic pigment-and-oil paint upon the palette, and then putting the brush to the canvas or panel. It is also well-known that you cannot add very much solvent to your paint, or else that paint will more-resemble powder than a cohesive paint-film. Fact is, a bit too much solvent and you will be able to rub the dried film off the surface with your finger. This is because oil mixed with more than a scant amount of solvent becomes compromised; it forms a weakly-bound material due to the oil being extended by the solvent. There is also a physical mechanic involved with this operation: The solvent soon evaporates from above the pigments while driving the now-weakened oil beneath. By this mechanic, the pigment becomes relatively 'dry', which means the final dried paint-layer is powdery and crumbly, as it is not thoroughly surrounded or encapsulated by the weakened binding oil.
If you add some resinous varnish to your paint then you can add much more solvent without reducing the latent binding-power. A decent resin varnish is not noticeably harmed by a solvent-addition. Resin varnish behaves like a good friend to both oils and solvents. The three ingredients simply behave better and remain better together. Certain proper resin varnishes will intermix with and carry the oil to the surface along with the evaporating solvent; thus effectively leaving the pigment properly encapsulated. The resulting paint will be durable and remain colorful.
Still, even with the resinous varnish added, the improved thinned-down oil paint may likely run and sag. In other words, the paint will not 'keep its place'. Also, though solvent flash causes a certain amount of "set" to the stiffening paint, this set may not allow any overpaint while wet. And so, even if you are using a proper and durable varnish you may yet have a paint behavioral problem .
A congealing varnish can 'solve' this malady by providing an increased 'set', or resistance to the paint after solvent-flash.
Sample Demo, Using Rubens’ Method ..... and Asphaltum
Aside from those traits already noted, the use of this congealed Fir Wax varnish with a solvent offers some additional attributes. For one, it allows a rapid paint-application; second, it fully supports the use of various known-to-be-faulty oil paints, such as carmine and verdigris, paints which cannot last in oil, alone, and must be bound with a pinene-type varnish, such to allow application with safety and durability. For another instance, consider the notorious true asphaltum, which I must necessarily mention because Rubens did often use it within his own lasting work.
It is known that the 1600's Dutch and other early painters were seduced by the beautiful but wicked asphaltum; and yet their work does not suffer any consequences, even when the asphaltum was used in the underpainting! This particular congealed fir varnish allows such use.
This closeup shows the lovely transparent color available to this fossil brown, that is, when you can tame it!
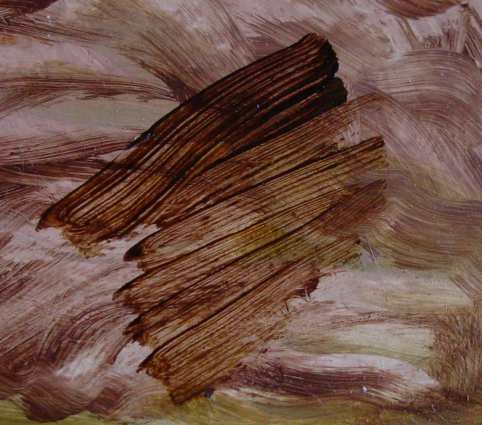
Asphaltum is a naturally-occurring hard glassy resinous mineral found in seams. It is quite stable in its natural form. Contrary to what has been written about it, true asphaltum is not the same as bitumen. Bitumen is what we typically term "tar", which is a plastic gook left over from crude oil distilation. Bitumen can also be made through the venue of coal-processing into coke. Bitumen can occur naturally in pockets here and there within the Earth's Crust. Some such pockets are often called "tar pits". Chemical analysis shows asphaltum sharing some of its constituents with petroleum-based bitumen; however, asphaltum is harder and not so easily caried into solution with a solvent. While both bitumen and asphaltum seem to have originated from the same or similar ethereal substance -- crude oil which naturally forms within the outer fringes of the hot Mantel --asphaltum would seem to have been physically 'cooked' to a much greater or longer heat. This resinous material appears to have been then jettisoned from the hot Mantle to the surface via large cracks in the Earth's otherwise stratified Crust. Thus, seams of asphaltum "rock" often appear in vertical veins perpendicular to the normal rock-strata. Asphaltum is not physically plastic at normal room tmperature. While under heat it does become plastic and even a thick liquid -- in great similarity to a pine resin. It crushes to a powder but must be melted into oils and spirits to show off its best attributes. Asphaltum has found a use in oil painting since at least the 1500's. Contrary to common belief, asphaltum forms the basis for a very durable and hard paint. For particular example, asphaltum was a major ingredient of that black laquer Henry Ford utilized on his Model T's. Bitumen could not have met that same performance. Owing to its harder and brittle nature, asphaltum must be combined with bitumen to create decent durable road asphalt. Anyway, understand from the start here, asphaltum is not the same as the plastic, physically weaker and softer bitumen. Myself, I would never consider using bitumen within an oil painting. But asphaltum? I have no real reason to fault its use. Asphaltum was carried into use by the old masters and it served them well.
I personally believe that much of the "asphaltum" used since the 1600's has been derrived from bitumen, instead of the true asphaltum. Whatever its basis, Moran, Cole, Church, Bougie, and too many other 19th C. painters loved the stuff. If it was based upon bitumen, those painters 'got away' using it only as a glaze layer supported by an overpowering varnish-carrier. By comparison, Rubens was able to use his true asphaltum in his underpainting; and his own phenomenal performance has been puzzling we moderns for nearly four centuries.
Asphaltum can be used to create an amazing and useful artist's brown --and with great permanancy ...though it also exhibits a fault or two.
The good aspects? Well, when transformed into a 'paint' by dissolving or physically melting it into an oil or solvent, asphaltum produces the most wonderfully-glowing and transparent golden-brown color; and when applied in its opaque top-color form, it shows off an intense 'burning' blackness. Also, when this weak-tinting brown is reduced by a slight bit of white, it becomes a pearly grey that goes well with flesh, clouds, tree-trunks, and so on. Asphaltum's weak-tinting attribute produces only a minor sombering effect when it's mixed with other colors; and so it can be used as an initial underpaint for skies, etc, where another brown might wreck havoc with superimposed coloring.
Yes, color-wise, asphaltum is perhaps the most exquisite brown ever found. Yet, it comes with a couple of nasty traits: Firstly, asphaltum is a powerful antioxident when common artist's drying oils are compounded with it. In essence, the asphaltum keeps the oil from polymerizing, or drying. That's bad; and thus, whenver choosing an oil as the carrier for this amazing brown, be certain -- as Mayerne prescribes in his manuscript --that oil is a strongly-drying one, such as one cooked with lead or manganese ; or simply add to that oil a good and proper siccative. Problem solved! The asphaltum paint will dry in a dependable manner and remain lastingly so.
A second fault concerns the physical character of the actual asphaltum paint. In a word, asphaltum paint simply will not 'behave'. You see, when the raw powdered asphaltum is melted into its oil carrier, the resulting brown paint will not keep its place on the palette, let alone the panel or canvas. It slumps and diffuses. It behaves rather like a thick dark brown varnish, which --no surprise --is exactly what it is.
Now, some 19th C. history-searchers maintained the apparent and amazing performance in 'keeping its place' of the earlier "Golden Age" asphaltum was due to it being conjured from a certain Middle Eastern asphaltum, one that was/is so hard that it out-performed all others. That dated rationale certainly sounds tempting to believe. I've never tried any Middle-Eastern asphaltum so I couldn't say for sure. Myself, I have only tried "Gilsonite". Utah-mined Gilsonite, which is named after the 19th Century fellow who promoted it, is so hard (fossilized?) that you need a good heat to combine the crushed glassy black-ish resin with a solvent. Again, that's the way it should be. Yes, Gilsonite is quite decent; and if asphaltum conjured from Gilsonite still creeps around on the palette -- and it does --then I can easily infer of no other asphaltum behaving any better. [Several Middle Eastern countries mine asphaltum. Turkey is one major supplier of true asphaltum. The mining companies also use the term "Gilsonite" to describe their mined asphaltum product, as well as to differentiate that hard material from regular bitumen. This foreign use of the term "gilsonite" leads me to accept a strong similarity in material; as well as a hefty reverence towards the American-mine material -- I mean, it must be good stuff if the other nations have adopted the same name "Gilsonite" for their own mined material.]
But again, the slumpy nature of asphaltum-based paint is a problem for the painter; after all, we painters desire our colors to stay as placed.
The early 19th Century painter/researcher J.F.L.Merimee was aware of the true asphaltum's intractible nature. He wrote in his 1830 book, "The Painter in Oil..."(page 33): "...asphaltum, which, whether it be dissolved in drying oil or oil of turpentine, is equally clammy and intractable, for it is impossible to keep it on the palette, or yet to spread it sufficiently thin upon any part of the picture, without its running beyond the bounds required." Merimee then passed along a recipe for creating artist's asphaltum oil paint which involved much wax and mastic within the paint-mix. He claimed this transparent brown would then "behave in the manner of Rubens". Merimee mixed lead paste ("oglio cotto", which is nut oil gently cooked with half its quantity of lead carbonate until the whole becomes a clear paste) with strong mastic varnish to create a substance he described as a pomade-like painting varnish. Thus he wrote, ".... when mixed with this varnish, that tendency (of asphaltum to spread and dry too slowly) is prevented, and it becomes as manageable as the other colours."
True enough, ample wax and mastic will engender a paste-like consistence and seemingly keep the lovely golden-brown creature from spreading on the palette. Myself, I would caution you would best forget about using this drying oil-based asphaltum within the underpainting. It goes against the 'more-flexible-over-less-flexible' rule. Your underpainting will eventually dry but it will take a long time. Most every other oil paint eventually becomes rigid; but asphaltum-in-drying oil may remain 'plastic' for too many years, stowing havoc upon whatever paint resides above it....and, repeating myself, wax will do anything but help in the final matter. If you require a bit of oil in your conjured asphaltum then make that a very little bit.
Making it behave within the underpainting ... primarily using a solvent-based asphaltum
My point in mentioning all this background is that the nefariously creeping asphaltum can be tamed to stay-put. According to my own trials, this wayward but beautiful and seductive color can be applied easily and without further consideration by use of the Fir Wax. It will actually be firm enough to paint over in a matter of minutes, endowing the normally wicked paint with a wonderful attribute towards laying in the preliminary sketch in 'washes'; which is precisely what Rubens used it for.
Now, I'll state up front that I did find some success by Merimee's "pomade" route, that is when I used basic Gilsonite conjured with a solvent and without any oil. Indeed, the mastic-and-lead paste combo gave the solvent-based asphaltum some needed 'backbone', allowing its use in a manner visually similar to Rubens' approach.
Still, the Merimee pomade's performance was less than stellar... and, it should be worth mentioning again, one must wonder why there is no chemical 'footprint' of mastic found within Rubens' paint?
As a visual comparison, the following image shows Gilsonite asphaltum dissolved in turps; and then-- at time of use-- combined in equal amounts with (1) Fir Wax (2) Megilp (3) our own Gelling Copal Varnish mixed 1:1 with nut oil, and (4) Merimee's lead paste combined with mastic varnish 'pomade'.
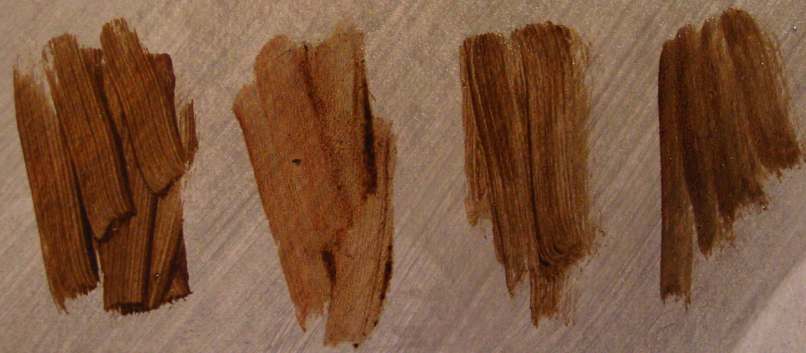
The asphaltum mixed with Fir Wax retained the brush-hatchings exactly and was solidified enough to paint over in 15 minutes. The second sample created with megilp (Maroger's Rubens' jelly but w/o wax) looked softened from the get-go. It remained wet and refused to solidify for four days, which allowed the brush-hatchings to completely diffuse. The third sample created with Gelling Copal Varnish kept the brush-hatching rather well, too, though it could not be overpainted until it was dry-- about 24 hours. The fourth sample made using Merimee's lead paste and mastic varnish pomade produced soft hatchings but was capable of being painted over in fifteen minutes-- all-in-all, not so bad.
Creating Asphaltum 'Paint'
Having made asphaltum in too many different ways, I can supply some small guidance in its creation: First, don't make it as Merimee prescribes by adding wax* and mastic. Also, use the solvent type in preference to the oil-based; that way you can use your asphaltum in the underpaint, while adding a bit of oil or oil medium for the more-elastic overpaint. I repeat, there is no reason not to use asphaltum, as long as it is made using true asphaltum and not bitumen. Do not, as some historically-advise, burn your asphaltum to a cinder; then re-grind that residue into a drying oil -- that approach destroys the glowing wonder of the color. In such case, you should just as well skip it altogether and use burnt umber, instead. [*Note: Burning bitumen may convert that critter into an actual asphaltum. Also, wax is an oil-bulking and paint-softening agent within oil paint or painting mediums. If you must use it, keep it to a very minimum to achieve your intended effect. True, great oil painters since the 1700's have added wax to their colors to make them behave in similar manner to the old masters; however, Eastlake accurately informs the careful reader there was never uncovered any written evidence whatsoever maintaining the old masters using wax in their craft of oil painting.]
The very best method for making asphaltum, such that it shall exhibit all its charms yet serve you without fear of change, is to gently heat it with an amount of solvent in a boiling water bath. Keep the oil out of it --that can be combined when adding a medium. Still, and as Merimee points out, using the solvent, alone, will not stop it from moving, spreading on the painting or palette. Something more must be compounded with it at the time of actual painting to procure its best use. That's where a proper medium comes in; and so again I must maintain a strong belief that Rubens' medium or varnish-- whatever it was-- performed admirably when used to temper his own asphaltum for use in the preliminary sketch. [Groves' recipe for making spirit asphaltum: Place 1 tbls. powdered Gilsonite and 1-1/2 tbs. of mineral spirits into a clean baby-food type jar. Place the jar in a roiling (not full-boiling) pot of water; the water being about an inch in depth . Begin stirring the mixture while it heats in the roiling water bath. The mixture will soon become thickened as the Gilsonite melts, but keep stirring until it again becomes free. Done. If the jar moves while stirring, hold it steady with tongs. The entire process takes 4-5 minutes. Place a drop of the hot asphaltum upon a sheet of glass. It should cool to a soft blob which can be easily pushed and pressed with the knife, so as to allow free mixing with varnish or other additive on the palette. If too firm, mix-in a tsp. or more of turps while still hot, and again test consistency. Repeat until satisfactory. Put a lid on the jar.]
As shown, this Fir Wax works wonderfully for the purpose. You simply mix it half-and-half with your solvent-based asphaltum whereupon it will then work perfectly beneath the brush, keep its place, and be firm enough to paint over within half-an-hour or less. Based on my several years trials, no harm will ever come to it. Apparently, without much oil being involved, the solvent-'melted' Gilsonite pretty much remains as it became over time-- hard. This makes total sense, really. I hold some measure of belief that this is the manner in which Rubens used this usually troublesome paint; and with such lasting success ...though, as always, I cannot declare it..
One final mention here: Mineral spirits is the somewhat better choice as a solvent for the Gilsonite. Be aware that when using turpentine spirit as the solvent, your conjured asphaltum will, in a month or so, become too plastic and gummy for best use. It will "liver", meaning it will become rubber-like and clotting within its container. The turps-thinned asphaltum is showing signs of somehow becoming polymeric. The heating with the solvent has awakened something long dormant within the glassy brown material; and this then alters the working properties. The malady can be somewhat countered by mixing-in a bit more turps, which will keep it for a few more months, though it will not be as well-behaved as when freshly-made. The livering effect is lessened when using mineral spirits. Perhaps the best thing to do is make-up your fresh asphaltum in small amounts when required; or just keep it in the fridge.
Update April, 2011: Within the past decade, members of MOLART have been involved with the study of asphaltum, bitumen, Cassel/Kassel earth (AKA Cologne earth), Vandyke brown, and "mummy". One of their goals was to find and establish "benchmarks" for identifying these various historical browns -- organic colors which so easily thwart and escape the limited capabilities of our modern day instruments. Overall, what the researchers found was the earths and Vandyke browns (essentially low-grade coals) contain much organic humus (rotting vegetative matter) which lead to eventual fading, wrinkling and shrinking/fissuring. Natural asphaltum in a solvent solution or drying oil was found to be inherently the least problematic and most successful of all these seductive browns. Of course, this finding goes against the wisdom of so many, past and present, who claimed asphaltum the cause of such disaster during the 18th and 19th centuries. Instead, so many disruptive brown oil paints thought to be asphaltum were otherwise found to be varieties of Cologne/Cassel, or Vandyke browns-- or natural bitumens composed of raw oils and agents that caused it to never solidify. [Some artificial asphaltums, such as that derrived from coal tar, were also found to be problematic/never-drying.]
During the lengthy study, samples of asphaltum oil paints were constructed with a modern-day artificial asphaltum derived from bitumen (Shell Oil Company VEGA, a close match to a benchmark naturally-occurring Middle Eastern asphaltum) and using historical 18th and 19th century recipes found in Merimee (asphaltum melted into various meguilp jellies and waxes) and Williams ( "Antwerp browns" made by burning the asphaltum to a cinder then grinding the residue in oil). The resulting sample asphaltum paints were subjected to aging and other tests to judge durability and stability. The findings were interesting. To wit -- and not surprisingly --slow-drying issues encountered with asphaltum oil paint passages arise from its being prepared using regular untreated painting oils. Without the use of additional driers, such raw oils succumb to asphaltum's anti-oxidative properties and become VERY slow-drying. Other deleterious effects arose from adding waxes (Merimee), or even combining asphaltum with vermilion to create lovely flesh-tones. [The Williams cinder-approach worked well but harmed the wondrous color of the asphaltum; then again, I should add here that once the original bitumen was cooked into a state matching true asphaltum, there really was no need to go this additional step.].
In other words, when prepared with a fast-drying oil (i.e., oil prepared with a siccative), the asphaltum paint did solidify properly and seemed perfectly safe, causing no actual harm to the painted work (again, though, don't use an oil-based asphaltum as your underpaint or monochrome). Thus true asphaltum, in and of itself, is not the 'n'er do well' culprit deemed such by so many. Instead, it would appear the various agents heretofore utilized to conjure the asphaltum paint and to make the paint BEHAVE itself have played quite a hand in that paint's eventual instability. I want to mention that it is unfortunate the researchers uncovered no other historical methods to allow asphaltum spirit and oil-based paint to �keep its place' upon the palette. I have personally spent many years using the S-P-F congealed varnishes (such as Fir Wax and ORIGIN) based upon Spruce, Pine, and Fir-- and Venetian Turpentine. All Gilsonite-based asphaltums seem quite stable via combination with these congealed varnishes. Of course, the finding of pinene in so many samples of Rubens' paints allows me to somewhat speculate the master may have also been aware of these various coniferous-based "waxes"--every one of which would very likely provide the same finding. [Additional Note: In the early 1600's, Mayerne provided a formula for creating asphaltum. The recipe called for simply melting the crushed asphaltum into a strong drying oil. Based upon this MOLART study ...and recalling Mayerne's recipe ...asphaltum should be considered perfectly safe.... though I still caution against its use within the underpainting.
The lengthy 2010 MOLART release can be accessed here:
Now to painting....
The following is my own rendition of painting in a Rubens' manner. I shall illustrate the method within a landscape instead of a figure-piece. Do not complain, for Rubens created many landscape paintings. Landscape painters also desire Rubens' technique; in fact, the second generation Hudson River School landscapists sought his method with a fever -- though they often resorted to having some wax in their mediums to attain it.
Important. Do not attempt this method using a modern day acrylic gesso containing chalk; at least not without sealing that acrylic gesso first. The chalk ingredient will present a rough and absorbent surface which destroys your costly brushes and generally thwarts transparent/translucent paint-facilty and brushstroke-retention. Also, stay away from chalk-bearing oil-based primers, as these, too, can somewhat harm bristle and suck oil from your paint. It is a mistaken modern-day notion that a gritty mechanical agent is required in an oil ground that will be covered by oil paint. No, not true. Of course, as king of your realm, you are free to oil paint directly onto an absorbent ground; but this was not Rubens' way.
Rubens used a chalk gesso ground on wooden panel. As I understand it, he even used this on a heavy woven canvas, too, as did many other old masters. The gesso was sealed by a coat of hide glue before any oily agent became involved. This glue coating kept the oil from ever finding its way down into the gesso. Above the glue Rubens applied an oil-based coating, usually an imprimitur; though it can also be a simple thin coating of drying oil; or drying oil mixed with some varnish. This dried oily coating atop the glue helps the solvent technique perform properly; and without it, the glue coating, alone, causes too much solvent-attack upon tender applied colorings. The result is a sort of 'melting' effect-- which some painters may like and take advantage of but, again, a visual inspection of the master's thinned paint indicates this was not R's way.
Following the Rubens approach, I first prepare a panel with chalk-hide glue gesso; or, in this quickly-put-together case, I grab a piece of heavy white paperboard. I can draw my design easily upon the tooth of the smooth raw gesso, (or upon this white paperboard); then, very important, I must completely seal the gesso (or white paperboard) with a single coat of pure hide glue. Again, I do not desire any oil or varnish being absorbed down into my gesso (or paperboard). The hide glue is perfectly sealing. It also dries very quickly and actual oil painting may begin soon after.
Now--very important to the function of the solvent technique-- before beginning to apply my composition and coloring, I wish to first demonstrate the application of a thin translucent varnish-and-oil-based imprimitur atop the glue coating. This imprimitur is an old device dating back to the Van Eycks. An imprimitur is translucent, allowing the white gesso ground to still have a sway with the colorings applied during actual painting. An imprimtur diminishes the overall optical brightness of the white ground while allowing the drawing, which was accomplished on the naked gesso underneath, to remain visible. The dried imprimitur also presents a pleasing and receptive surface upon which to begin your rub-in or coloring. Oil painting atop the bare glue sealer is, by comparison, quite unpleasant.
An imprimitur aids the transparent/translucent painting methodology by allowing several positive actions. The various transparent or translucent colors laid in atop a toned-down ground (imprimiture) gain a certain solidity and uniformity by decreasing the stainy flimsiness which can often and otherwise become unpleasantly-apparent; and this being due to the stark white ground showing through the thinly-applied coloring. Pigment graininess, dust, or other glaring faults seem to recede or entirely disappear by this simple light-reducing remedy. Darks can also be thinly-applied without need of loading on the paint. Without such loading, transparent shading more easily gains power and increased depth from the tone-down, too; ditto the brightening power of lead white touched-in later on when it is called into play to provide highlights atop the midtones. A colored imprimitur can also add to the general over-all atmosphere, swaying applied paint-colors towards warm or cool. [ For instance, in a landscape, using an orange imprimtur will tone applied translucent or transparent colors towards a sunrise or sunset time of day. A grey imprimitur tones translucent/transparent colors towards mid-day illumination. By use of this route, the very same basic colors applied translucent or transparently will shift in color-temperature.] As a final added bonus, the thin dried oil/resin-based imprimitur provides a wonderful surface that is so pleasant to paint upon..
I desire my imprimitur to dry quickly so that I can be at work on the morrow. For this particular grey-ish imprimitur, I take lead white and make it into a lean thick oil paint by use of some siccative drying oil or some sun-thickened walnut oil. I add just the merest speck of lamp black and re-mix to a mid-tone grey. Next, I add about 50% (half-amount) of the congealed Fir Wax. and re-mix the paint and congealed varnish together. I use the tip of my knife to scrap the "wax" from the surface in the jar. When I then mix this Fir Wax with my paint it creates a granulated grey. You generally have to look closely to see it. You will get this slight grainy effect with every color and the paint will dry with that effect, too, if you wish it. Adding turps and thinning the paint does away with it, to a large or complete extent.
OK, my grey imprimitur paint has been well-mixed with the "wax" varnish. It is now congealed. I'll need to thin it down for quick and easy application. To do this I add turps, or whatever solvent I desire, by dribbling it off the dipped-knife, mixing it thoroughly into the stiffened grey paint, producing a soft but still standing and exeedingly ductile fluffy mass. This sort of paint is full of solvent yet it retains a ductile resilience beneath the brush-- all due to the congealing Fir Wax varnish-addition.
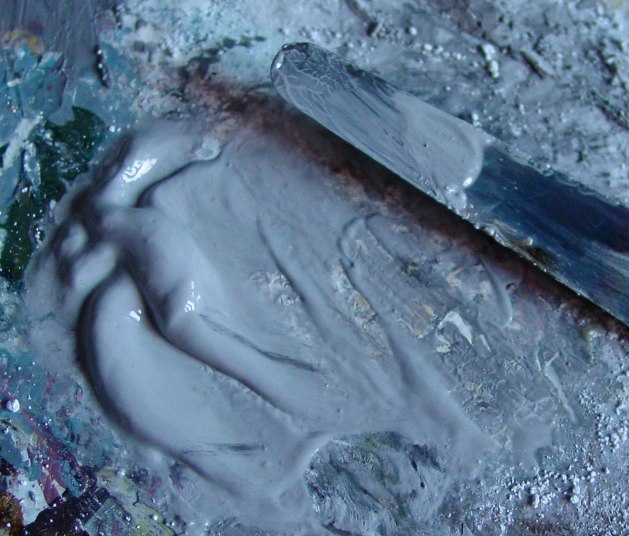
Taking a big brush, I apply this translucent paint quickly atop my glue-sealed heavy paperboard, thus:
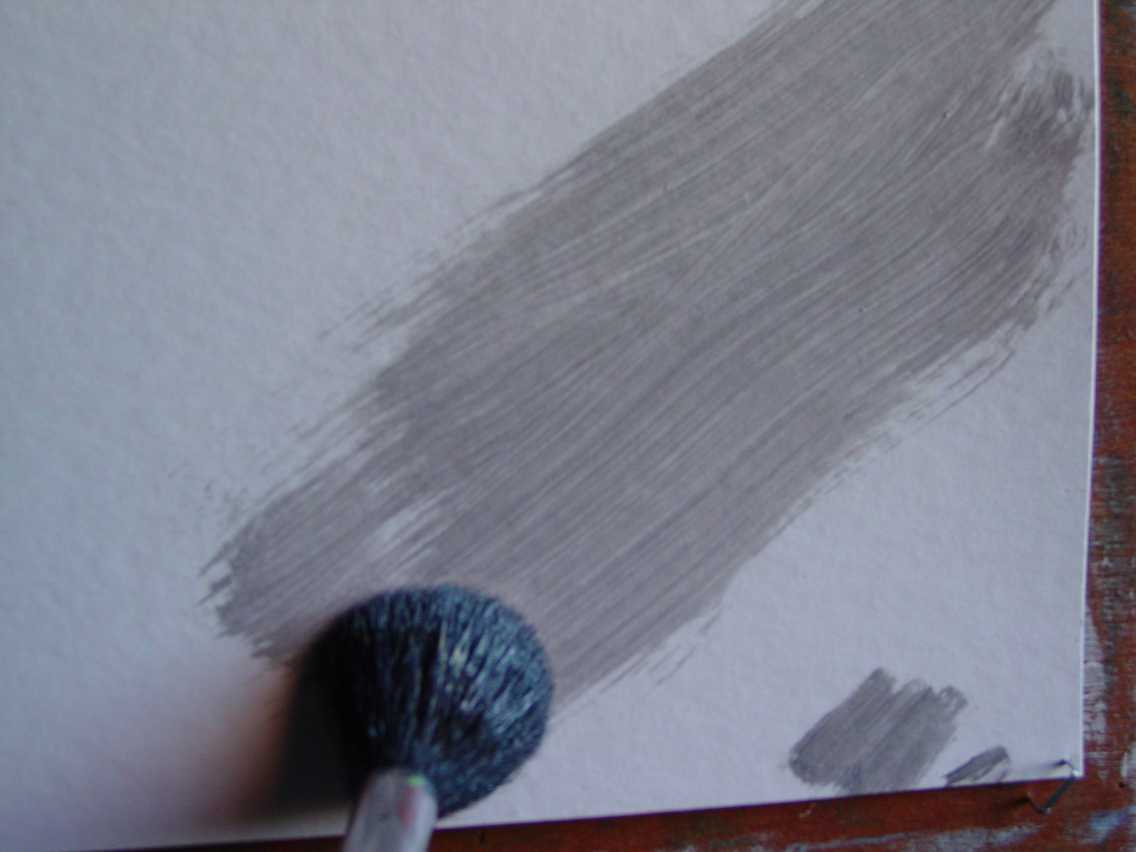
I go over the whole paper-board and even-out the imprimiture. Note how the brush marks become visible in micro-line hatchings due to the white ground shining through. I do not know what implement was used by Rubens to apply his imprimatur. He may have actually chosen a natural sea sponge, which will quickly and effectively cover the work surface, producing the very same striations as the brush. Now, you may rid the work of these lines if you wish by continuing to go over them with the brush as the paint sets. Rubens generally left the streaky lines visible. Maroger claimed these visible striations added a certain optical energy to the painted effect. Myself, I don't know why Rubens did it. Perhaps the striations gave visual indication as to whether or not the over-paint was sufficiently obscouring; and if the striations were still visible, then another wash of obscuring color was called for... Who really knows?
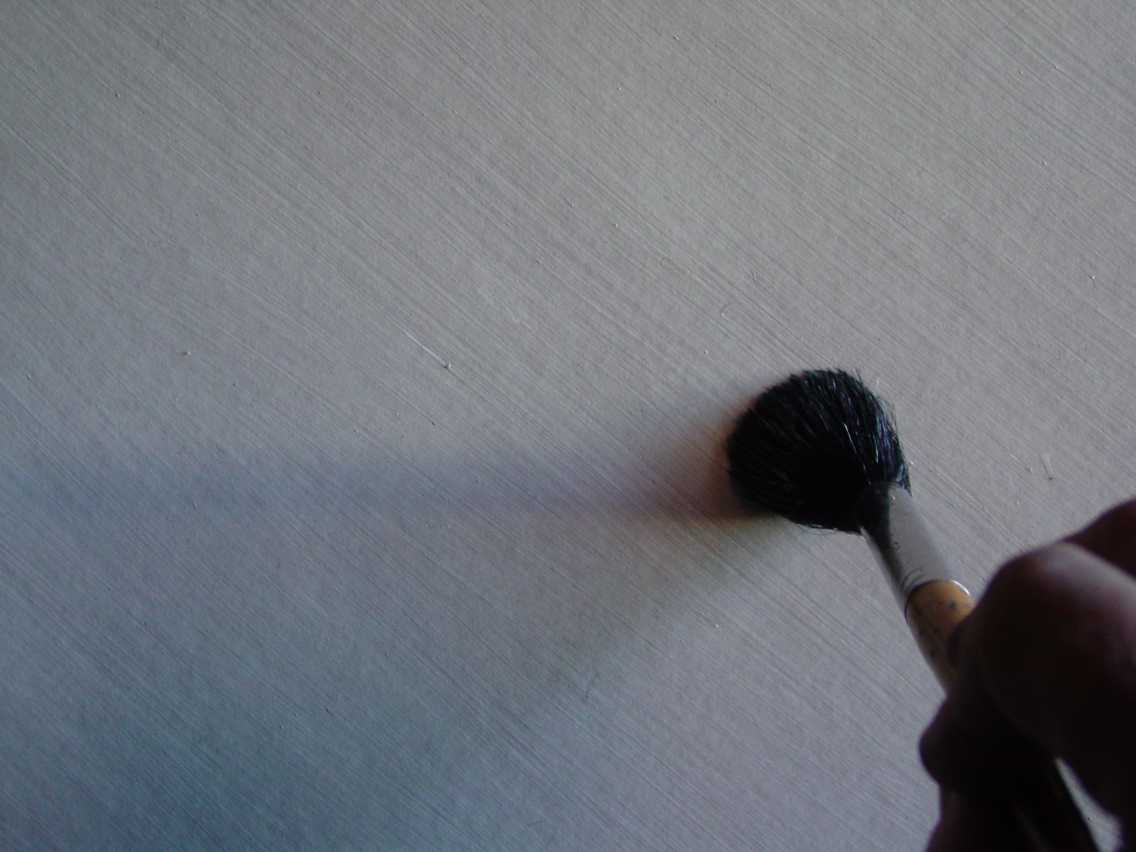
I allow this imprimiture to dry a day; or a few hours in sunlight will also suffice.
I now take some solvent-based asphaltum and mix that with an equal amount of the Fir Wax:
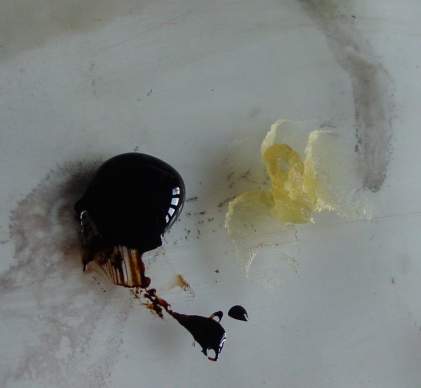
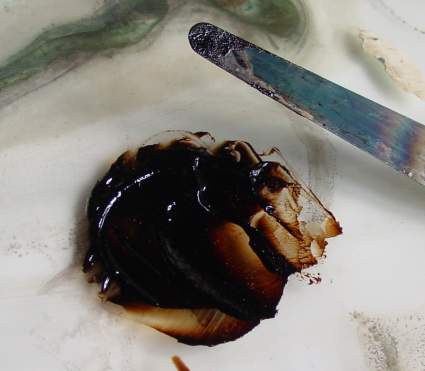
Now that my asphaltum is ready, I dip my drawing brush into solvent, then swirl my saturated brush into my asphaltum paint-pile to make a suitable drawing and sketching wash. Important! There is no oiling-out or need to lubricate the ground at any time within this technique. This means my paint will stay lean of the inherently-yellowing oil; and so it will remain bright.
I begin drawing in my design. Due to the congealed effect of the asphaltum plus some judicious solvent, I can draw effortlessly upon the dry imprimitur while capturing the hair-marks of the wet drawing brush. It appears as if I am painting in oil but this is solvent. I'm using Taklon synthetic brushes for this solvent approach. Sable or Taklon brushes work well, the fine hairs holding the solvent as it is carried from the bottle into the paint piles; then carrying the charged paint onto the work.
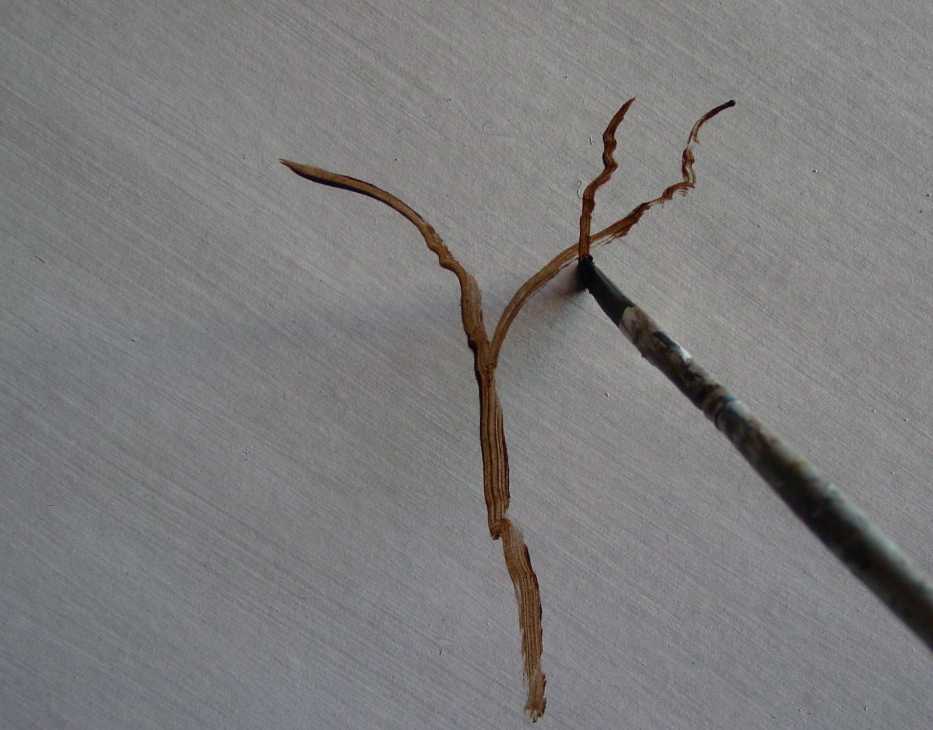
Note: As mentioned, many Dutch painters drew their design atop the raw gesso with a chalk or some sort of carbon -- sometimes even inking it over -- before sealing it with hide glue. For this demo I have no need for this preliminary drawing step, as I am simply making a design on the fly, inventing as I go. And so I sketch in a rough drawing atop my dried imprimiture.
Continuing with the quick brush-in.
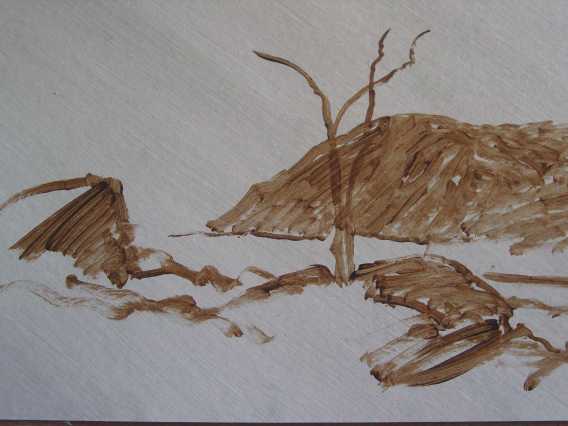
Notice in the following extreme closeup image that the striations of the underlying grey imprimiture show clearly through the transparent brown asphaltum paint. This is quite typical of Rubens' sketches; and some of his larger works, too.
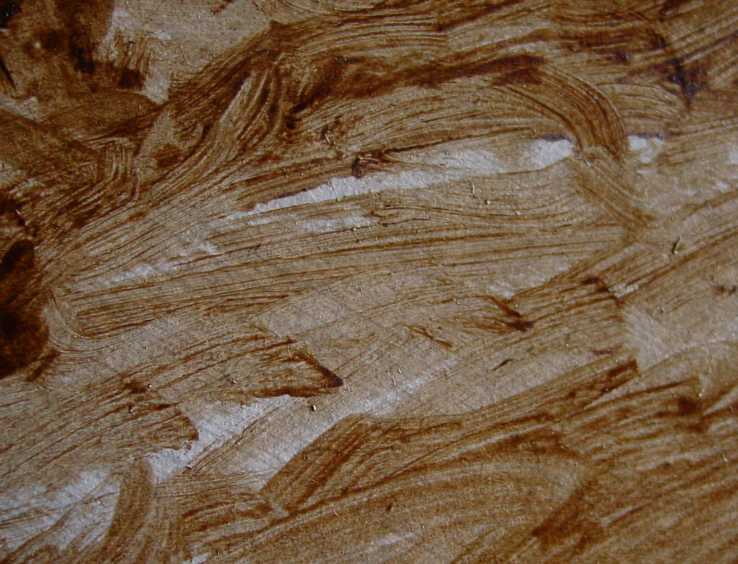
The next image shows the few colors I'll be using within this sketch. All receive approximately 50% to equal amounts (100%) of the Fir wax (iron oxide red at far right, which is a powerful tint and requires about 150%). Note how the mass tone of that iron red approaches the brightness of medium cad red. This wax-like varnish suspends pigments and engenders a noticeable simmering glow upon the colors. Anyway, exact amounts of the jelly are not so critical. You need enough to extend the paint into a transparent/translucent condition. The exceedingly powerful lampblack requires about 200%, while lead white may need about 25%+, depending on how 'solvent-tough' or translucent you require it to be. These decisions come through experience; it's not so critical, though. The Fir Wax will suspend and extend-out the pigment particles but there will be no eventual lowering in tone, as would happen when using oil-filled bulking agents (aluminum stearate, wax, chalk, or a fumed-silica gel).

If I were using a drying oil or megilp to apply my asphaltum, it would take days to dry --which effectively and completely negates any use as an underpainting. But not with this congealed fir varnish. There is no need to wait long for the asphaltum to set-up frmly. With set-up, I can now begin to "watercolor" my sketch with transparent/translucent paint mixed and applied by dipping my various brushes into solvent, just as I did with the asphaltum.
Here I am mixing up some blue for washing-in the sky.
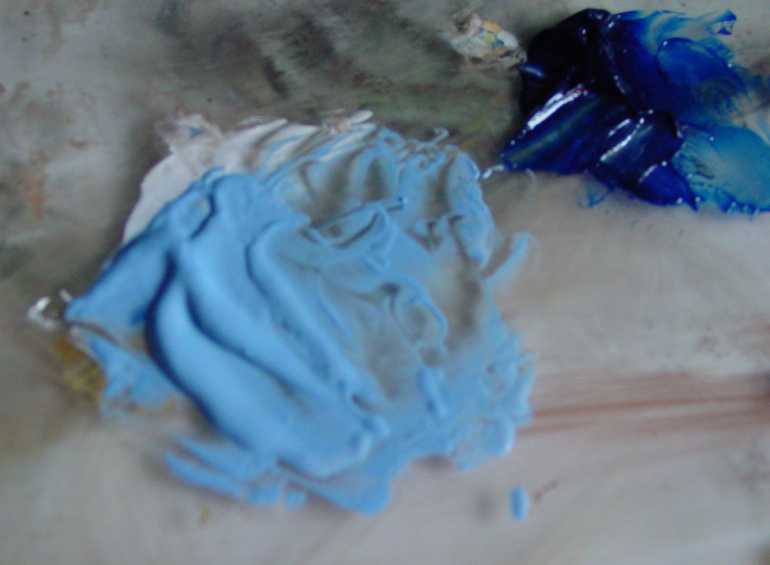
Be aware that this solvent-application of paint is tricky. The application of the imprimitur above the glue-sealed gesso is quite helpful in the scheme, allowing the 'older' paint-layers to better resist the subsequent solvent-attack which occurs with each new layer (if you prefer to retain the pure white arising from the glue-sealed gesso, instead of a colored imprimitur, you should apply a coating of quickly-drying oil-- which is raw oil mixed with turps, a few drops of a drier, and some varnish to better harden it).The general rule is to apply the newest layer quickly then leave it alone until set ; or, if you wish utmost safety against solvent-damage, allow the last coloring to fully 'dry'. But as regards the first approach, after "set" returns, you can refine and blend, and carefully manipulate what has been laid down. But be careful, for to blend tender layers of "set" paint, you neeed to take Rubens' advice to Mayerne, which is to lightly dip the tip of your brush in solvent then facily stroke over the parts to be blended. Do it gently, quickly and no more than twice; otherwise you will likely pull-off the thin paint-- which can be a good thing if correction is required. And I caution here, especially if one is using mineral spirits, not to try and blend by force as the tender paint will crumble into tiny bits and specks. Use turps or spike, instead. Be deft and watch it as you go. If you see crumbling, use the solvent-moistened brush to stroke the layer back together.There is a sort of "plated look" created by this quick application of washes or glazes. You have to plan a bit. It will take much practice getting used to it. There is only so much I can relay by use of these images and basic descript. [Note: Rubens was not much into blending. He seems to have placed his paint on and left it mostly alone. If blending is your forte, await the drying of the Fir Wax paint then switch to an oilier or all-oil technique for your final layer/s. As a general rule, the more oil in the paint, the easier the blending; while the more Fir Wax in the paint, the less the ease in blending and the more the paint will resemble tempera.]
For example, the sky is a broad and rather uniform area. It will demand a well-loaded brush. Mix your requisite sky color blue, thin it down to a silky-cream and you're ready. Select a proper soft and wide brush for the job at hand. Apply the wash quickly and broadly and never mind going 'outside the lines' or painting over the asphaltum sketch. You will still be able to see it. Leave the blue off here and there for clouds, as the grey imprimitur makes a perfect base for later cloud-development.
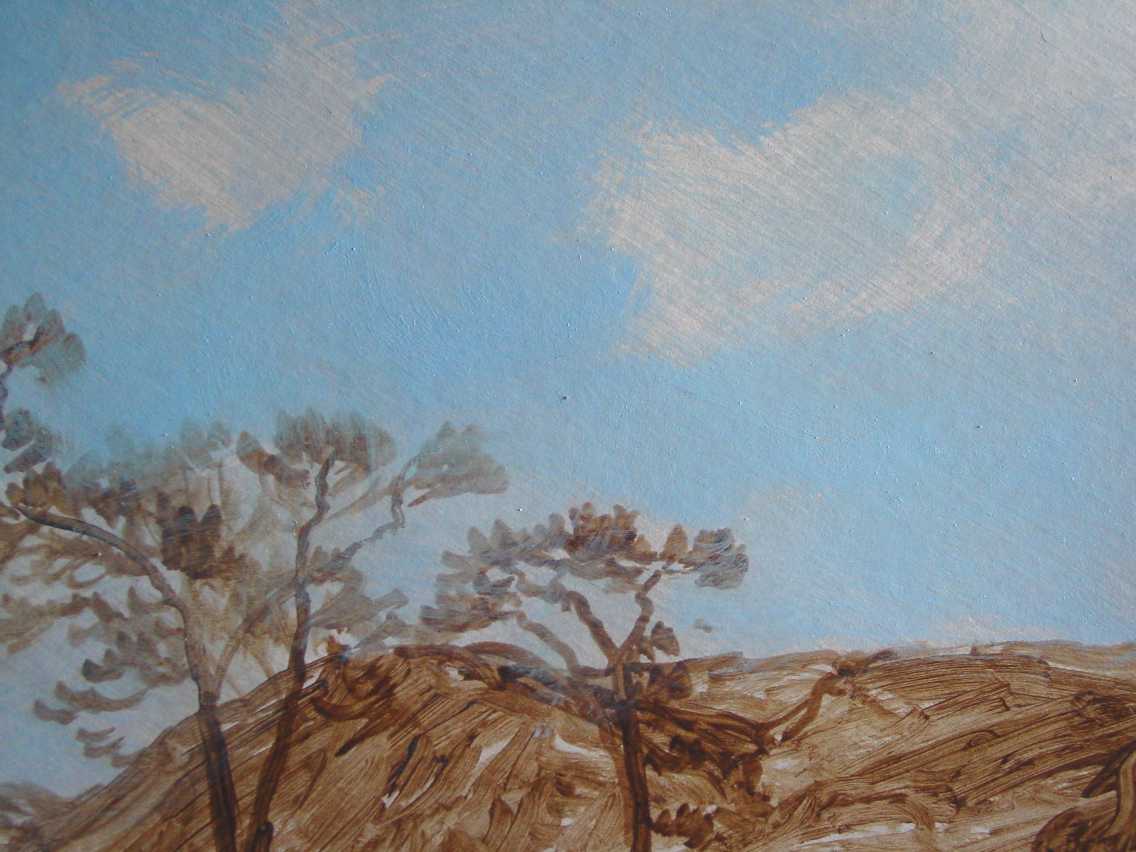
Important! Though my asphaltum is firm against gentle and quick overlay of paint, it must always be borne in mind not to scrub too much or the underlying paint will come off. I mean, we are using solvents in a manner similar to water-color or egg tempera painting. But the great thing is, if I do decide to intermix layers or if I desire to pull a color off the work, it is easily possible to do so. Thus, I maintain and reserve a valuable trait I refer to as "correct-ability".
Note in the following broader image how the blue washes over the asphaltum without destroying it. Don't over-do it, though!
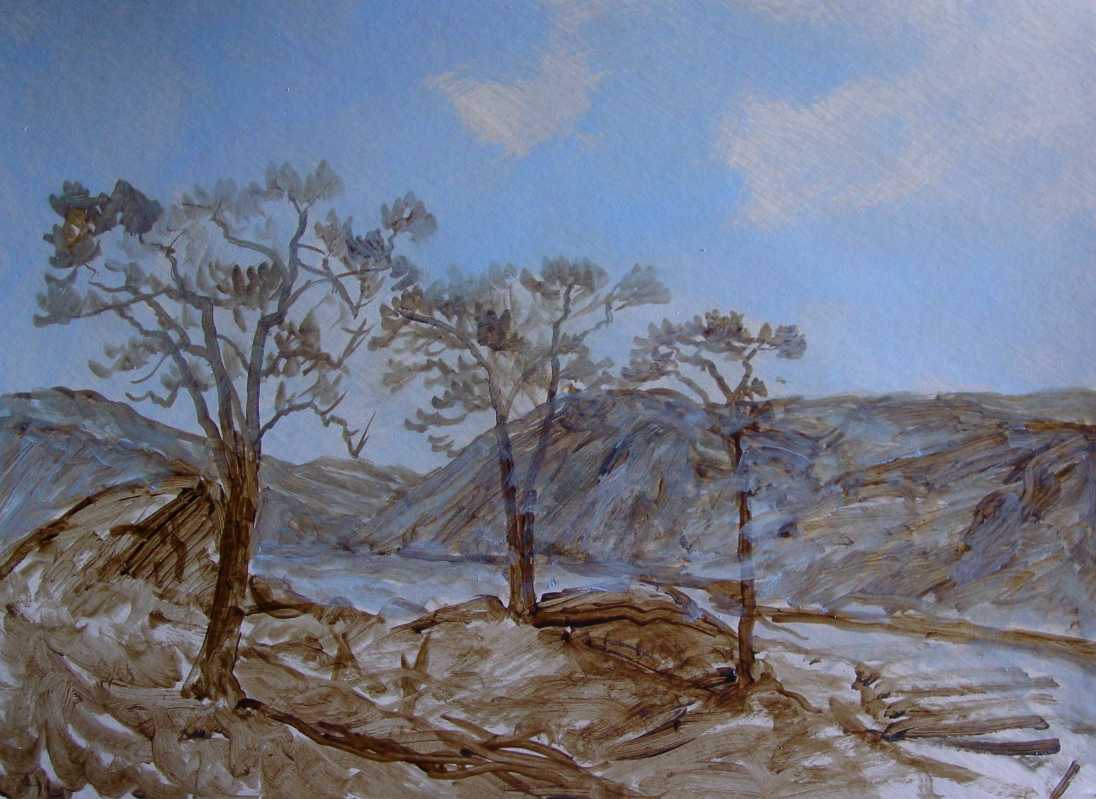
Now to quickly wash in some color in the hills and ground:
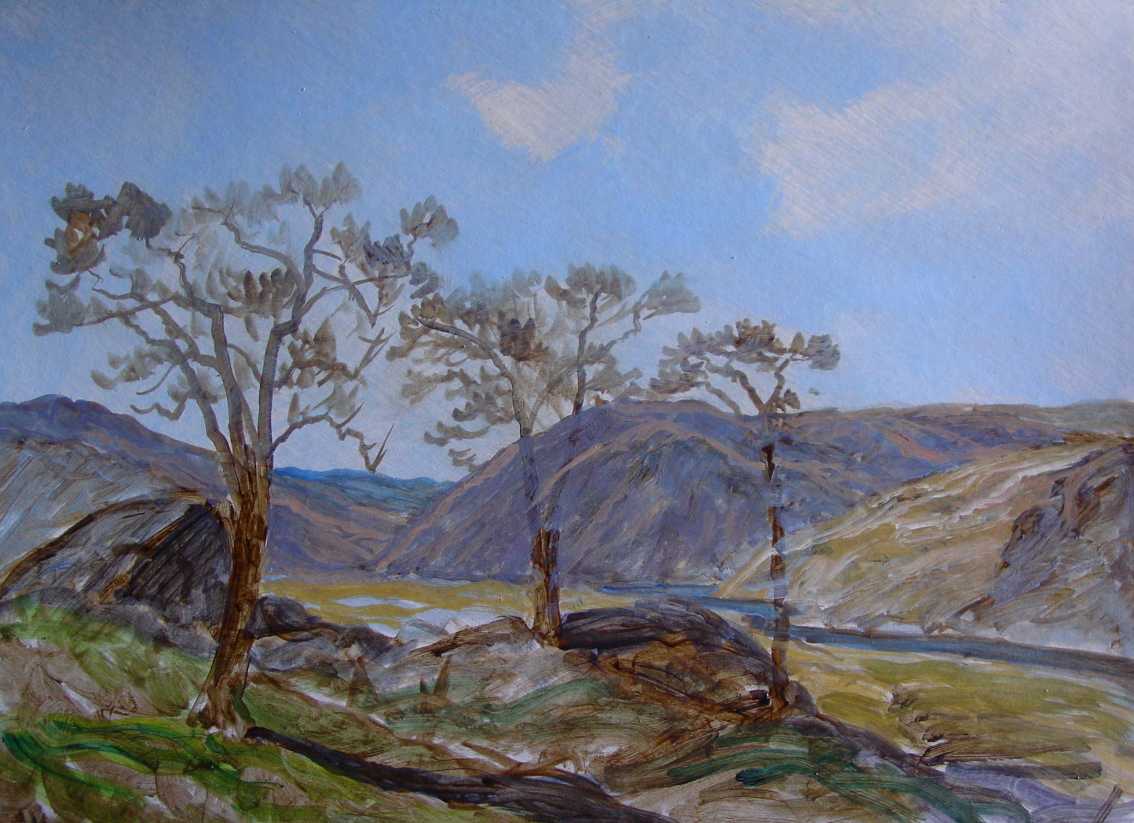
Next can come the local color of the tree trunks and foliage-shadows. Remember, all shadow colors especially will be transparent or translucent.
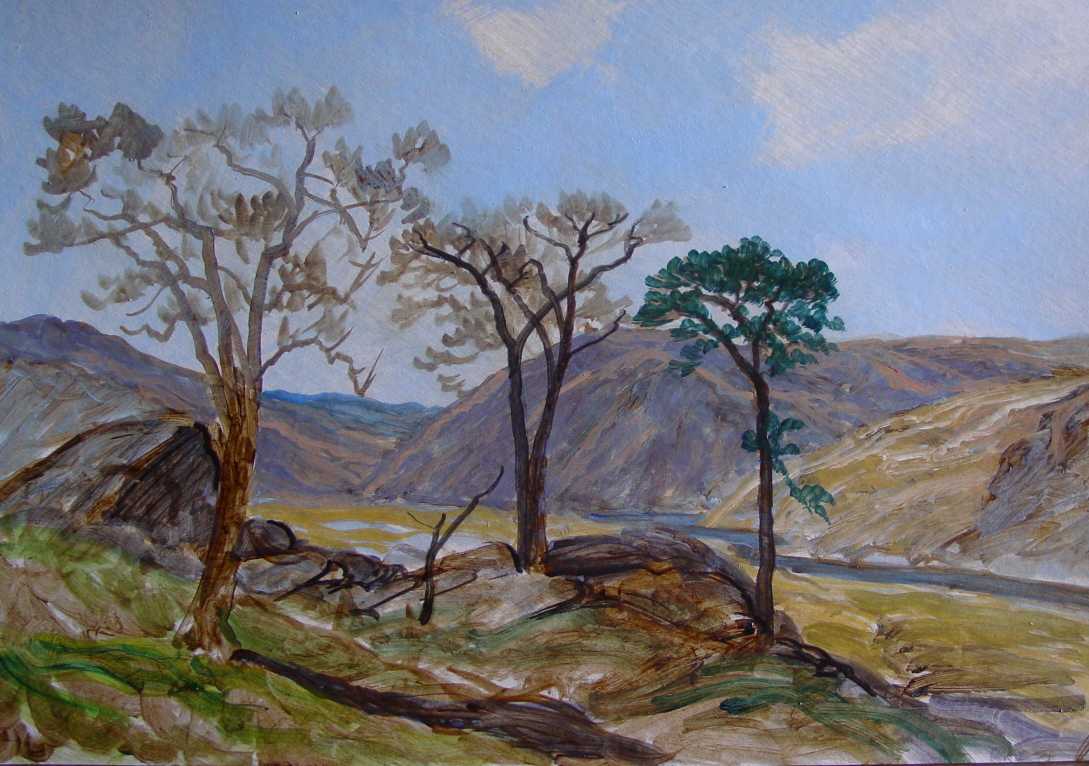
Now, atop the set-up shadow colors I can easly jot or stroke in some thicker and more opaque highlights. Opaque paint merely requires less solvent in the mix. The highest opaque shall reguire even less ....or even none.
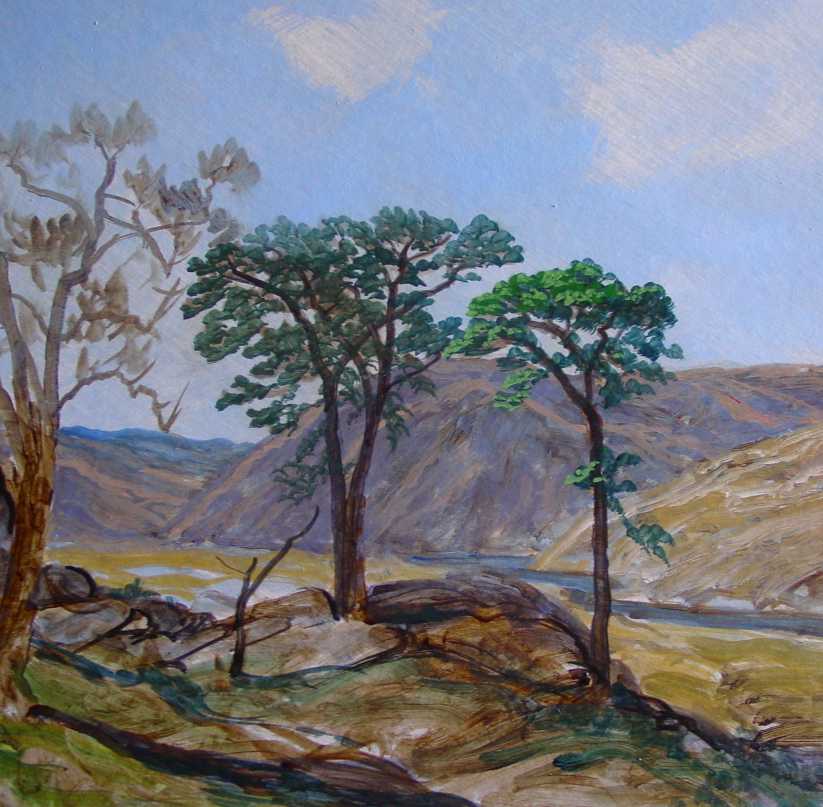
Highlights and shadows begun upon the ground areas ...it's like simple watercoloring, though without any spreading or saturation....and you can do some blending later, where desired. As always, opaques shall come after setup of the applied transparent colorings.
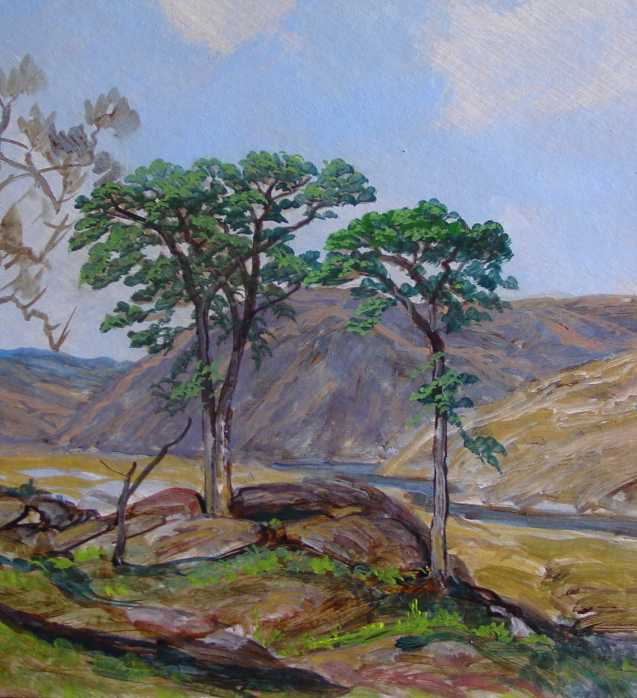
Opaque details inserted on clouds and ground, wherever deemed fit. These thick opaques provide a visual balance and sense of solidity to the overall mostly transparent/translucent painting.
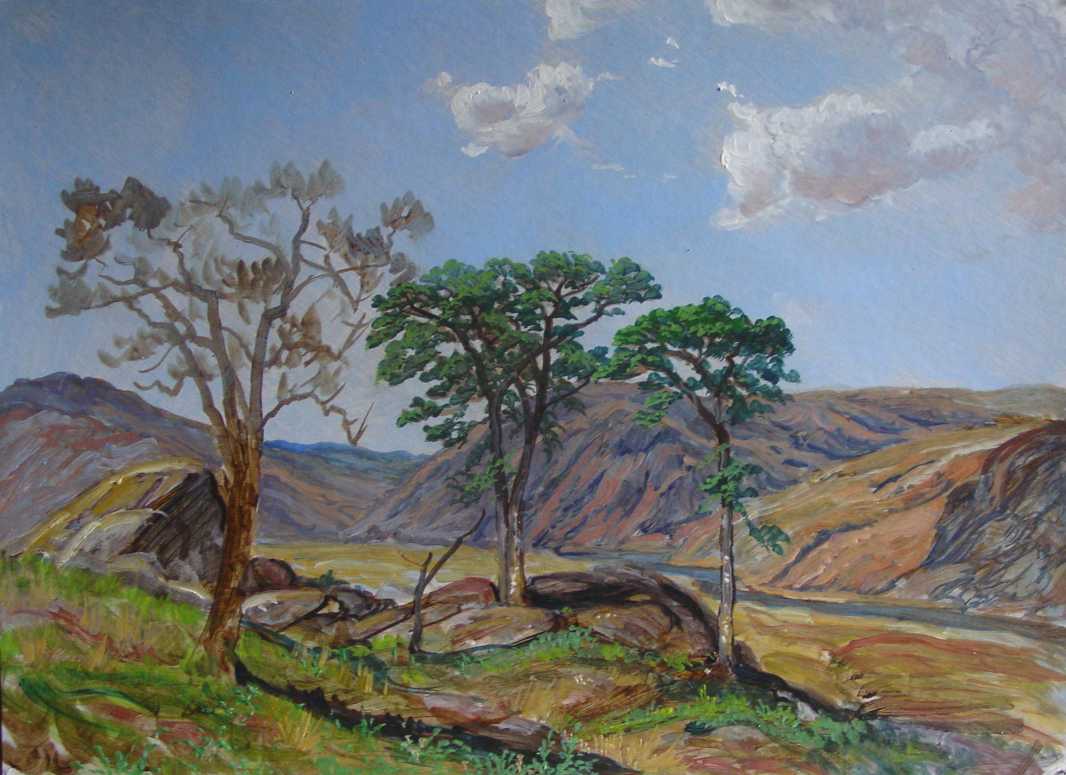
I complete the work in a little over an hour. I then allow it two days to dry well and become tack-free. Sunlight can speed thorough solidification of the paint. The painting dries with a perfect and pleasing uniform gloss and without need of a final varnish for many years down the road.
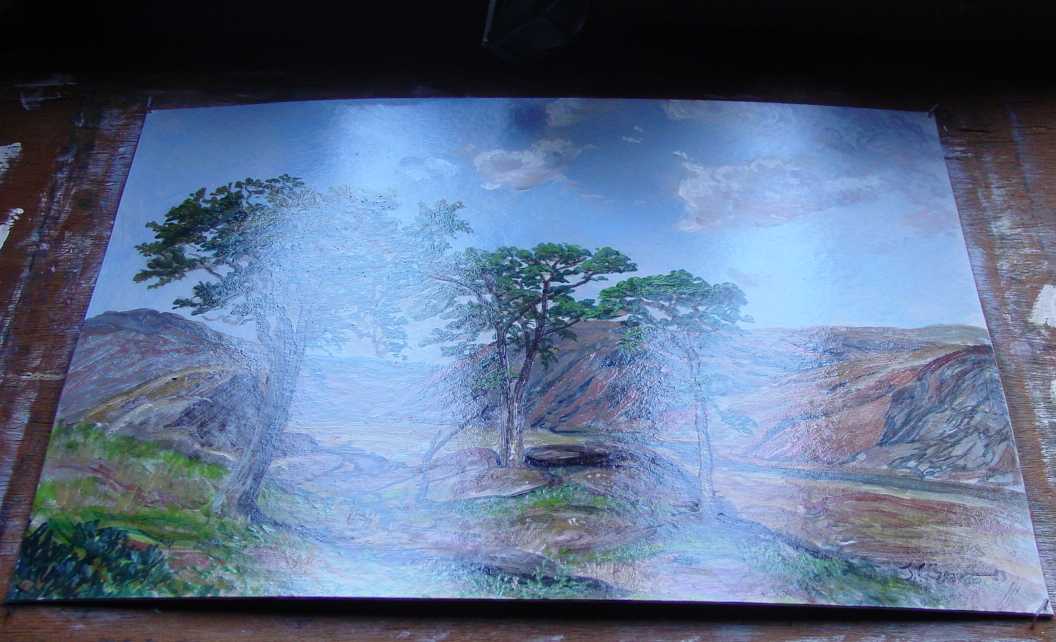
By-the-way, just how do I know a solvent-methodology was the very technique of Rubens? Very simple: He said so. Rather plainly, too. Read DeMayerne concerning Rubens and carefully perform your own translations of the French and Italian passages.* You will find Rubens mentions mixing his paint with varnish and also turpentine spirit. [*Yes, do your own translating. The current translations of the Mayerne manuscript have been performed by non-painters. This can lead to spurious information. In his 1848 book, Eastlake depended upon Merrifield to do the translations of Mayerne. I do consider Eastlake's versions to be the most accurate translations of any historically-available because the man was a fine oil painter, himself . Unfortunately, Eastlake was not a color-maker nor a varnish maker and much of Mayerne's words speak closer perhaps to those of us with the more rounded materials background.]
Again, I cannot say with certainty whether this congealed fir varnish was the master's very own means. Still, it does match the jelly-like brushwork and performs fittingly. Plus, something I consider highly indicative, this congealed varnish does wonders when used in conjunction with the nefarious asphaltum. As for resulting resin-markers, I can also suspect pinene will show up in the paint at some future date. In the end, though, it is all merely a best guess scenario on one man's part.
One more thing: Do not allow the Fir Wax treated paints to dry upon your palette. Regardless the solvent abundance, your paint will dry with a toughness similar to copal or amber-based paint.
.
Final
Though this quick little sketch was made throughout using much solvent and in a tempera-like or watercolor-like methodology, it still appears in all stages as an oil painting. It does not look like a watercolor or a tempera painting. This appearance is due to the superadded stability of the congealed fir varnish. The paint is not a stain; it has definite substance. A painting of this tempera-like manner cannot be made using simple-oil-and-pigment paint coupled with a solvent. Why? Well, as instances of thoughtful merit: Using asphaltum would be out of the question. The amount of solvent required to pull this off would engender running, trickling, or spreading after placement. The thinned-down paint would not retain brush-hatching. Layers would not truly "set" with solvent flash, which would then dis-allow further added over-washes. In addition, the paint would not be bound properly. The work would never dry to a shine, let alone a gloss; and instead it would be dull and powdery-looking. There would be no resistance to atmospheric-attack; the painting could never be washed with water or anything else. Varnishing the work would help somewhat but even that procedure would be done at great risk to the tender paint.
Warning! This Congealed Fir Varnish and the above example technique should not be considered by anyone sensitive to solvent-use. Still, for those who desire to paint in the Gentileschi, or an all-oil manner, Fir Wax can be made into a megilp-like jelly by mixing-in 25-30% drying oil or sun-thickened oil to some of this jelly on a sheet of glass. Thereafter a megilp-like performance and painting technique can be used. I recommend the type of oil to be walnut, as linseed oil will generate more yellowing and wrinkling when used with handmade oil paints-- or most any oil paint.
Fir Jelly might be customized to even greater toughness by the addition of any of our amber or copal varnishes without losing its congealed character; still, the amazing toughness of the polymerized fir resin alone, by itself, seems to match the actual and final strength of copal. Thus, I believe use of such additional agents are unnecessary. Note: Though it has a good shelf-life, Fir Wax should never be heated and might best be stored between use in a refrigerator.
.
Additional Background Notes and Rants
Notes and Rants (I) Medium-Rich paint: Rubens painted with much medium. His work shows-off what I would term an overall "medium-rich" look. Some might think I mean Rubens painted with much oil. No. In fact and as I mentioned earlier, Rubens was chastised by his contemporaries for painting with too much varnish. These critics decried the underlying transparent/translucent paint and admonished the master that his work would not outlast his own mortality. Let me share with you, transparence and translucence are the greatest keys to the finest OM masterworks. Prior to the discovery of the Van Eycks, the Italian Cennini promoted the technique of oil painting only in an opaque fashion. What soon-after revolutionized oil painting was the novel technique introduced by the Van Eycks, which was primarily a transparent/translucent method of using oil-based paint. If you will but read Karl Van Mander's own words (1602) then you will understand that the majority intent of the 14-1500 Northern painters was to paint primarily in a single-layer, and in mostly see-through fashion, adding solid highlights only and strictly where finally needed. Some experts today say this is not so, and that the 19th Century oil painters were delusional in their search for transparentizing mediums. Take caution when you hear such defamation, for the very greatest optical effects allowable through oil paint arrives primarily through the use of transparence and translucence with super-added opaques in the highlighted areas only. That wonderful and amazing optical-richness and depth can come in no other way! Midtones and shadows must be primarily transparent and translucent; and by vibrant contrast, the shining glowing brights can come by piled-on opaques, but not at the expense of the subtle and also-glowing midtones and shadows, whose marvelous and complimentary richness yet descends from the underlying priming.
This was all established way back in the 1400's. Again, do not accept the words of anyone today who tells you the old master's paint was not primarily transparent or translucent by original intent and design; and that it has become so only through the benevolent hand of Father Time. [Note:Yes, indeed, some sorts of oil paint may certainly become translucent with time. For instance, simple oil-and-pigment lead white without the ample addition of a strong resinous varnish to lock it from atmospheric-attack will (will) become translucent with time, just as if you had gently cooked the two ingredients together ; only the combination will occur interminably slower. Over time and helped along by oxdation, the oil actually dissolves the lead carbonate and the two become united in either transparent or translucent lead-oliate. Look up "pentimenti" to see what it is, though no source will tell you what causes the effect. Now, this combination of lead carbonate with the oil is a failing not noticeable in Rubens work; or Jan Van Eyck's work well before him. All opaque touches of lead white remain pretty much as these particular masters intended. No, I'm not making this up. If anyone wishes to acquaint themselves with historical visual descripts of either Van Eyck or Memling or Rubens or Durer or Bosch, Belini, Leonardo, or most any other worker's paintings as they appeared to the multitudes down through the centuries, they will always find the same mention of the lucid supporting transparence visible here-and-there throughout the work, and coupled with opaque highlights where necessary. You will find no historical account maintaining these painters worked overall and mostly with solid opaque paint. Instead, that was Cennini's primitive, limiting, and so-inferior method. Cennini came before the Van Eycks. He tells us to mix tints to the color we visually discern; then we shall apply these mixed tints opaquely. Yes, some amazing painting can come via that route; and after all, that was the predominant method of the impressionists ....which fellowship held such sway at the end of the 19th C., as to allow we of the 20th to descend to a limited and backwards-state in craft. The primarily transparent/translucent methodology introduced by the Van Eycks has been buried and lost to us. It is unfortunate that this opaque manner of oil painting has been adopted amongst the majority of oil painters in our own time. Again, the method is not without some amazing charm in many instances; however, due to the overall limitations encountered when applying the opaque manner towards a tight careful realism, it is no wonder that, today, egg tempera has re-established itself among many as the better means to reproducing such.]
Notes and Rants (II) Oils and Oily Paint: This 'jelly' varnish is quite different from megilp. Megilp is an oily medium. Fir Wax is a lean varnish, being mostly fir resin. Too much megilp in your paint will cause all the faults of the oil to become manifest. By contradistinction, too much of this fir varnish in your paint causes no negative effects, whatsoever. In fact, to garner the best manipulative effects from megilp, it is necessary to mix substantial amounts of the jelly with the paint. That will eventually lead to a faulty painting, yellowing, wrinkling, etc. But adding 100%+ of the Fir Wax to your paint allows every bit and more regarding wonderful manipulation, and without adding any over-abundance of the oil. Yes, this is what I have found through many trails. My paint remains bright.
Be aware of something that is seemingly unknown or disregarded today among oil painters: Oil is both lord and devil to oil paint. Oil is at once the most evil but also the most necessary and creating-ingredient. You will read everywhere that resins are the blame for yellowing, browning, powdering, wrinkling, weakness, and on and on. Nope, the primary culprit causing yellowing/browning, wrinkling, etc., is the oil, itself. The various resins associated with historical oil painting have remained clear and bright in damp-darkness for thousands or millions of years. No painting oil can ever come close to that feat, as it would quickly oxidize, dissolve, or carbonize underground, or even above ground, as often occurs in humid climates. As for oily varnishes or mediums, those concoctions yellow in proportion to their oil-content; not their resin-content.
I repeat, oil is a relatively weak and faulty ingredient in oil paint. Were I able to get rid of that particular troublesome agent, my paintings would remain clear and bright and never sallow ... well, excepting from atmospheric attack/rot --effects which can be mostly alleviated by the simple act of a final removable resin varnish layer atop my so-carefully-built work. Let that final layer suffer the atmospheric-attack; then replace it when it does. Everything lying beneath that final varnish will remain pristine. This is the best route to bright oil paint. Truth is, I have found that those resins historically-known and utilized within oil painting practice are quite durable and non-yellowing, either in damp, darkness, or lightness; and fir, copal and amber ...sometimes larch and certain light pine and spruce ... are considered the very best. No, it is the oil constituent that yellows the most and by far. Wrinkling? Yes, that is due to the oil, too.
There are of course variables involved with this simple overview, but the gist of what I'm telling you is accurate. The most yellowing ingredient within oil paint is the oil; and so we should keep the oil-content as low as possible. [In case you might disagree, go right ahead and coat your next cured painting with a final layer of linseed oil. Oils yellow inherently and this just necessarily begins at the point where curing is reached. Untreated drying oils typically reach their cured stage rather sooner than treated oils; thus the untreated oil is seen to yellow sooner. Adding a siccative will, of course, speed curing; hence the yellowing. The treated oils become semi or mostly polymerized; thus they can take months or years to lose their "tack" and become cured. But then they yellow, too. Science tells us the degree of yellowing is directly proportional to the oil's linolenic acid-content. By contrast, durable resins yellow predominantly when compromised by atmospheric-attack (mostly by moisture). If kept from a harsh environment, decent resin varnishes will show only modest yellowing in a hundred years. Ask the Tate Gallery about their Holman Hunt painting which is still thinly-coated with good copal since the day he performed it. They report it is noticeably degraded but not to the point of requiring removal. And for those who think damar spirit varnish soon yellows, next time make it yourself using good turpentine-- and don't add any linseed oil to it (the linseed oil will yellow, of course-- but the damar will receive the blame). As such your good damar varnish will last thirty years on the wall with only a minimal yellowing. BTW, dried oils get attacked by the atmosphere, too. That attack gradually reduces an oil to carbon; and this process happens much faster than with a durable moisture-resistant resin. Again, vegetable drying oils, alone, offer little resistance against moisture-attack; but as for those same oils combined with certain resins... well, that is an entirely different and much-tougher critter.
Back to oil and yellowing: The future yellowing or sallowing of a painted color is neccessarily dependent upon how much of the oil-ingredient is visible. For example, say ultramarine blue plus some white is apllied to your sky. If the pigment particles sink down and the oil rises, the work will soon show yellowing. If the blue dries and the oil sinks away, the pigment particles will pretty much hide the oil, leaving a sky blue color that remains rather bright. This is due to the hiding power of the pigment. The more pigment and less oil, the less the oil is seen to yellow. Yes, the oil within the sky-blue shall yellow soon enough; yet, for the most part, the over-abundant blue and white pigments will obscure or hide that yellowing.
Now, anything that increases the oil in that sky-blue paint will increase the eventual visual-yellowing, too. As example, when the oil-content is increased within a paint, the pigs will be scattered further apart from each other, with the inherently-yellowing oil filling-in the space between and surrounding. Thus, adding additional oil or adding oily bulking-agents to your sky-blue paint will decrease the hiding-power of the pigment. This is the latent problem when using cheaper or student-grade paint. Such paints have been bulked-up with aluminum stearate, wax, bentonite, pyrolized-silica-- I've even heard of using mica flakes. Chalk is another bulking critter. Like silica, chalk offers nothing in the form of hiding power against the oil's future darkening 'sneak-attack'. All of these bulking agents increase oil-content and rob pigment-load; thus to decrease the hiding ability of your fine pigments. Of course, adding slight amounts of silica, wax, bentonite, or chalk to a pigment will have little effect on amounts of oils in the whole; however, there is a current trend to actually construct paint-extending oil gels and paste out of these materials by mixing them with oil. This practice amounts to making transparent or translucent oil paint! That's a no-no simply because there is nothing within such gels or putty to hide the eventual darkening/browning of the oil-binder. If you desire to paint in a translucent/transparent manner, simply apply your colors thinly -- there is no need to bulk your colors further using a substance heavy in oil. Adding these oil-y gels and pastes to your oil paints will necessarily darken your colors due to the yellowing/darkening oil-content. The visual results may not become manifest for months ...and the deepest darkening --which is a rotting of the oil film due to atmospheric-attack -- will take years; but 'down the road' your painting will become increasingly subdued-- perhaps even to the point of darkness. This malady is well-known and lamented over if you read through the various centuries. Every writer wonders why their own generation's oily-works are turning dark and dingy. They point to various earlier schools of oil painting, such as the van Eyke brothers or the Venetian School, whose master-works have somehow remained bright without darkening. They then hold up these painters as benefit of certain viable painting secrets. The means of their glowing works capture the minds; and yet we painters continue to use over-oily mediums, the worst offenders using linseed combined with bulking-agents. I repeat here, too much oil and not enough pigment to hide its inherent faults results in too-noticeable yellowing/sallowing/darkening.
I should consider here that a few restorers and conservators are finding amounts of chalk in certain Old Master paintings. True, chalk shows up in some of the old works. But realize, adding chalk to paints is not mentioned --ever-- in the olden texts on oil painting, except as something to avoid. This finding of chalk may be merely the amount of that substance normally found in natural earth pigments such as the iron oxides, umbers, and siennas. Do realize that yellow ochre, Venetian red, green earth, etc., contain a fair amount of natural chalk in their make-up; and so how does the chemist separate that from the pigment 'equation'? They cannot, truly. Thus, paintings using common earth pigments will produce findings of chalk during testing/analysis. Then again, the finding of chalk within a paint-chip may also arrive from that age-old scheme of the pigment-makers using ground chalk or white kaolin, barytes, etc., to extend (bulk-up) their product and so improve their profits. Then, too, pigments with added chalk and intended for house-painting were also readily available to the buying painter, who might themselves prefer to save a coin. I'll also mention the historically-known use of colored chalks to outline figures betwixt layer's. So you see there are several manners or mechanics for finding chalk within an old oil paint or paint-layer. Whichever, whatever the reason, know this: Adding-in chalk will not improve the color of any resulting oil paint. Ground chalk in all sizes is quite absorbent and it increase the amount of grinding oil needed to work-up a color. Soest and Gandy, two of Vandyck's students, do mention a chalk-adulterated lead white called "loos wit" as being available, but they also say their master was careful not to use it. UPDATE 2011: The National Gallery reports finding chalk in the priming and other spots of white in Van Dyke's portrait of Elena Grimaldi; and so, knowingly or un-knowingly, Van Dyke made some use of the aforementioned "loos wit". See here: http://babel.hathitrust.org/cgi/pt?id=mdp.49015001275362;size=125;view=image;page=root;seq=50;num=46 }
Anyway, and again, nowhere do any historical manuscripts/writings claim that a paste made of, say, chalk and oil should be made up and used within the craft of oil painting; yet we find this odd practice gaining popularity amons't today's artists. Some voices go so far as to claim the use of such pastes as being a 'lost secret'.
I might see a 'spot of light' if modern bulking mediums, such as chalk, fumed silica, or wax, actually lent moisture-resistance or aided the relatively weak binding-power of the oil. They do not. I recognize modern synthetic alkyd resins are being incorporated in some versions of these bulking agents. That addition represents an improvement in strength; but still, less pigment and more oil-bulking means more eventual yellowing/browning. Some enthusiasts say they have found ways to keep their oils from yellowing; though I do wonder if they have actually followed their trials with the many year's of final observations requisite to verification. Again, science tells us the yellowing is due to the relative linolenic acid-content inherent to the oil. Anyway, if some painters have managed to find a way around this then I must applaud them, and rightfully so. Pacheco, the teacher of Velazquez, supplied a rather-involved method for 'purifying' his linseed oil; yet when he bragged about being able to paint blue skies using his linseed oil without fear of yellowing, his secret turned out to be that of simply adding spike lavender to his oil paint. In practice, the evaporating spike allowed Pacheco's 'purified' linseed oil to sink down from the surface, leaving the blue sky color dull and lean of oil...and rich in pigment! Yes, that will work, though a certain deadness follows dull paint; and so you apply a top-coat of clear durable varnish. History gives many other recipes for supposedly cleaning oils; I have no doubts the followers of such methods, having spent great time at their task, if nothing else, felt better about their work.[Note: In 1632, Vandyck extolled the use of linseed oil above all other oils, and by way of preparing it via a certain odd 'purification' method involving an egg; however, by the time of his death some eight years later, he had switched to walnut oil.]
But to stop the yellowing of linseed oil ...? Myself, I have failed at that through any and all attempts at 'clensing' my oils. Some early attempts showed exciting promise, only to fail within the following months or years, when the oil or paint-film finally cured (fresher and untreated oils generally cure much faster than aged, bulk-oxidated, or heat-polymerized oils-- the usual exception being 'blown' and "sun-ed" oils). Thus, I do not possess any reasons to presume oils can be made non-yellowing by subjecting such oils to what is called 'cleaning'. I won't worry about it, though. I'll keep my paint on the lean-of-oil side and dose it only with historically-dependable resins instead of oil. It will be much better bound and resistant to atmospheric-attack. I can even apply it very lean by the simple use of a solvent. As a pre-requisite, like most of the early oil painters, I'll also prefer nut oil over linseed; and I shall not attempt to 'cleanse' my nut oil beyond allowing the foots to settle out. Again, I have found nothing offering further gain. If you would not accept my own word in this matter, then bear in mind Titian said this*: " If you have good oil, you can make a good picture ; if you have bad oil, you can still make a good picture." [Apparently, and if this attributed quote has historical merit, this great painter, who was known for creating the very brightest works, did not depend on the cleaning of his oil. This attributation might also indicate Titian used a solvent in his own technique, which would incur the sinking of the oil away from the paint surface, rendering any inherent penchant to discolor much less of an issue.] *See Merrifield; "Original Treatises...", page CXXII
Below is an image comparing a commercial artist's best refined linseed oil, foots-separated unrefined walnut oil, and foots-separated flaxseed oil. If you have read through my website you will likely recall this image. If not, allow me to introduce you : On a strip of window glass, all three oil paint samples were compounded exactly the same way with equal amounts of oils and lead carbonate, then applied to the glass in rounded piled blobs. The sample was then laid flat in a daylight-lit room. The nut oil in the center dried the fastest (4 days) and did not collapse into itself, wrinkle, nor turn yellow, as did both types of linseed oil. [To contrast the relative outcome and effects, dark blue mattboard was placed beneath the glass before photography.]
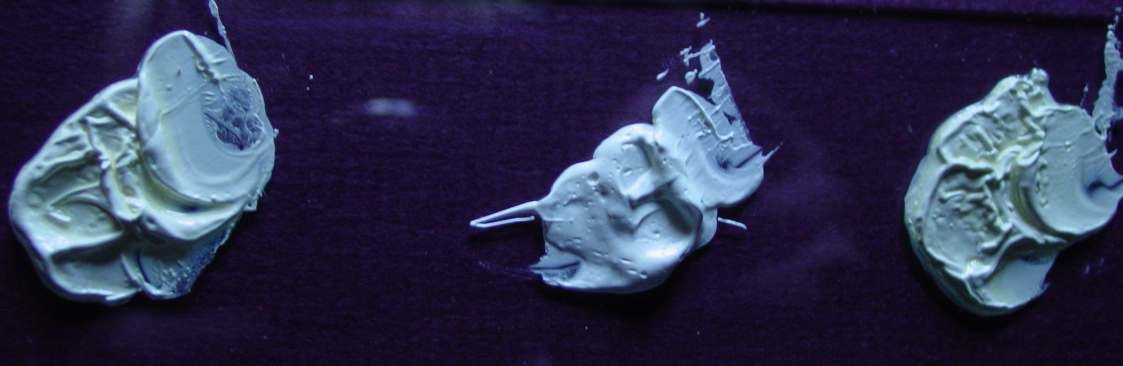
It can be seen that both linseed-based lead white show more yellowing and have collapsed inwards and wrinkled, while the walnut-based lead white remained upstanding, rounded and wrinkle-free. Walnut oil shares this inherent ability to resist oil paint-wrinkling with poppy and sunflower-seed oils.
The following before-then-after images show the effect of placing this same test-sample in a drawer for two months time; then subsequently exposing the darkened and yellowed paints to direct sunlight for three-days duration: All samples show the bleaching effect of exposure to UV. The non-wrinkled walnut oil sample regained brightness the quickest, its oil-y pellicle uniformly covering the paint blob. Not so with the linseed/flaxseed samples. Unfortunately, during initial drying, collapsing and wrinkling of the linseed/flaxseed-based whites interfered with the uniformity of the oil pellicle. The oil essentially gathered more within the wrinkle-valleys. This results in an even greater apparent yellowing, making a bad situation even worse-- and requiring many more days of UV-exposure for remedy.
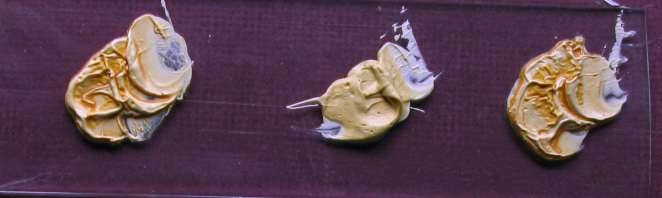
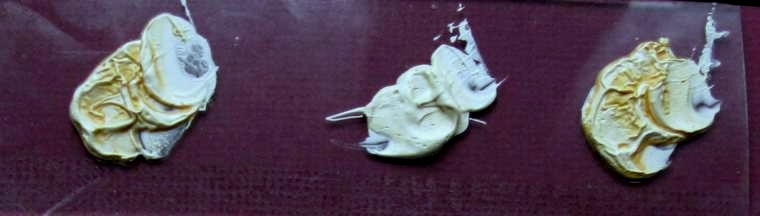
In the realm of mechanical bulking agents within oil painting and the typical effects garnered through their use, I present this illustration:
The following image shows, far left, "water-washed" flaxseed oil. This oil was shaken numerous times with common tap-water. An orange sludge made up of oxidized and rotted oil-particles gradually precipitated from the mass and formed at the bottom. [Note: A.P.Laurie termed this gook "mucilagenous and albumenoid impurities". Uh...no, it's just what becomes of water-emulsified oil. As I understand it there is a form of "mucilagenous" material in flax meal; but this is separated during oil-production.Thus, that hazy/cloudy sludge forming betwixt oil and water is simply artificially-produced and rotting 'foots'. It results from the emulsified yellow-ish 'cloud-layer' betwixt purer oil above and the water below-- in other words this cloudy layer is nothing more than microscopic oil-particles which combined too-intimately with the turbulent water. Were it possible to mechanically shake the oil long and intimately enough, the whole shebang would become emulsified into that cloudy gook -- though gravity would still allow some separation of oil and water as the days go by. Anyway, these oil-and -water particles soon succumb to the "O" part of the H2O -- the tiny oil particles oxidize and cure. Afterwards, the resulting hardened particles simply rot via the degradative-attack of the surrounding water ...and sink away from the oil-water mix. If you doubt my words, syphon-off some of that yellow-ish cloud, place it upon a sheet of glass and allow the sun to bake-off the water. What you will obtain is a thin layer of flaxseed oil; and it will soon dry and behave exactly like a comparable layer of the 'pure' oil. What I mean is, the film will yellow in shade/darkness; and it will become clear again when subjected to sunlight.] Now, as the supposedly "washed" flaxseed oil thickened and became more and more acidic (rancid), it polymerized to the point where its hygroscopic ability to emulsify with the shaken water became less and less. Re-iterating, this 'less-shed' effect is nothing more than the result of polymerizing oil becoming more resistant to water-permeability. Know that a fresh oil is more permeable to water than an aged oil. And so, after reaching this stage, my altered flaxseed oil was carefully separated out from the water and orange sludge, then shaken and stored with an addition of lead carbonate ... which eventually rendered it nicely clear and fast-drying. [Note: There are many ways to "wash" oils but this version, which I used in the 1980's, comes down from the 1600's. I do not often paint with artifically-aged semi-polymeric oil--such as this oil-- as these oils produce long paint and my own preference is towards the short. As I have said before, such oils firm quickly but remain un-curred and tacky for a very long time, which, with most pigments, greatly hides their eventual inherent yellowing nature. [See my web-page on Siccatif de Courtrai.] The second grey dab in the photo image is chalk paste made with the same treated flaxseed oil. Though my chalk is the very material I use to make brilliant white gesso, the addition of oil produces a nearly translucent (thus grey) paste. The third blob is Halstab triple-A lead carbonate mixed into a stiff lean paint using the same flaxseed oil. Far right is a glob of resulting paint when the chalk paste is added in an equal amount to that pure lead white paint. In the photo, this simple 50:50 combined chalk-paste-and-lead carbonate paint looks much less-white than the pure lead carbonate paint. I have read, some artists say the brightness of their colors increases when adding chalk paste. That may appear correct in the wet state; however, realize, pure chalk paste is grey; thus, adding this bulking agent to my colors will necessarily dull their color-brightness. With the addition of chalk paste, whites become darker while darks become lighter.
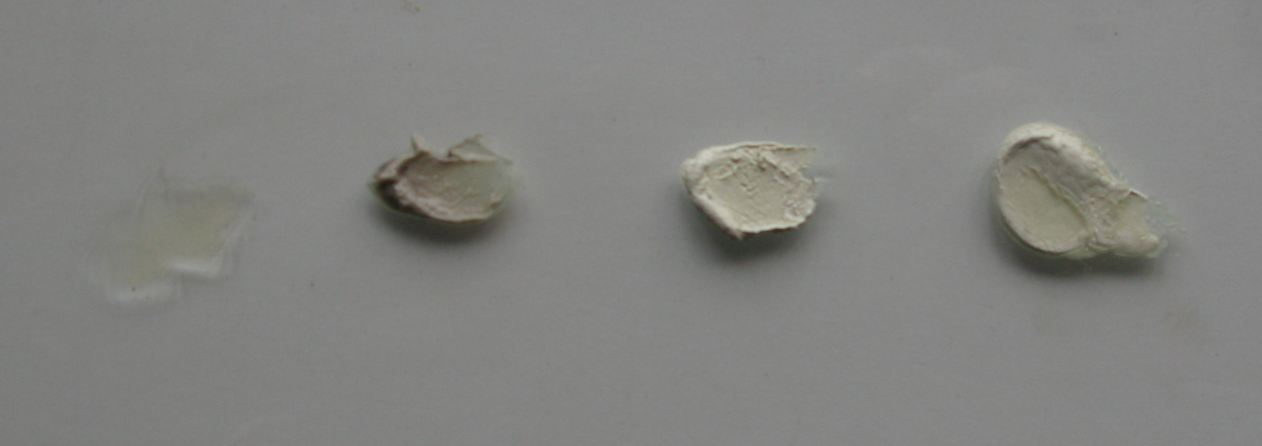
Now the same sample as it appears after sitting face-up four months in a dimly-lit but not dark second-floor room:
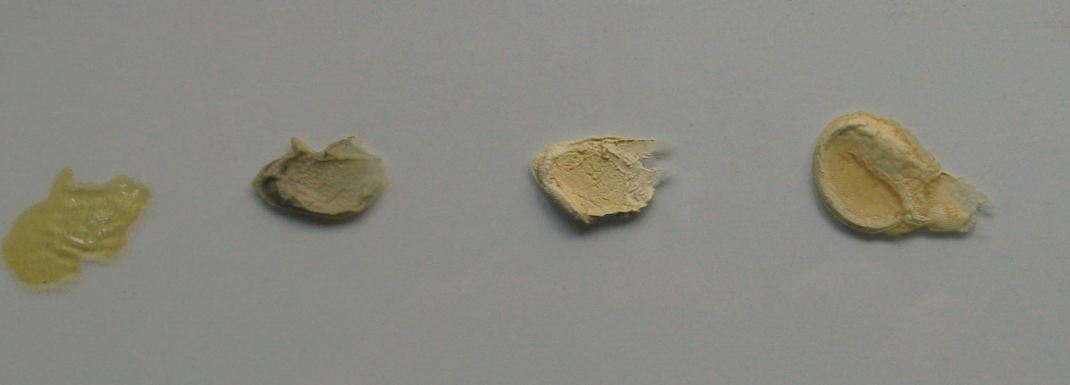
There is nothing quite like the old master's favorite white to sooner reveal an oil's nature and capabilities-- both in the treatment of the oil and the immixture with that oil to create paint. Lead generally causes raw oils to reach their cured and polymerized state quicker, thus to uncover the oil's true faults. Titanium and zinc prove to be much more hiding and forgiving. In the illustration above, final curing has overcome the washed flaxseed oil and reveals that washing to have had no remarkable effect against the oil's inherent yellowing. Moreover, adding chalk paste to my lead white has ultimately engendered the oil's latent yellowing to be more visible due to increased oil-content plus the overall ratio/reduction of lead pigment within the paint. [*Important note: I was very careful to lid my "washed" and lead-treated oil and to leave as little air-space as possible in the storing jar. You see, oils noticeably thickened by lead-treatments and/or oxidation can become so polymeric as to actually revert to a slow-cured state quite similar to today's commercially-produced standoil. No, I wished my treated oil to remain as thin and fast-curing as possible. Old "black oil" and lead paste also behave poorly as to cure-rates; ditto oils treated with too much siccative. I personally have samples of thickened lead-treated oil that have remained rubbery and un-cured since the mid-eighties--and still tacky at the touch. It should be borne in mind that any oil which cures slowly will not reveal its inherent yellowing nature until it finally does cure. Some may think this a good thing, i.e., allowing the oil paint to remain wonderfully flexible, but know that any oil that remains uncurred for a lengthy interval allows likely and unhappy reactions with certain pigments. For instance, lead carbonate will react with the acid in that uncurrred oil and become lead soap-- a substance that is transparent. In essence, what happens is the lead white paint becomes increasingly transparent over time. BTW, it is historically mentioned that this saponification can be remedied by the simple act of adding a powerful resin-varnish to the oil paint. I believe there is truth in this old assertion, as a proper varnish typically hardens --cures--oil films. Be aware, the Pre Raphaelite painters liked hard paint. To achieve such paint, these craftsmen were fond of adding resin varnish and zinc to their paints. As their work shows, sooner-hardened paints produce the better state for oil painting longevity. This hardened condition of paint idea goes against oil painting practices being promoted today; yet it is true that hard paint will be more durable than soft, that is, if proper attention to the rules of craftsmanship are adhered to. But, yes, agents that produce hard paint are criticized nowadays. This is unfortunate as too many young painters are willing to put faith in the newest claims, especially if the label of "science" has been conjoined with such. Always remember that the greatest science of today will be considered matter from the Dark Ages tomorrow, and that the gathering of scientific facts is different from the all-too-human interpretation of those facts. As perfect example, consider that zinc I've noted as a favorite of the PR painters: According to one such "scientific" claim gathering momentum today, zinc is bad for oil painting. Hmmm.... I won't be buying into this "science". I wish it known, zinc is a wonderful addition to oil paint; and yet it is currently condemned outright, even though history shows it as long-used and desired as a paint-hardening agent. Recipes for its use to speed the curing of oils, as a sulfate, or calcined into an oxide, date back to the 1400's. The famous recipe for "Oleum Preciosum" mentions use of "copperas" -- which is zinc sulfate-- as a final addition. A.P.Laurie believed the zinc sulfate was added as a siccative. No, as I learned from reconstructing this oil, the true drier in the recipe is calcined sheep bone; and actual cooking of that ingredient within the oil allowed a noticeable siccativity. As for the copperas, that was added after the cooking. I believe that ingredient was added as a curing (hardening) agent, as without the zinc, the excellent "oleum" will remain tacky for a year or more (note: copperas that has been burnt by the act of sprinkling the powder onto a red-hot iron plate does produce some actual siccativity). And so I will admonish you that zinc was and still is a valuable agent to our time-honored craft. A hundred-and-fifty-years ago, the PR painters preferred zinc oxide white over lead white as their primer, as well as an addition to their colors, where it has done such great service. I will use zinc; I will not fear it. Resin varnishes will harden oil paint ...and so will zinc. Zinc will also solve the too-flexible, oil-saponifying and yellowing nature of lead white. If no one else today will tell you, know this: Zinc oxide and lead carbonate should be combined for the very best white of all those whites available to us. History has shown this as fact. And while scientific thought changes considerably over time, the historical record does not.]
As I mentioned earlier, perhaps some good researcher "out there" has come up with a way to actually thwart the inherent yellowing of linseed and other oils*. That would certainly alleviate one aspect of using chalk paste or another bulking agent; though, still, what about the greying-down and subdued coloring effect created by adding chalk or other to the paints? Why would a painter prefer to paint with oilier colors and subdued chroma capability? Are these aspects to be sacrificed for increased translucency/transparency? [*Note: I am aware of one way to create a practically non-yellowing walnut and linseed oil-- not through washing but, instead, through a cooking process. I use this process to create our "Heat Polymerized Walnut Oil"; but I remain so far uncertain if actual curing has taken place within my samples. The earliest of my samples remain yet non-yellowing and have out-shone commercial standoil ...Still, mine eyes have been fooled before into making and stating false conclusions...] [2011 update: I am now using this heat-polymerized nut oil as the oil-ingredient in ORIGIN Congealed Oil Varnish -- see above.]
There are various differences betwixt mechanical bulking agents and proper resin varnishes when these agents are added to oil paints. As one example of this difference, a proper varnish-addition to a paint will increase the visual intensity --chroma--of that paint color .... whereas a mechanical bulking agent will decrease that intensity. [Note: Fumed silica is a bulking agent which forms a transparent gel when added to oil; thus it somewhat matches the use of a resin varnish. For instance, silica gel will beautifully transparentize any paint color and make it appear more intense while wet. The downside? The additional oil-content delivered to that color will soon lead to increased yellowing of the paint. Also realize that fumed silica is a "flatting" agent-- this means the colors will lose their initially-generated visual intensity upon drying. By harsh comparison, proper use of a decent resin varnish will neither increase inherent yellowing of an oil paint, nor cause dulling in the final dried film.]
To sum-up this rant, in oil painting we still need the oil. Regrettably, we cannot achieve the wonderful effect of blending without having this oil-ingredient in our chosen paint. No, we simply cannot rid it from our craft. After all, this supreme ability to blend is the plus-factor available to our paint that is missing from those so-numerous other methods. Okay, that's why it's called oil painting. We need the oil but we need to limit its ratio to pigment as much as possible. The use of proper historical resins and solvents can greatly help in the construction of a colorful and durable oil painting.
Update Feb. 2011: The following images show another and more-carefully made example of this Fir Wax/solvent technique.
"The Cumberland Narrows, Lovers' Leap" 18"x24".
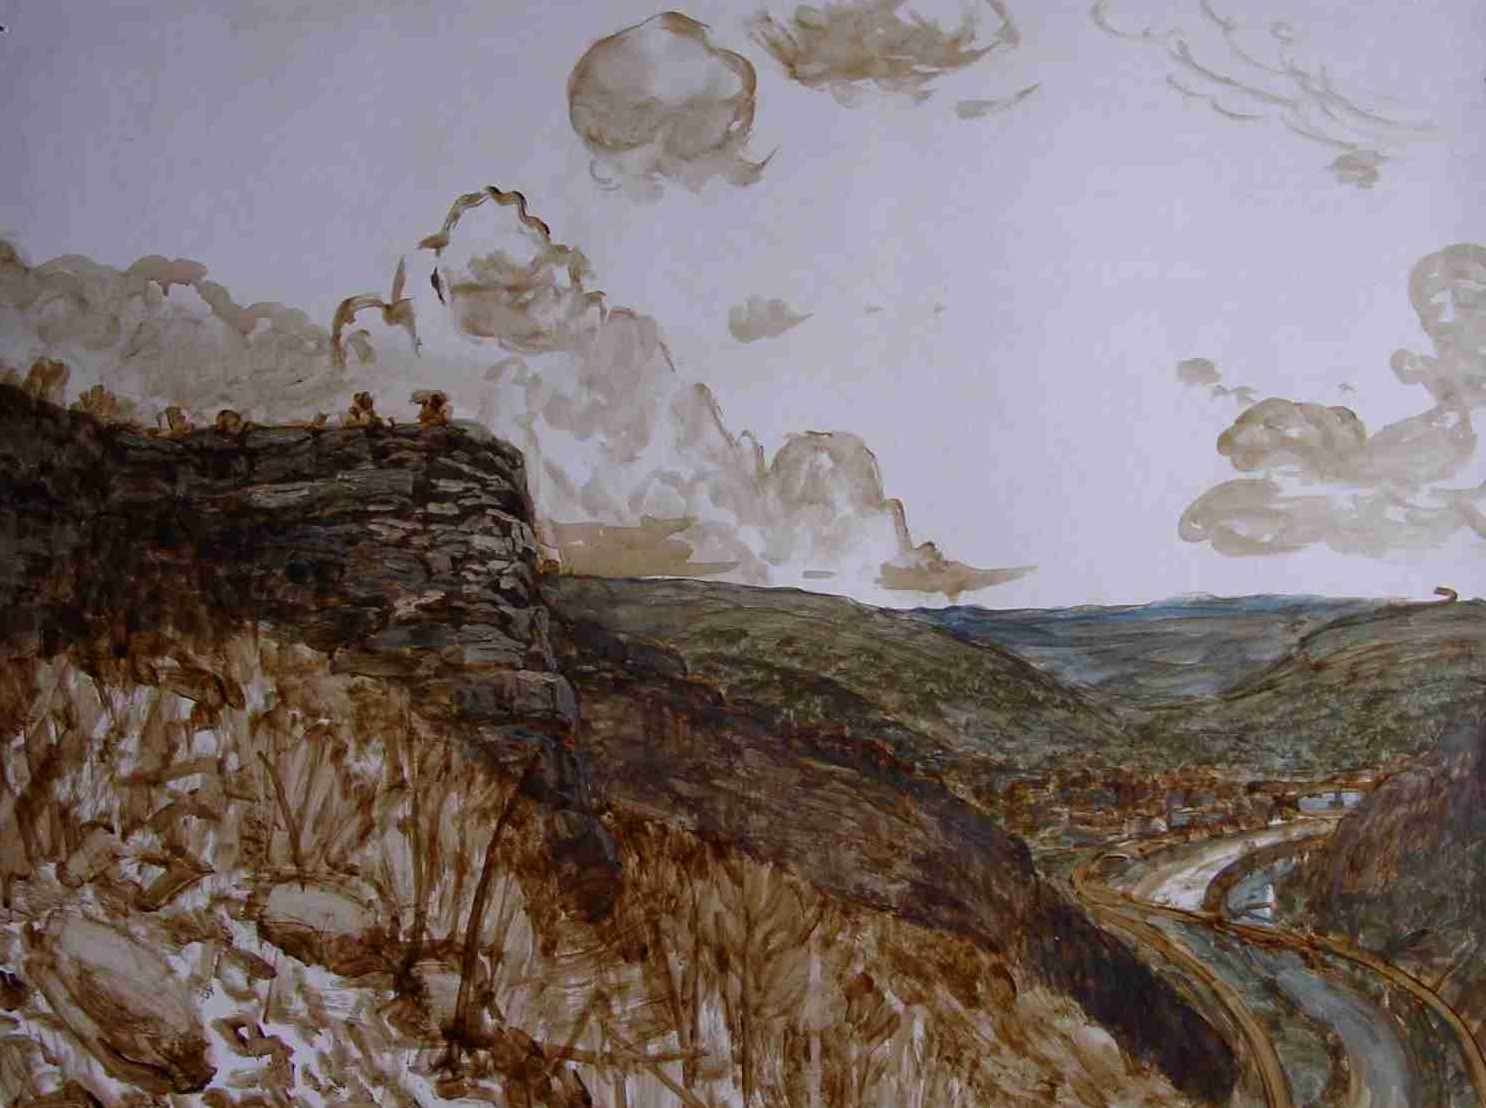
Above: The asphaltum sketch sets-up allowing an immediate wash-in of superimposed colors. Each applied color also sets to some degree, allowing further coloring and correction. If necessary, at any stage the whole can be washed back to the sealed ground and begun afresh. Incidently, do recall my advice of using an imprimitur atop the sealing glue-layer. This imprimitur, whether colored or clear, aids the superimposed application of the oil paints in every way. Instead of applying a grey or colored imprimitur atop the sealing glue layer, I chose to go with a clear coating in this instance, so as to retain the pure white of the chalk gesso. I used Fir Wax mixed half-and-half with oil, then slightly-thinned with turps. It worked well with the applied asphaltum and coloring layers. This clear imprimitur was dry in 24 hours, allowing me to begin with my sketch-in using the FW-treated Gilsonite asphaltum.

Above: Nearly finished -- highlight-colorings, such as leaves, etc., are performed opaquely. The painting drys to a glossy surface by itself, requiring no final varnish. Throughout the work, the seductive asphaltum under-sketch peeks through the overlying colored glazes and scumbles. There is an optical richness to this manner that cannot come through painting with opaque color-mixes -- which, again, is the near-universal oil painting approach being practiced today. The applied paint shown here is transparent/translucent, excepting where the brightest highlights occur. This primarily transparent/translucent painting system using Fir Wax is not for everyone; still, it can be quite the show-off at producing glowing full-sunlight and simmering half-light illumination.
For a constructive demo regarding use of Fir Wax and asphaltum to create and colorize an "optical grisaille", go to next page.
Copyrights to James C. Groves, Frostburg, Md. September, 2008; updated December, 2008.
For Ordering Online click here
Click here to visit our Gallery page.